Subaru Crosstrek Service Manual: Inspection
GLASS/WINDOWS/MIRRORS > Remote Control Mirror Switch
INSPECTION
1. Disconnect the connector of the switch - door mirror.
2. Check the resistance between switch - door mirror terminals.
Preparation tool:
Circuit tester
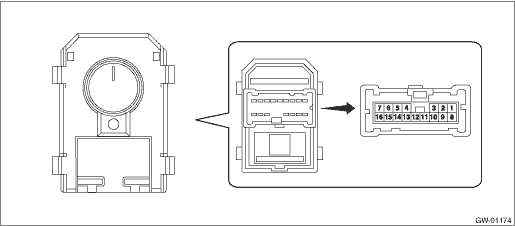
• Changeover switch RH
Terminal No. | Inspection conditions | Standard |
— | OFF | 1 M? or more |
1 — 12 9 — 7 | UP | Less than 1 ? |
1 — 9 12 — 7 | DOWN | Less than 1 ? |
1 — 11 12 — 7 | LEFT | Less than 1 ? |
1 — 12 11 — 7 | RIGHT | Less than 1 ? |
• Changeover switch LH
Terminal No. | Inspection conditions | Standard |
— | OFF | 1 M? or more |
1 — 14 8 — 7 | UP | Less than 1 ? |
1 — 8 14 — 7 | DOWN | Less than 1 ? |
1 — 10 14 — 7 | LEFT | Less than 1 ? |
1 — 14 10 — 7 | RIGHT | Less than 1 ? |
3. If the inspection result is not within the standard, replace the switch - door mirror.

 Removal
GLASS/WINDOWS/MIRRORS > Remote Control Mirror SwitchREMOVAL1. Disconnect the ground cable from battery and wait for at least 60 seconds before starting work. NOTE">2. Remove the trim panel ...
Other materials:
SRS airbag system warning light
WARNING
If the warning light exhibits any of
the following conditions, there may
be a malfunction in the seatbelt
pretensioners and/or SRS airbag
system. Immediately take your vehicle
to your nearest SUBARU dealer
to have the system checked. Unless
checked and properly repaired, the
seatb ...
Removal
FUEL INJECTION (FUEL SYSTEMS)(H4DO) > Manifold Absolute Pressure SensorREMOVAL1. Disconnect the ground cable from battery.2. Disconnect the connector (A) from the manifold absolute pressure sensor, and remove the manifold absolute pressure sensor from intake manifold. ...
Electrical component location Location
HVAC SYSTEM (AUTO A/C) (DIAGNOSTICS) > Electrical Component LocationLOCATION1. OUTSIDE VEHICLE(1)A/C compressor(3)Pressure switch(4)Ambient sensor(2)A/C relay 2. COMPARTMENT(1)Air mix door actuator LH*2(5)Intake door actuator(9)A/C control panel(2)In-vehicle sensor(6)Mode door actuator(10)Blow ...
