
Subaru Crosstrek Service Manual: Inspection
FUEL INJECTION (FUEL SYSTEMS)(H4DO) > Tumble Generator Valve Assembly
INSPECTION
1. CHECK MOTOR
1. Connect the battery positive terminal to terminal No. 5 and the battery ground terminal to terminal No. 4, and check that the valve is fully opened on LH side and the valve is fully closed on RH side.
CAUTION:
Do not power the motor for more than 10 seconds.
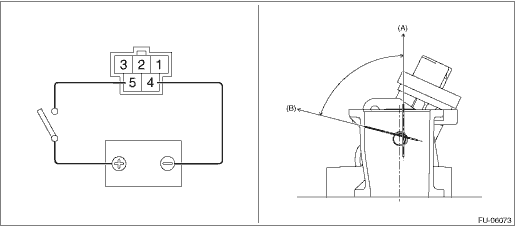
(A) | Full open | (B) | Full closed |
2. Connect the battery positive terminal to terminal No. 4 and the battery ground terminal to terminal No. 5, and check that the valve is fully closed on LH side and the valve is fully opened on RH side.
CAUTION:
Do not power the motor for more than 10 seconds.
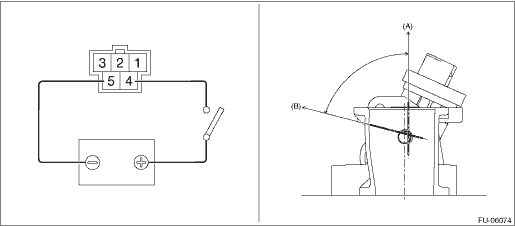
(A) | Full open | (B) | Full closed |
2. CHECK SENSORS
1. Connect dry-cell battery positive terminal to terminal No. 3 and dry-cell battery ground terminal to terminal No. 2, and connect the resistance (0.5 — 2 k?) between dry-cell battery positive terminal and terminal No. 1.
NOTE:
• Use new dry-cell batteries.
• Using circuit tester, check the voltage of a single dry-cell battery is 1.6 V or more. And also check the voltage of three batteries in series is between 4.8 V and 5.2 V.
• For power supply, 5 V DC voltage source can also be used.
2. Connect the circuit tester positive terminal to terminal No. 1, and the circuit tester negative terminal to terminal No. 2.
3. Connect the battery positive terminal to terminal No. 5 and the battery ground terminal to terminal No. 4, and measure the voltages with the valve fully opened on LH side and with the valve fully closed on RH side.
CAUTION:
Do not power the motor for more than 10 seconds.
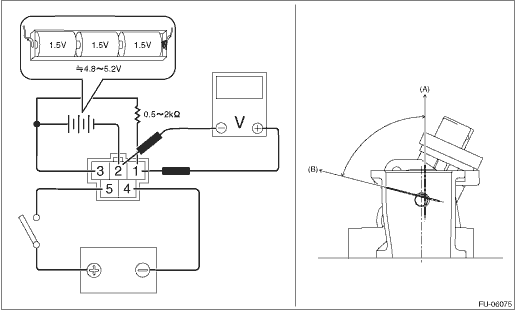
(A) | Full open | (B) | Full closed |
Terminal No. | Standard |
1 (+) and 2 (−) | LH side: Approx. 5 V (when 25°C (77°F)) RH side: Approx. 0 — 0.5 V (when 25°C (77°F)) |
4. Connect dry-cell battery positive terminal to terminal No. 3 and dry-cell battery ground terminal to terminal No. 2, and connect the resistance (0.5 — 2 k?) between dry-cell battery positive terminal and terminal No. 1.
NOTE:
• Use new dry-cell batteries.
• Using circuit tester, check the voltage of a single dry-cell battery is 1.6 V or more. And also check the voltage of three batteries in series is between 4.8 V and 5.2 V.
• For power supply, 5 V DC voltage source can also be used.
5. Connect the circuit tester positive terminal to terminal No. 1, and the circuit tester negative terminal to terminal No. 2.
6. Connect the battery positive terminal to terminal No. 4 and the battery ground terminal to terminal No. 5, and measure the voltages with the valve fully closed on LH side and with the valve fully opened on RH side.
CAUTION:
Do not power the motor for more than 10 seconds.
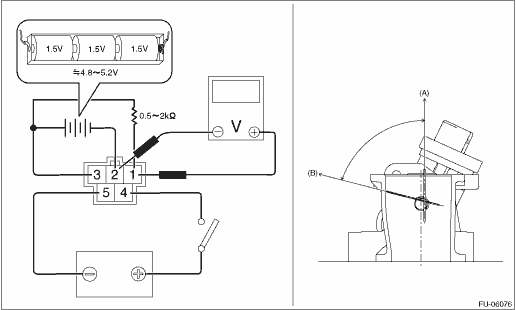
(A) | Full open | (B) | Full closed |
Terminal No. | Standard |
1 (+) and 2 (−) | LH side: Approx. 0 — 0.5 V (when 25°C (77°F)) RH side: Approx. 5 V (when 25°C (77°F)) |
3. OTHER INSPECTIONS
1. Check that the tumble generator valve assembly has no deformation, cracks or other damages.
2. Check tumble generator valve assembly for contamination or clogging.

 Removal
FUEL INJECTION (FUEL SYSTEMS)(H4DO) > Tumble Generator Valve AssemblyREMOVAL1. Release the fuel pressure. Fuel > PROCEDURE">2. Disconnect the ground cable from battery.3. Remove the int ...
Other materials:
Read cancel code Operation
CRUISE CONTROL SYSTEM (DIAGNOSTICS) > Read Cancel CodeOPERATION1. On «Start» display, select «Diagnosis».2. On «Vehicle selection» display, input the target vehicle information and select «Confirmed».3. On «Main Menu» display, select «Each System».4. On «Select System» display, sele ...
Clock/calendar screen
Clock (analog format)
Clock (digital format)
Calendar
Today's date
Birthday/Anniversary
In addition to the clock/calendar, the outside
temperature and average fuel consumption
can also be displayed.
You can select clock (analog format),
clock (digital format) or calendar ...
Dtc p050b cold start ignition timing performance
ENGINE (DIAGNOSTICS)(H4DO) > Diagnostic Procedure with Diagnostic Trouble Code (DTC)DTC P050B COLD START IGNITION TIMING PERFORMANCENOTE:For the diagnostic procedure, refer to DTC P050A. Diagnostic Procedure with Diagnostic Trouble Code (DTC) > DTC P050A COLD START IDLE CONTROL SYSTEM PERFORM ...
