Subaru Crosstrek Service Manual: Inspection
FRONT SUSPENSION > Front Strut
INSPECTION
Check the removed part for wear, damage and cracks, and then repair or replace it if defective.
1. STRUT
1. Check for oil leaks.
2. Move the piston rod up and down to check that it operates smoothly without any hitch.
3. Check the piston rod runout.
Preparation tool:
Dial gauge
(1) Fix the outer shell.
(2) Extend the piston rod until it stops retracting, and set the dial gauge at the L position from the end of the piston rod.
Measuring point:
L = 10 mm (0.39 in)
(3) While applying a force of W1 [20 N (2 kgf, 4 lbf)] to the arrowed section, read the dial gauge indication P1.
(4) While applying a force of W2 [20 N (2 kgf, 4 lbf)] from the opposite side of W1, read the dial gauge indication P2.
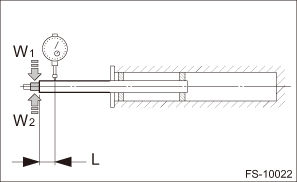
Play limit (P1 + P2): 0.8 mm (0.031 in)
4. Replace the strut if faulty is found in the inspection or limit value is exceeded.
2. STRUT MOUNT - FRONT
Check the rubber part for deformation, cracks or deterioration, and then replace it with a new part if defective.
3. DUST COVER - INNER
If cracks or damage are found, replace it with a new part.
4. COIL SPRING - FRONT
If a permanent strain is found, replace it with a new part.
5. HELPER - FRONT STRUT
If major cracks or damage are found, replace it with a new part.
 Disposal
FRONT SUSPENSION > Front StrutDISPOSALCAUTION:• Before handling the strut damper and shock absorber, be sure to wear goggles to protect eyes from gas, oil and cutting powder.• Do not di ...
 Installation
FRONT SUSPENSION > Front StrutINSTALLATION1. Install the strut mount - front at the upper side of the strut to the body, and tighten it with new flange nuts.Tightening torque:20 N·m (2.04 kg ...
Other materials:
List
TELEMATICS SYSTEM (DIAGNOSTICS) > Diagnostic Code(s) DisplayLISTDTCItemNoteU0073CONTROL MODULE COMMUNICATION BUS OFF Diagnostic Procedure with Diagnostic Trouble Code (DTC) > DTC U0073 CONTROL MODULE COMMUNICATION BUS OFF">U0100LOST COMMUNICATION WITH ECM/PCM “A” Diagnostic ...
CVT models
1. Apply the parking brake.
2. Turn off unnecessary lights and accessories.
3. Shift the select lever to the "P" or "N"
position (preferably the "P" position).
The starter motor will only operate when
the select lever is at the "P" or "N" position.
4. Turn the ignition switch to the "O ...
Inspection
POWER ASSISTED SYSTEM (POWER STEERING) > Universal JointINSPECTIONCheck for wear, damage or any other faults.1. Check the universal joint assembly - steering for excessive looseness.Service limit:Play of the universal joint assembly - steering: 0 mm (0 in)2. Measure the swing torque of the univer ...
