Subaru Crosstrek Service Manual: Inspection
EMISSION CONTROL (AUX. EMISSION CONTROL DEVICES)(H4DO) > Leak Check Valve Assembly
INSPECTION
1. CHECK SWITCHING VALVE
1. Check the resistance between switching valve terminals.
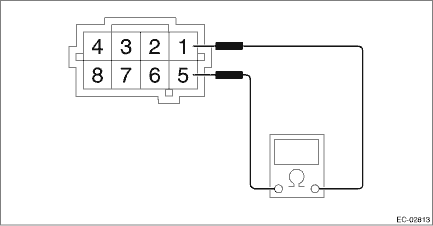
Terminal No. | Standard |
1 and 5 | 27+3 −2 ? (when 20°C (68°F)) |
31±4 ? (60°C (140°F)) |
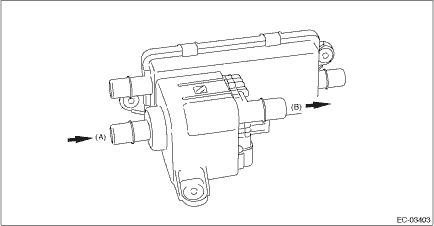
2. Check that air is discharged from (B) when air is blown into (A).
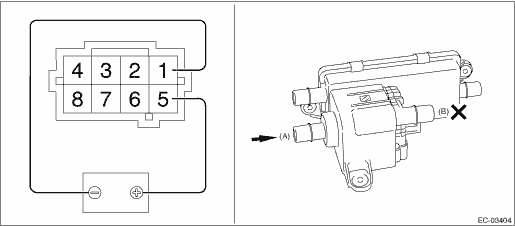
3. Connect the battery positive terminal to the terminal No. 5 and the battery negative terminal to the terminal No. 1. Check that air does not come out from (B) when air is blown into (A).
NOTE:
The purpose of this inspection is to check the valve movement, and it would be success if a large change of flow can be checked resulting from valve opening/closing. Therefore, it does not indicate a malfunction if a small amount of flow from (B) is detected when the valve is opened.
2. CHECK VACUUM PUMP
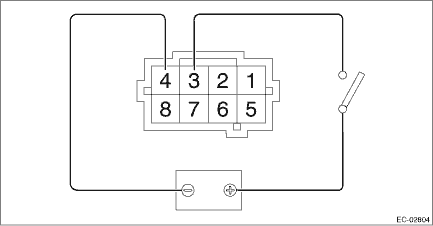
1. Connect the battery positive terminal to terminal No. 3 and the battery ground terminal to terminal No. 4, and inspect the vacuum pump operation.
CAUTION:
Do not operate the vacuum pump for 5 minutes or more.
3. CHECK PRESSURE SENSOR
1. Connect dry-cell battery positive terminal to terminal No. 6 and dry-cell battery ground terminal to terminal No. 8, circuit tester positive terminal to terminal No. 7 and the circuit tester negative terminal to terminal No. 8.
NOTE:
• Use new dry-cell batteries.
• Using circuit tester, check the voltage of a single dry-cell battery is 1.6 V or more. And also check the voltage of three batteries in series is between 4.8 V and 5.2 V.
• For power supply, 5 V DC voltage source can also be used.
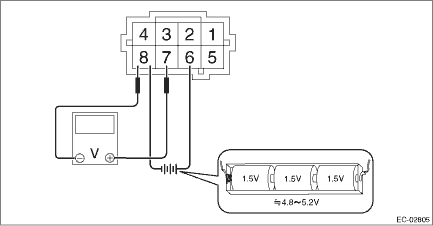
2. Check the voltage at a normal atmospheric pressure.
NOTE:
The atmospheric pressure at higher altitude is lower than normal. Therefore, the voltage is lower than the standard value.
Terminal No. | Standard |
7 (+) and 8 (−) | Approx. 3.5 V (when 25°C (77°F)) |
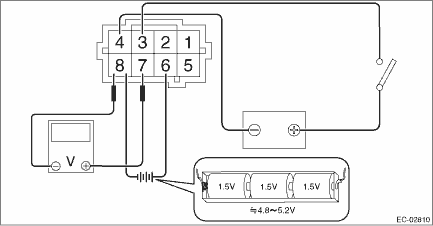
3. Connect the battery positive terminal to terminal No. 3 and the battery ground terminal to terminal No. 4, and check that there is a voltage drop from the voltage measured in step 2) when the vacuum pump is operated.
4. OTHER INSPECTIONS
1. Check that the leak check valve assembly has no deformation, cracks or other damages.
2. Check that the tube or hose have no cracks, damage or loose part.
 Disassembly
EMISSION CONTROL (AUX. EMISSION CONTROL DEVICES)(H4DO) > Leak Check Valve AssemblyDISASSEMBLY1. Remove the drain separator from the leak check valve assembly. Drain Separator > REMOVAL"> ...
 Installation
EMISSION CONTROL (AUX. EMISSION CONTROL DEVICES)(H4DO) > Leak Check Valve AssemblyINSTALLATION1. Install the leak check valve assembly to the vehicle with the bolt and clip (A).Tightening torque:7. ...
Other materials:
Disassembly
DIFFERENTIALS > Rear Differential (T-type)DISASSEMBLYTo detect the real cause of trouble, inspect the following items before disassembling.• Tooth contact and backlash between hypoid driven gear and drive pinion• Hypoid driven gear runout on its back surface• Total preload of dr ...
Removal
MANUAL TRANSMISSION AND DIFFERENTIAL(5MT) > Manual Transmission AssemblyREMOVAL1. Disconnect the ground cable from battery.2. Remove the clip (A) from the air intake boot.3. Loosen the clamp (B) connecting the air intake boot and air cleaner case (rear).4. Loosen the clamp (C) which connects the ...
Dtc p0328 knock/combustion vibration sensor 1 circuit high bank 1 or single sensor
ENGINE (DIAGNOSTICS)(H4DO) > Diagnostic Procedure with Diagnostic Trouble Code (DTC)DTC P0328 KNOCK/COMBUSTION VIBRATION SENSOR 1 CIRCUIT HIGH BANK 1 OR SINGLE SENSORDTC DETECTING CONDITION:Immediately at fault recognitionTROUBLE SYMPTOM:• Poor driving performance• Knocking occursCAUT ...
