
Subaru Crosstrek Service Manual: Dtc p0138 o2 sensor circuit high voltage bank 1 sensor 2
ENGINE (DIAGNOSTICS)(H4DO) > Diagnostic Procedure with Diagnostic Trouble Code (DTC)
DTC P0138 O2 SENSOR CIRCUIT HIGH VOLTAGE BANK 1 SENSOR 2
DTC detecting condition:
Detected when two consecutive driving cycles with fault occur.
CAUTION:
After servicing or replacing faulty parts, perform Clear Memory Mode Clear Memory Mode > OPERATION"> , and Inspection Mode Inspection Mode > PROCEDURE">.
Wiring diagram:
Engine electrical system Engine Electrical System">
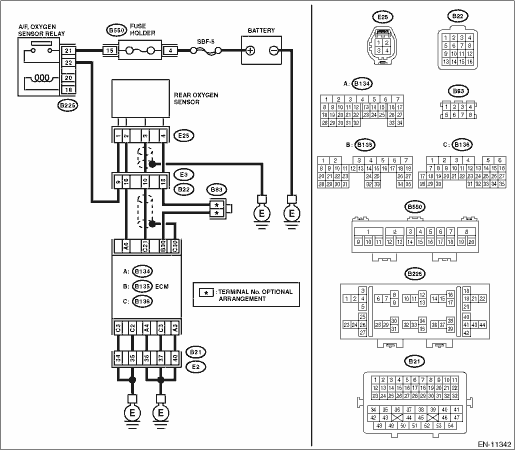
| STEP | CHECK | YES | NO |
1.CHECK REAR OXYGEN SENSOR DATA.
1) Warm up the engine until engine coolant temperature is higher than 75°C (167°F), and rapidly reduce the engine speed from 3,000 rpm.
2) Read the value of «Rear O2 Sensor Voltage» using the Subaru Select Monitor or a general scan tool.
NOTE:
• Subaru Select Monitor
For detailed operation procedures, refer to “Current Data Display For Engine”. Subaru Select Monitor">
• General scan tool
For detailed operation procedures, refer to the general scan tool operation manual.
Is the value of «Rear O2 Sensor Voltage» 0.250 V or less?
Diagnostic Procedure with Diagnostic Trouble Code (DTC) > DTC P0138 O2 SENSOR CIRCUIT HIGH VOLTAGE BANK 1 SENSOR 2">Go to Step 5.
Diagnostic Procedure with Diagnostic Trouble Code (DTC) > DTC P0138 O2 SENSOR CIRCUIT HIGH VOLTAGE BANK 1 SENSOR 2">Go to Step 2.
2.CHECK REAR OXYGEN SENSOR CONNECTOR AND COUPLING CONNECTOR.
Has water entered the connector?
Completely remove any water inside.
Diagnostic Procedure with Diagnostic Trouble Code (DTC) > DTC P0138 O2 SENSOR CIRCUIT HIGH VOLTAGE BANK 1 SENSOR 2">Go to Step 3.
3.CHECK HARNESS BETWEEN ECM AND REAR OXYGEN SENSOR CONNECTOR.
1) Turn the ignition switch to OFF.
2) Disconnect the connector from ECM.
3) Disconnect the connector from rear oxygen sensor.
4) Measure the resistance of harness between ECM connector and rear oxygen sensor connector.
Connector & terminal
(B136) No. 21 — (E25) No. 3:
(B135) No. 30 — (E25) No. 4:
Is the resistance less than 1 ??
Diagnostic Procedure with Diagnostic Trouble Code (DTC) > DTC P0138 O2 SENSOR CIRCUIT HIGH VOLTAGE BANK 1 SENSOR 2">Go to Step 4.
Repair the harness and connector.
NOTE:
In this case, repair the following item:
• Open circuit in harness between ECM connector and rear oxygen sensor connector
• Poor contact of coupling connector
4.CHECK HARNESS BETWEEN ECM AND REAR OXYGEN SENSOR CONNECTOR.
1) Connect the connector to ECM.
2) Turn the ignition switch to ON.
3) Measure the voltage between rear oxygen sensor connector and chassis ground.
Connector & terminal
(E25) No. 3 (+) — Chassis ground (−):
Is the voltage 0.2 — 0.5 V?
Replace the rear oxygen sensor. Rear Oxygen Sensor">
Repair the harness and connector.
NOTE:
In this case, repair the following item:
• Open circuit in harness between ECM connector and rear oxygen sensor connector
• Poor contact of coupling connector
• Poor contact of ECM connector
5.CHECK EXHAUST SYSTEM.
Check exhaust system parts.
NOTE:
Check the following items.
• Looseness and improper fitting of exhaust system parts
• Damage (crack, hole etc.) of parts
• Loose part and improper installation between front oxygen (A/F) sensor and rear oxygen sensor
Is there any fault in exhaust system?
Repair or replace faulty parts.
Replace the rear oxygen sensor. Rear Oxygen Sensor">
1. OUTLINE OF DIAGNOSIS
NOTE:
For the detection standard, refer to DTC P0137. Diagnostic Procedure with Diagnostic Trouble Code (DTC) > DTC P0137 O2 SENSOR CIRCUIT LOW VOLTAGE BANK 1 SENSOR 2">
 Dtc p0137 o2 sensor circuit low voltage bank 1 sensor 2
ENGINE (DIAGNOSTICS)(H4DO) > Diagnostic Procedure with Diagnostic Trouble Code (DTC)DTC P0137 O2 SENSOR CIRCUIT LOW VOLTAGE BANK 1 SENSOR 2DTC detecting condition:Detected when two consecutive driv ...
 Dtc p013a o2 sensor slow response - rich to lean bank 1 sensor 2
ENGINE (DIAGNOSTICS)(H4DO) > Diagnostic Procedure with Diagnostic Trouble Code (DTC)DTC P013A O2 SENSOR SLOW RESPONSE - RICH TO LEAN BANK 1 SENSOR 2DTC detecting condition:Detected when two consecu ...
Other materials:
Dtc p013b o2 sensor slow response - lean to rich bank 1 sensor 2
ENGINE (DIAGNOSTICS)(H4DO) > Diagnostic Procedure with Diagnostic Trouble Code (DTC)DTC P013B O2 SENSOR SLOW RESPONSE - LEAN TO RICH BANK 1 SENSOR 2NOTE:For the diagnostic procedure, refer to DTC P013A. Diagnostic Procedure with Diagnostic Trouble Code (DTC) > DTC P013A O2 SENSOR SLOW RESPONS ...
Disassembly
CONTROL SYSTEMS > Select LeverDISASSEMBLY1. GRIP ASSY1. Remove the button assembly_AT.(A)Claw2. Remove the rod COMPL.2. AT SELECT LEVER ASSEMBLY1. Remove the spacer plate.2. Remove the gasket.3. Insert a flat tip screwdriver with a thin tip under the connector and disconnect the harness connector ...
Removal
SECURITY AND LOCKS > Rear Outer HandleREMOVAL1. Raise the glass assembly - rear door to the top position.2. Disconnect the ground cable from battery. NOTE">3. Remove the trim panel - rear door. Door Trim > REMOVAL">4. Remove the sealing cover - rear door. Rear Sealing Cover ...
