Subaru Crosstrek Owners Manual: Defogger and deicer
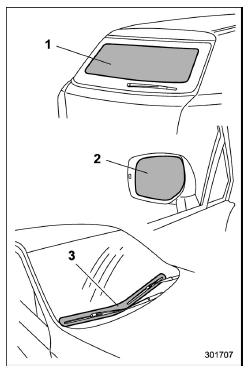
- Rear window defogger
- Outside mirror defogger (if equipped)
- Windshield wiper deicer (if equipped)
The vehicle is equipped with a rear window defogger. Some models are also equipped with an outside mirror defogger and/or windshield wiper deicer. The defogger and deicer system is activated only when the ignition switch is in the "ON" position.
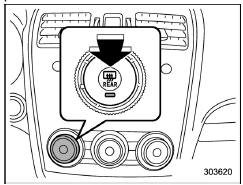
Climate control system type A and type B
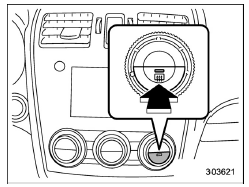
Climate control system type C and type D
To activate the defogger and deicer system, press the control switch that is located on the climate control panel. The rear window defogger, outside mirror defogger and windshield wiper deicer are activated simultaneously. The indicator light on the control switch illuminates while the defogger and deicer system is activated.
To turn them off, press the control switch again. They also turn off when the ignition switch is turned to the "ACC" or "LOCK"/ "OFF" position.
The defogger and deicer system will automatically shut off after approximately 15 minutes. If the rear window and the outside mirrors have been cleared and the windshield wiper blades have been deiced completely before that time, press the control switch to turn them off. If defrosting, defogging or deicing is not complete, you have to press the control switch to turn them on again.
For models with the automatic climate control system (type B, C and D), it is possible for the defogger and deicer system to be set to continuous operation mode by a SUBARU dealer. Consult your SUBARU dealer for details. Also, for models with a multi function display, the setting can be changed using the display.
For details, refer to "Multi function display" 3-42.
If the battery voltage drops below the permissible level, continuous operation of the defogger and deicer system is canceled and the system stops operating.
CAUTION
- To prevent the battery from being discharged, do not operate the defogger and deicer system continuously for any longer than necessary.
- Do not use sharp instruments or window cleaner containing abrasives to clean the inner surface of the rear window. They may damage the conductors printed on the window.
NOTE
Turn on the defogger and deicer system if the wipers are frozen to the windshield.
If the windshield is covered with snow, remove the snow so that the windshield wiper deicer works effectively.
While the defogger and deicer system is in the continuous operation mode:
- If the vehicle speed remains at 9 mph (15 km/h) or lower for 15 minutes, the windshield wiper deicer stops operating. However, the rear window defogger and outside mirror defogger maintain continuous operation.
- If the battery voltage drops below the permissible level, the defogger and deicer system stops operating.
 Outside mirrors
Convex mirror (passenger side)
WARNING
Objects look smaller in a convex
mirror and farther away than when
viewed in a flat mirror. Do not use
the convex mirror to judge the
distance of vehicles ...
 Tilt/telescopic steering wheel
WARNING
Do not adjust the steering wheel
tilt/telescopic position while driving.
This may cause loss of
vehicle control and result in
personal injury.
If the lever cannot be raised to
...
Other materials:
Switches and harness
Inspection
Blind Spot Detection/Rear Cross Traffic Alert > Switches and HarnessINSPECTIONBSD/RCTA OFF switch1. Measure the resistance between connector terminals.Preparation tool:Circuit testerTerminal No.Inspection conditionsStandard1 — 2Switch OFF1 M? or moreSwitch ONLess than 1 ?2. Apply ba ...
Preparation tool
COOLING(H4DO) > General DescriptionPREPARATION TOOL1. SPECIAL TOOLILLUSTRATIONTOOL NUMBERDESCRIPTIONREMARKS18355AA000PULLEY WRENCH• Used for removing and installing water pump pulley.• Used with PULLEY WRENCH PIN SET (18334AA030).18334AA030PULLEY WRENCH PIN SET• Used for removin ...
Removal
HVAC SYSTEM (HEATER, VENTILATOR AND A/C) > Ambient SensorREMOVAL1. Disconnect the ground cable from battery. Battery > REMOVAL">2. Remove the ambient sensor.(1) Disconnect the connector.(2) Release the claws, and then remove the ambient sensor from the bracket. ...
