
Subaru Crosstrek Owners Manual: Connecting a trailer
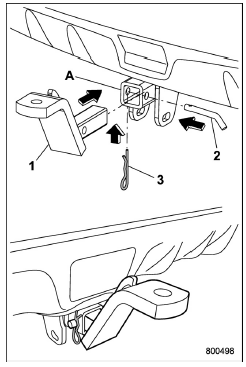
- Ball mount
- Hitch pin
- Safety pin
- Hitch receiver tube
1. Insert the ball mount into the hitch receiver tube.
2. Insert the hitch pin into the hole located on the hitch receiver tube so that the pin passes through the ball mount.
3. Insert the safety pin through the hole located on the hitch pin securely.
4. Check the ball mount assembly by pulling on it to make sure it does not come off the hitch receiver.
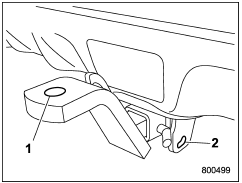
- Hitch ball installation point
- Hooks for safety chains
5. Attach a hitch ball. Use only a hitch ball that is appropriate for the ball mount and your trailer. The hitch ball must be securely installed on the ball mount.
6. Connect your trailer to the hitch ball.
7. Connect the trailer and the hitch with safety chains that will hold the trailer's maximum gross weight. The chains should cross under the trailer tongue to prevent the tongue from dropping onto the ground in case it should disconnect from the hitch ball. Allow sufficient slack in the chains taking tight turn situations into account; however, be careful not to let them drag on the ground.
WARNING
Do not connect safety chains to any part of the vehicle other than the safety chain hooks.
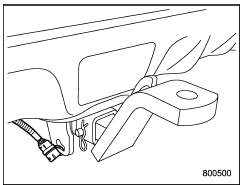
Hitch harness connector
8. Connect the hitch wire harness's black four-pin wire connector to the towing trailer's wire harness.
9. Confirm proper function of the hitch wire harness by individually activating the brake, stop and turn signal lights on the trailer.
NOTE
Always disconnect the trailer wire harness before launching or retrieving a watercraft.
 Trailer hitch (dealer option)
WARNING
Never exceed the maximum
weight specified for the trailer
hitch. Exceeding the maximum
weight could cause an accident
resulting in serious personal injuries.
Permissible traile ...
 If not towing a trailer
Remove the ball mount from the hitch
receiver tube and insert the receiver cover
onto the hitch receiver tube.
Place the dust cap over the four-pin
connector of the hitch wire harness to
...
Other materials:
Read diagnostic trouble code (dtc) Operation
Blind Spot Detection/Rear Cross Traffic Alert (DIAGNOSTICS) > Read Diagnostic Trouble Code (DTC)OPERATION1. On «Start» display, select «Diagnosis».2. On «Vehicle selection» display, input the target vehicle information and select «Confirmed».3. On «Main Menu» display, select «Each Syst ...
Dtc c2552 motor relay
POWER ASSISTED SYSTEM (POWER STEERING) (DIAGNOSTICS) > Diagnostic Procedure with Diagnostic Trouble Code (DTC)DTC C2552 MOTOR RELAYTROUBLE SYMPTOM:• The steering wheel operation feels heavy.• STEERING warning light illuminates.NOTE:When this code is displayed, replace the power steeri ...
Dtc b1013 ignition power
BODY CONTROL SYSTEM (DIAGNOSTICS) > Diagnostic Procedure with Diagnostic Trouble Code (DTC)DTC B1013 IGNITION POWERDTC detecting condition:Voltage failure caused by poor contact of IGN power supply circuitsTrouble symptom:Symptoms such as shift lock or wiper not operating may occur.Wiring diagram ...
