Subaru Crosstrek Owners Manual: Checking the oil level
1. Park the vehicle on a level surface and turn the ignition switch to the "LOCK"/ "OFF" position. If you check the oil level just after turning the ignition switch to the "LOCK"/"OFF" position, wait a few minutes for the oil to drain back into the oil pan before checking the level.
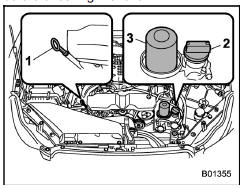
- Oil level gauge
- Oil filler cap
- Oil filter
CAUTION
If the level gauge cannot be pulled out easily, twist the level gauge right and left, then gently pull it out.
Otherwise, you may be injured accidentally straining yourself.
2. Pull out the level gauge, wipe it clean, and insert it again.
3. Be sure the level gauge is correctly inserted until it stops.
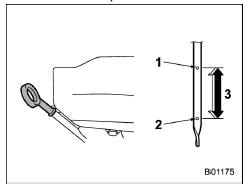
- Full level
- Low level
- Approximately 1.1 US qt (1.0 liter, 0.9 Imp qt) from low level to full level
4. Pull out the oil level gauge again.
5. Check the oil levels on both sides of the level gauge. The engine oil level must be judged by the lowest of the two levels.
If the oil level is below the low level mark, add oil so that the full level is reached.
CAUTION
- Be careful not to touch the engine oil filter when removing the oil filler cap. Doing so may result in a burn, a pinched finger, or may cause some other injury.
- Use only engine oil with the recommended grade and viscosity.
- Be careful not to spill engine oil when adding it. If oil touches the exhaust pipe, it may cause a bad smell, smoke, and/or a fire. If engine oil gets on the exhaust pipe, be sure to wipe it off.
To add engine oil, remove the engine oil filler cap and slowly pour engine oil through the filler neck. After pouring oil into the engine, you must use the level gauge to confirm that the oil level is correct.
NOTE
To prevent overfilling the engine oil, do not add any additional oil above the upper level when the engine is cold.
 Engine oil consumption
Some engine oil will be consumed while
driving. The rate of consumption can be
affected by such factors as transmission
type, driving style, terrain and temperature.
Under the following conditio ...
 Changing the oil and oil filter
Change the oil and oil filter according to
the maintenance schedule in the "Warranty
and Maintenance Booklet".
The engine oil and oil filter must be
changed more frequently than listed in
the m ...
Other materials:
Removal
SECURITY AND LOCKS > IG Relay2 (Push Button Start)REMOVALCAUTION:Before handling the airbag system components, refer to “CAUTION” of “General Description” in “AIRBAG SYSTEM”. General Description > CAUTION">1. Disconnect the ground cable from battery ...
Installation
MANUAL TRANSMISSION AND DIFFERENTIAL(5MT) > Main Shaft AssemblyINSTALLATION1. Attach the needle bearing and oil seal to the front of the main shaft assembly.NOTE:• Wrap the clutch splined section with vinyl tape to prevent damage to the oil seal.• Apply NICHIMOLY N-130 or the equivale ...
Removal
LIGHTING SYSTEM > Glove Box LightREMOVAL1. Disconnect the ground cable from battery. NOTE">2. Remove the pocket assembly.(1) Attach the protective tape (a) to the panel center LWR.(2) Remove the damper COMPL - pocket.(3) Release the stoppers and remove the pocket assembly by pulling it t ...
