Subaru Crosstrek Service Manual: Assembly
REAR SUSPENSION > Rear Shock Absorber
ASSEMBLY
1. Before assembly, check each part. Rear Shock Absorber > INSPECTION">
2. Using a coil spring compressor, compress the coil spring - rear.
CAUTION:
When installing the coil spring compressor to the coil spring, follow the operation manual accompanied with the coil spring compressor during operation.
3. Install by aligning with the edge surface of the coil spring - rear and the stopper portion of the lower side spring seat.
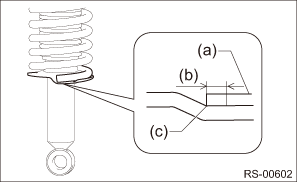
(a) | Coil spring - rear |
(b) | 0+ 10 mm (0 + 0.4 in) |
(c) | Spring seat stopper portion |
4. Install the helper - rear and the dust cover - rear shock to the piston rod.
5. Fully pull up the piston rod in the upward direction.
6. Temporarily tighten the rubber seat - shock UPR and the shock mount - rear with new self-locking nuts.
NOTE:
Position the shock mount - rear as shown in the figure.
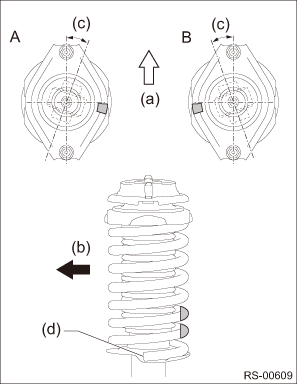
A | LH side |
B | RH side |
(a) | Front side of vehicle |
(b) | Vehicle outside |
(c) | 0°±10° |
(d) | End portion of coil spring - rear |
7. Using a hexagon wrench to prevent the shock absorber piston rod from turning, tighten the new self-locking nut with ST.
CAUTION:
Make sure that the shock mount - rear turns smoothly after tightening.
Preparation tool:
ST: STRUT MOUNT SOCKET (20399FG000)
Tightening torque:
25 N·m (2.55 kgf-m, 18.4 ft-lb)
8. Loosen the coil spring compressor carefully.

 Removal
REAR SUSPENSION > Rear Shock AbsorberREMOVAL1. CROSSTREK MODEL1. Disconnect the ground cable from battery. NOTE">2. Lift up the vehicle, and then remove the rear wheels.3. Remove the senso ...
Other materials:
Dtc b1815 short in passenger s airbag dual stage - 2nd step
AIRBAG SYSTEM (DIAGNOSTICS) > Diagnostic Chart with Trouble CodeDTC B1815 SHORT IN PASSENGER’S AIRBAG DUAL STAGE - 2ND STEPDiagnosis start condition:Ignition voltage is 10 V to 16 V.DTC detecting condition:• Airbag main harness circuit is shorted.• Airbag module harness circuit ...
SXM setting
1. An option menu screen is displayed
when you touch the tab on the
lower
left side of the screen. The "Options"
screen will appear.
Option menu screen
No.
Function
1
Set the lock function of each channel.
Input the password is necessary
for operation.
...
Clear memory mode Operation
HVAC SYSTEM (AUTO A/C) (DIAGNOSTICS) > Clear Memory ModeOPERATION1. On «Start» display, select «Diagnosis».2. On «Vehicle selection» display, input the target vehicle information and select «Confirmed».3. On «Main Menu» display, select «Each System».4. On «Select System» display, se ...
