Subaru Crosstrek Service Manual: Dtc b1815 short in passenger s airbag dual stage - 2nd step
AIRBAG SYSTEM (DIAGNOSTICS) > Diagnostic Chart with Trouble Code
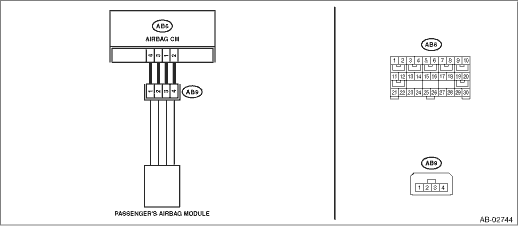
DTC B1815 SHORT IN PASSENGER’S AIRBAG DUAL STAGE - 2ND STEP
Diagnosis start condition:
Ignition voltage is 10 V to 16 V.
DTC detecting condition:
• Airbag main harness circuit is shorted.
• Airbag module harness circuit (passenger’s side) is shorted.
• Passenger’s airbag module is faulty.
• Airbag control module is faulty.
CAUTION:
Before performing diagnosis, refer to “CAUTION” in “General Description”. General Description > CAUTION">
Wiring diagram:
Airbag system Airbag System > WIRING DIAGRAM">
| STEP | CHECK | YES | NO |
1.CHECK POOR CONTACT OF CONNECTORS.
Check for poor contact of the connectors between the airbag control module and the passenger’s airbag module.
Is there poor contact?
Replace the airbag harness.
Diagnostic Chart with Trouble Code > DTC B1815 SHORT IN PASSENGER’S AIRBAG DUAL STAGE - 2ND STEP">Go to Step 2.
2.CHECK AIRBAG MAIN HARNESS (PASSENGER’S AIRBAG HARNESS).
1) Turn the ignition switch to OFF, disconnect the battery ground cable, and wait for 60 seconds or more.
2) Disconnect the connectors (AB7) and (AB2).
3) Disconnect the connector (AB66) from the driver’s knee airbag module.
4) Disconnect the connectors (AB6, AB17, AB18) from the airbag control module, connect the connector (1AG) in the test harness AG, and release the short mechanism of the connectors (AB6, AB17, AB18).
5) Disconnect the passenger’s airbag module connector (AB9).
6) Using a probe, measure the resistance between the terminals of connector (AB9). General Description > PREPARATION TOOL">
CAUTION:
When measuring the resistance, make sure that the probe is inserted from the back side (harness side) of the connector. Also, do not insert the probe forcibly.
Connector & terminal
(AB9) No. 3 — (AB9) No. 4:
Is the resistance 1 M? or more?
Diagnostic Chart with Trouble Code > DTC B1815 SHORT IN PASSENGER’S AIRBAG DUAL STAGE - 2ND STEP">Go to Step 3.
Replace the airbag main harness along with body harness.
3.CHECK AIRBAG CONTROL MODULE.
1) Disconnect the test harness AG and test harness AH from the connectors (AB6, AB17, AB18).
2) Connect the connectors (AB6, AB17, AB18) and the airbag control module.
3) Connect the connectors (AB7) and (AB2).
4) Connect the connector (AB66) to the driver’s knee airbag module.
5) Connect the battery ground terminal and turn the ignition switch to ON.
6) Perform the Inspection Mode. Inspection Mode">
7) Read the DTC. (Current malfunction) Read Diagnostic Trouble Code (DTC)">
Is DTC B1815 displayed?
Replace the airbag control module. Airbag Control Module > REMOVAL">
Diagnostic Chart with Trouble Code > DTC B1815 SHORT IN PASSENGER’S AIRBAG DUAL STAGE - 2ND STEP">Go to Step 4.
4.CHECK PASSENGER’S AIRBAG MODULE.
1) Turn the ignition switch to OFF, disconnect the battery ground cable, and wait for 60 seconds or more.
2) Connect the passenger’s airbag module connector (AB9).
3) Connect the battery ground terminal and turn the ignition switch to ON.
4) Perform the Inspection Mode. Inspection Mode">
5) Read the DTC. (Current malfunction) Read Diagnostic Trouble Code (DTC)">
Is DTC B1815 displayed?
Replace the passenger’s airbag module. Passenger’s Airbag Module > REMOVAL">
Diagnostic Chart with Trouble Code > DTC B1815 SHORT IN PASSENGER’S AIRBAG DUAL STAGE - 2ND STEP">Go to Step 5.
5.CHECK FOR ANY OTHER DTC ON DISPLAY.
Is any other DTC displayed?
Check DTC using “List of Diagnostic Trouble Code (DTC)”. List of Diagnostic Trouble Code (DTC)">
Finish the diagnosis.
 Dtc b1813 short in driver s airbag dual stage - 2nd step circuit (to +b)
AIRBAG SYSTEM (DIAGNOSTICS) > Diagnostic Chart with Trouble CodeDTC B1813 SHORT IN DRIVER’S AIRBAG DUAL STAGE - 2ND STEP CIRCUIT (TO +B)Diagnosis start condition:Ignition voltage is 10 V to 1 ...
 Dtc b1816 open in passenger s airbag dual stage - 2nd step
AIRBAG SYSTEM (DIAGNOSTICS) > Diagnostic Chart with Trouble CodeDTC B1816 OPEN IN PASSENGER’S AIRBAG DUAL STAGE - 2ND STEPDiagnosis start condition:Ignition voltage is 10 V to 16 V.DTC detect ...
Other materials:
Fuses and circuits
Fuse panel located in the passenger compartment
Fuse panel located in the engine compartment
A) Main fuse
...
Installation
MECHANICAL(H4DO) > Timing Chain AssemblyINSTALLATION1. TIMING CHAIN LHNOTE:• Be careful that the foreign matter is not into or onto the assembled component during installation.• Apply engine oil to all component parts of the timing chain.1. Prepare to attach the chain tensioner LH.(1) ...
USB memory
Audio files on the USB memory can be
played.
WARNING
Do not operate the player's controls
or connect the USB memory while
driving. Doing so may result in
losing control of your vehicle and
cause an accident or serious injury.
CAUTION
Do not leave your USB memory
in the car. In particul ...
