Subaru Crosstrek Service Manual: Adjustment
LIGHTING SYSTEM > Front Fog Light Assembly
ADJUSTMENT
1. FOG LIGHT AIMING
1. Before checking the fog light assembly - front beam level, be sure of the following:
• The area around the fog light assembly - front has not sustained any scratches, damage or other type of deformation.
• The vehicle is parked on a level surface.
• The inflation pressure of tires is correct.
• The vehicle does not have load.
• Vehicle’s fuel tank is fully filled.
2. Bounce the vehicle several times to normalize the suspension.
3. Make certain that someone is seated in the driver’s seat.
4. Place the vehicle with the front end facing to the measurement panel.
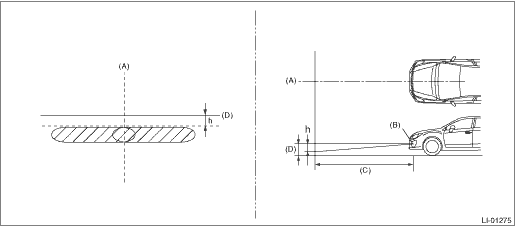
(A) | Vehicle center | (C) | 3 m (10 ft) | (D) | Height of fog light center |
(B) | Bulb center marking |
h mm (in) at 3 m (10 ft) |
40 (1.58) |
5. Adjust the fog light assembly - front beam.
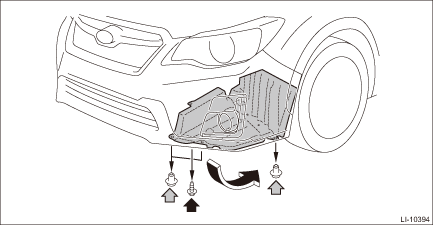
(1) Remove the screw and clips, and turn over the front side of the mud guard - front.
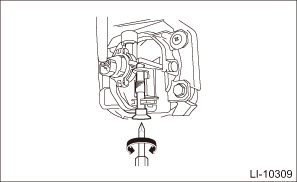
(2) Adjust the beam direction by turning the aiming screw from the bottom of the bumper face - front.

 Removal
LIGHTING SYSTEM > Front Fog Light AssemblyREMOVAL1. Disconnect the ground cable from battery. NOTE">2. Lift up the vehicle.3. Remove the screw and clips, and turn over the front side of th ...
Other materials:
Disassembly
CONTINUOUSLY VARIABLE TRANSMISSION(TR580) > Extension CaseDISASSEMBLY1. Remove the dust cover from extension case.2. Remove the extension case oil seal from the extension case. Differential Side Retainer Oil Seal > REPLACEMENT">3. Remove all plugs. ...
Inspection
CONTROL SYSTEMS > Select CableINSPECTIONCheck the removed cable and replace or adjust if damaged, rusty or malfunctioning.1. Check the cable for smooth operation.2. Check the inner cable for damage and rust.3. Check the outer cable for damage, bends and cracks.4. Check the boot for damage, cracks ...
Vdc warning light and vdc indicator light do not go off
VEHICLE DYNAMICS CONTROL (VDC) (DIAGNOSTICS) > Warning Light Illumination PatternVDC WARNING LIGHT AND VDC INDICATOR LIGHT DO NOT GO OFFDetecting condition:• Defective combination meter• Defective engine• Defective CAN communicationTrouble symptom:VDC warning light and VDC indic ...
