
Subaru Ascent 2018-2026 Owner's Manual: When the display mode malfunctions
When the display mode malfunctions
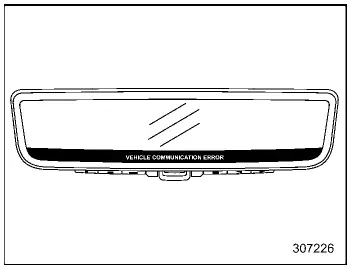
In the Subaru Ascent, if a communication issue occurs within the system, warning indicators will appear on the Smart Rearview Mirror display as illustrated. These alerts are designed to inform the driver that the display mode is not functioning correctly and requires attention.
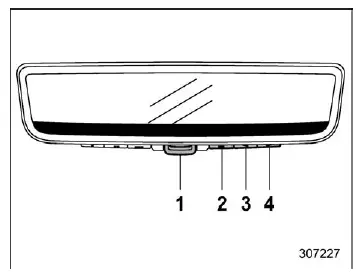
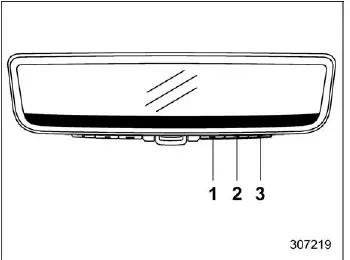
- Mode lever
- Left button
- Center button
- Right button
When such warning indicators are shown in the Subaru Ascent, immediately switch to the standard mirror mode using the mode lever. This ensures continued rear visibility even if the display system is compromised. After switching modes, it is strongly recommended to have the system inspected by an authorized SUBARU dealer.
If the display does not switch to mirror mode when operating the lever, this may indicate a malfunction of the mode control mechanism itself.
In this situation, press and hold any of the control buttons (left, center, or right) for approximately 10 seconds. The Subaru Ascent will then force the system into mirror mode, allowing safe operation until repairs can be performed.
Camera calibration error
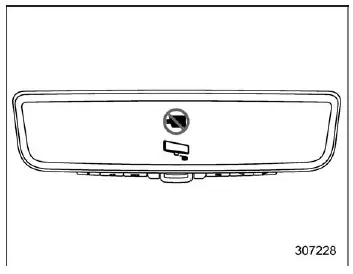
If a camera calibration error occurs in the Subaru Ascent, a specific warning indicator will be displayed. This typically means that the camera alignment or internal calibration has been disrupted.
When this warning appears, switch immediately to mirror mode using the mode lever to maintain proper rear visibility. For accurate recalibration and system restoration, consult a SUBARU dealer as soon as possible.
Maintenance
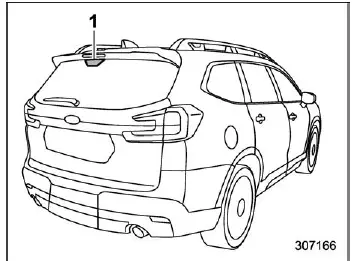
- Camera
- To ensure optimal performance of the Smart Rearview Mirror in the Subaru Ascent, regularly clean both the mirror surface and the rear camera area. Dirt or contamination can significantly reduce image clarity.
- Use a soft, dry cloth to wipe the mirror and surrounding camera area. If stubborn dirt is present, first clean with a slightly damp soft cloth, then finish with a dry cloth to prevent streaking.
- Avoid using harsh chemicals such as alcohol, benzine, or thinner, as these substances may damage surfaces or lead to system malfunction in the Subaru Ascent.
- Keep the rear gate glass clean at all times. For best results, use a diluted mild detergent with a soft cloth, followed by drying with a clean cloth.
- Do not place stickers or decals on the rear glass in front of the camera, as this may obstruct the camera view and degrade system performance.
- When installing accessories such as a roof box on the Subaru Ascent, ensure that the camera’s field of view is not blocked, as this may interfere with the displayed image.
Tips
- Do not use the display mode for extended periods when the engine is off
in the Subaru Ascent.
Prolonged use without the engine running may lead to battery discharge.
- Avoid installing radio antennas near the Smart Rearview Mirror, as electromagnetic interference may affect display stability.
- Follow these precautions carefully to prevent malfunction or physical damage:
- Do not press control buttons excessively or operate the lever with excessive force.
- Avoid rotating the mirror unit beyond 90 degrees.
- Do not strike or apply impact to the mirror assembly.
- Prevent impact to the rear camera or its protective cover located on the tailgate.
- If strong light conditions make the display difficult to read, switch the Subaru Ascent to mirror mode for improved visibility.
- Flickering may occur if LED lights or reflections are captured by the camera. This is a normal characteristic and not a system fault.
- Rapid movement near the camera may not be captured accurately on the display. This behavior is expected and does not indicate a malfunction.
- When using display mode in the Subaru Ascent, the perspective differs from a traditional mirror view. Always verify surroundings visually and do not rely solely on the digital display.
- Adjust the screen brightness appropriately. Excessive brightness may lead to eye fatigue during long drives.
- During rainy conditions, use the rear wiper to maintain camera visibility. If the image remains unclear, inspect the condition of the rear wiper blade.
- When the rear wiper passes in front of the camera, temporary flickering may occur on the screen. This is normal and does not indicate a malfunction.
- If the display remains unclear, clean the rear glass thoroughly. If visibility does not improve, the glass surface may be affected by residue such as oil, which requires proper cleaning.
The Smart Rearview Mirror system in the Subaru Ascent is designed to deliver reliable performance in a wide range of conditions, but proper maintenance and correct usage are essential to ensure consistent visibility, safety, and long-term durability.
In the Subaru Ascent, if the rear glass surface becomes contaminated with oil or similar residue, it is essential to thoroughly remove the film and clean the glass properly. Failure to do so may significantly reduce the clarity of the Smart Rearview Mirror display and affect overall visibility.
For detailed instructions on using the rear window defogger, refer to the corresponding section titled "Defogger and deicer".
- When objects are located at a significant distance from the camera, color accuracy may decrease.
- In very low-light or dark environments, the Subaru Ascent display may show reduced color clarity due to limited available light.
To operate the compass feature
- Left button
- Center button
- Right button
To access the compass functionality in the Subaru Ascent, press any of the control buttons (left, center, or right) to bring up the main menu. Navigate to the compass mode by using the left button, allowing you to enable directional display directly on the mirror interface.
NOTE
The main menu will only be available when the Subaru Ascent transmission selector is in the "P" (Park) position. This restriction ensures that system adjustments are performed safely while the vehicle is stationary.
To turn the compass feature on/ off
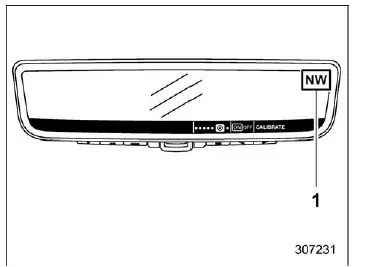
- Compass
Select either "ON" or "OFF" using the center button to control the compass display feature in the Subaru Ascent according to your driving preferences.
Compass calibration
If the compass reading in your Subaru Ascent appears inaccurate or unstable, recalibration is required to restore precise directional guidance.
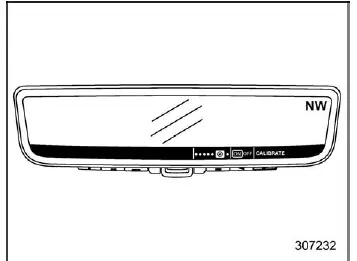
1. Navigate to the calibration setting by selecting "CALIBRATE" using the right button.
2. Initiate the calibration process by pressing the center button.
3. Confirm the operation by selecting "Continue" with the center button.
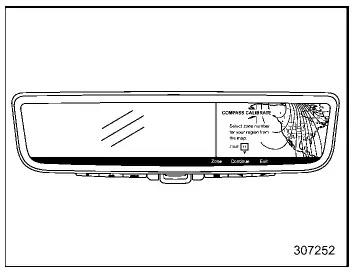
4. Choose your current geographic region using the left button to ensure accurate calibration based on location.
5. Press "Continue" again using the center button to proceed.
6. When the display shows the letter "C", slowly drive the Subaru Ascent in a circular path. This motion allows the system to recalibrate and determine accurate directional orientation. Continue driving in circles until the calibration process is complete and the compass returns to normal operation.
The Subaru Ascent compass system is designed to provide reliable directional information in a variety of driving environments, and periodic calibration helps maintain its accuracy, especially after changes in location or magnetic conditions.
 Brightness adjustment
Setting button: Press the setting button to activate brightness adjustment
mode.
Press this button to decrease the brightness.
Press this button to increase the brightness.
In the Sub ...
 HomeLink Wireless Control System
The HomeLink Wireless Control System in the Subaru Ascent offers a highly convenient
and integrated solution for replacing up to three separate hand-held radio-frequency
remotes. This advanced sys ...
Other materials:
Procedure
CONTINUOUSLY VARIABLE TRANSMISSION(TR580) > Preparation for OverhaulPROCEDURE1. Clean the transmission exterior.2. Remove the torque converter assembly. Torque Converter Assembly">3. Attach the ST on the transmission.ST 18632AA000STAND ASSY4. Remove the transmission case cover on the ...
Removal
FUEL INJECTION (FUEL SYSTEMS)(H4DO) > Front Oxygen (A/F) SensorREMOVAL1. Disconnect the ground cable from battery.2. Remove the radiator sub fan and fan motor assembly. Radiator Sub Fan and Fan Motor > REMOVAL">3. Lift up the vehicle.4. Remove the under cover. Front Under Cover > ...
Safety precautions
WARNING
Bulbs may become very hot while
illuminated. Before replacing
bulbs, turn off the lights and wait
until the bulbs cool down. Otherwise,
there is a risk of sustaining
a burn injury.
For models with HID low beam
headlights, observe the following
precautions. Not doing so carries
the ...
