
Subaru Crosstrek Service Manual: Replacement
CLUTCH SYSTEM > Clutch Fluid
REPLACEMENT
CAUTION:
• Be careful not to spill the brake fluid. Brake fluid spilled on the vehicle body will harm the paint surface; wash it off with water and wipe clean quickly if spilled.
• Use new FMVSS No. 116 DOT3 or DOT4.
• Cover the air bleeder with cloth to prevent brake fluid from being splashed on surrounding parts when loosening the bleeder.
• Avoid mixing brake fluid of different brands to prevent fluid performance from degrading.
• Be careful not to allow dirt or dust to enter the reservoir tank.
NOTE:
• During the bleeding operation, keep the reservoir tank filled with brake fluid to prevent entry of air.
• Clutch pedal must be operated very slowly.
• Bleed air from the oil line with help of a co-worker.
• The required amount of brake fluid is approximately 150 mL (5.1 US fl oz, 5.3 Imp fl oz) for total clutch system.
1. Remove the clip (A) from the air intake boot.
2. Loosen the clamp (B) connecting the air intake boot and air cleaner case (rear).
3. Loosen the clamp (C) which connects the air intake boot and throttle body.
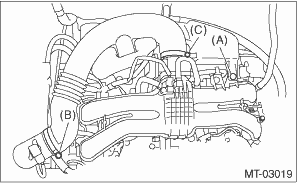
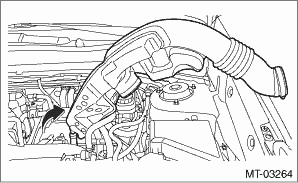
4. Remove the air intake boot from the throttle body, and move it to the left side wheel apron.
5. Drain the brake fluid from the air bleeder of the operating cylinder.
6. Refill the reservoir tank with recommended brake fluid.
Recommended brake fluid:
New FMVSS No. 116 DOT3 or DOT4
7. Bleed air from brake fluid. Clutch Fluid Air Bleeding">
8. Install the air intake boot. Air Intake Boot > INSTALLATION">
 Inspection
CLUTCH SYSTEM > Clutch FluidINSPECTIONCAUTION:Be careful not to spill the brake fluid. Brake fluid spilled on the vehicle body will harm the paint surface; wash it off with water and wipe clean qui ...
 Clutch pedal
...
Other materials:
Welcome screen and Good-bye screen
When the driver's door is opened and
closed after unlocking the door, the
welcome screen will appear on the multi
information display for approximately 20
seconds.
When the ignition switch is turned to the
"LOCK"/"OFF" position, the multi information
display gradually turns off (Good-bye
s ...
How to use keyless access functions
Keyless access function tips
Turn off the push-button ignition switch
before locking the doors (including rear
gate) using the keyless access function. It
is not possible to lock the doors (including
the rear gate) using the keyless access
function when the push-button ignition
switc ...
Dome light and cargo area light
Dome light
Cargo area light
1. Remove the lens by prying the edge of
the lens with a flat-head screwdriver.
2. Pull the bulb out of the socket.
3. Install a new bulb.
4. Reinstall the lens.
Other bulbs
It may be difficult to replace the bulbs.
Have the bulbs replaced by your
...
