Subaru Crosstrek Service Manual: Removal
MANUAL TRANSMISSION AND DIFFERENTIAL(5MT) > Front Differential Assembly
REMOVAL
1. Remove the manual transmission assembly from the vehicle. Manual Transmission Assembly > REMOVAL">
2. Remove the transfer case together with the extension case assembly. Transfer Case and Extension Case Assembly > REMOVAL">
3. Remove the transmission case. Transmission Case > REMOVAL">
4. Remove the drive pinion shaft assembly. Drive Pinion Shaft Assembly > REMOVAL">
5. Remove the main shaft assembly. Main Shaft Assembly > REMOVAL">
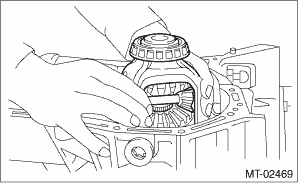
6. Remove the front differential assembly.
NOTE:
• Do not confuse the right and left taper roller bearing outer races.
• Be careful not to damage the oil seal of differential side retainer.

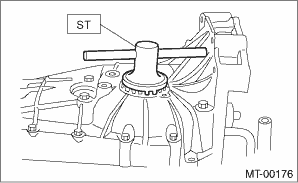
7. Remove the differential side retainers using ST.
| ST 18630AA010 | WRENCH COMPL RETAINER |

8. Remove the taper roller bearing outer race from the transmission case.
| ST 398527700 | PULLER ASSY |
 Adjustment
MANUAL TRANSMISSION AND DIFFERENTIAL(5MT) > Front Differential AssemblyADJUSTMENT1. DIFFERENTIAL BEVEL PINION GEAR BACKLASH1. Disassemble the front differential assembly. Front Differential Assemb ...
 Assembly
MANUAL TRANSMISSION AND DIFFERENTIAL(5MT) > Front Differential AssemblyASSEMBLY1. DIFFERENTIAL CASE ASSEMBLY1. Install the differential bevel gear and differential bevel pinion together with adjust ...
Other materials:
Specification
MECHANICAL(H4DO) > General DescriptionSPECIFICATIONEngineModel2.0 LCylinder arrangementHorizontally opposed, liquid cooled, 4-cylinder,4-stroke gasoline engineValve system mechanismChain driven, double overhead camshaft, 4-valve/cylinderBore ? Strokemm (in)84.0 ? 90.0 (3.31 ? 3.54)Displacementcm3 ...
Installation
HVAC SYSTEM (HEATER, VENTILATOR AND A/C) > FRESH/RECIRC Door ActuatorINSTALLATIONCAUTION:• After installing the grille assembly - ventilation RH, check that the air vent grille of the grille assembly - ventilation RH is inserted correctly into the air vent duct.• Before handling the a ...
Removal
HVAC SYSTEM (HEATER, VENTILATOR AND A/C) > Sunload Sensor (Auto A/C Model)REMOVALCAUTION:Be careful not to damage the sensors and interior trims when removing.1. Disconnect the ground cable from battery. NOTE">2. Remove the sunload sensor.(1) Release the connectors and claws, and then re ...
