
Subaru Crosstrek Service Manual: Removal
HVAC SYSTEM (HEATER, VENTILATOR AND A/C) > Blower Motor Unit Assembly
REMOVAL
CAUTION:
Before handling the airbag system components, refer to “CAUTION” of “General Description” in “AIRBAG SYSTEM”. General Description > CAUTION">
1. Disconnect the ground cable from battery and wait for at least 60 seconds before starting work. NOTE">
2. Remove the glove box. Glove Box > REMOVAL">
3. Remove the engine control module (ECM). Engine Control Module (ECM) > REMOVAL">
4. Remove the blower motor unit assembly.
(1) Release the claws, and then remove the grille assembly - ventilation RH.
(2) Disconnect the blower motor relay and each connector.
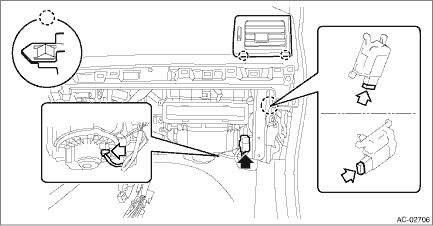
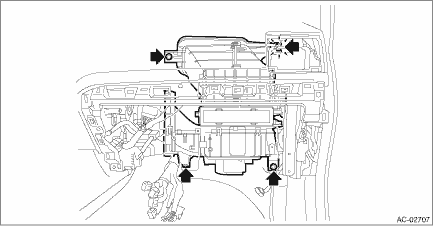
(3) Remove the bolts and nuts to remove blower motor unit assembly.
NOTE:
Remove the RH upper nut from the mounting portion of the grille assembly - ventilation RH.
 Installation
HVAC SYSTEM (HEATER, VENTILATOR AND A/C) > Blower Motor Unit AssemblyINSTALLATIONCAUTION:• Before handling the airbag system components, refer to “CAUTION” of “General Descr ...

Other materials:
Diagnostic procedure for subaru select monitor communication Communication for initializing impossible
HVAC SYSTEM (AUTO A/C) (DIAGNOSTICS) > Diagnostic Procedure for Subaru Select Monitor CommunicationCOMMUNICATION FOR INITIALIZING IMPOSSIBLEDiagnosis:Defective CAN communication circuitTrouble symptom:• LAN system is abnormal.• Communication failure between Subaru Select Monitor and A ...
Note
HVAC SYSTEM (HEATER, VENTILATOR AND A/C) > Air Conditioning SystemNOTEFor procedure of each component in the air conditioning system, refer to the respective section.• Blower motor unit assembly: Blower Motor Unit Assembly">• Blower motor: Blower Motor">• Power ...
Installation
CLUTCH SYSTEM > FlywheelINSTALLATION1. Press in a new pilot bearing to the position where it is flush with the flywheel surface or up to 0.4 mm (0.016 in) deeper than that.CAUTION:Do not press the bearing inner ring.(A)Pilot bearing2. Temporarily tighten the crankshaft position sensor plate and f ...
