Subaru Crosstrek Service Manual: Installation
CLUTCH SYSTEM > Flywheel
INSTALLATION
1. Press in a new pilot bearing to the position where it is flush with the flywheel surface or up to 0.4 mm (0.016 in) deeper than that.
CAUTION:
Do not press the bearing inner ring.

(A) | Pilot bearing |
2. Temporarily tighten the crankshaft position sensor plate and flywheel.
NOTE:
Align the knock pin hole of the crankshaft position sensor plate to the knock pin of the crankshaft to secure the knock pin.
3. Attach the ST.
| ST 498497100 | CRANKSHAFT STOPPER |
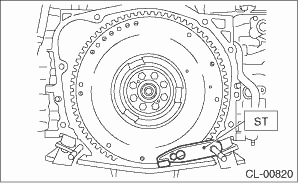
4. Tighten the flywheel mounting bolts in two stages.
(1) Tighten the flywheel attachment bolts.
Tightening torque:
30 N·m (3.1 kgf-m, 22.1 ft-lb)
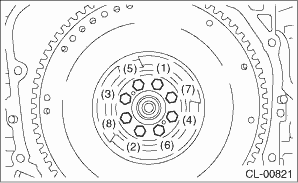
(2) While checking the tightening angle with the angle gauge, further tighten the flywheel mounting bolts.
Tightening angle:
30° — 35°
5. Install the clutch disc and clutch cover. Clutch Disc and Cover > INSTALLATION">
6. Install the transmission assembly. Manual Transmission Assembly > INSTALLATION">
 Removal
CLUTCH SYSTEM > FlywheelREMOVAL1. Remove the transmission assembly. Manual Transmission Assembly > REMOVAL">2. Remove the clutch cover and clutch disc. Clutch Disc and Cover > REMOV ...

Other materials:
Preparation tool
POWER ASSISTED SYSTEM (POWER STEERING) (DIAGNOSTICS) > General DescriptionPREPARATION TOOL1. SPECIAL TOOLILLUSTRATIONTOOL NUMBERDESCRIPTIONREMARKS — SUBARU SELECT MONITOR 4Used for setting of each function and troubleshooting for electrical system.NOTE:For detailed operation procedures of Subar ...
GVWR and GAWR (Gross Vehicle Weight Rating and Gross Axle Weight
Rating)
Certification label
The certification label attached to the
bottom of driver's side door pillar shows
GVWR (Gross Vehicle Weight Rating) and
GAWR (Gross Axle Weight Rating).
The GVW (Gross Vehicle Weight) must
never exceed the GVWR. GVW is the
combined total of weight of the vehicle,
f ...
Dtc p0716 input/turbine shaft speed sensor "a" circuit range/performance
CONTINUOUSLY VARIABLE TRANSMISSION (DIAGNOSTICS) > Diagnostic Procedure with Diagnostic Trouble Code (DTC)DTC P0716 INPUT/TURBINE SHAFT SPEED SENSOR "A" CIRCUIT RANGE/PERFORMANCEDTC detecting condition:Immediately at fault recognitionTrouble symptom:• No lock-up occurs.• Sho ...
