Subaru Crosstrek Service Manual: Removal
GLASS/WINDOWS/MIRRORS > Rear Door Glass
REMOVAL
1. Disconnect the ground cable from battery. NOTE">
2. Remove the trim panel - rear door. Door Trim > REMOVAL">
3. Remove the sealing cover - rear door. Rear Sealing Cover > REMOVAL">
4. Attach the battery ground cable and the switch - power window, and turn the ignition switch to ON.
5. Remove the glass assembly - rear door.
(1) Operate the switch - power window sub rear to move the glass assembly - rear door to the lowest position.
(2) Remove the running channel - rear door.
(3) Remove the screws and bolts, and then remove the sash COMPL - rear partition.
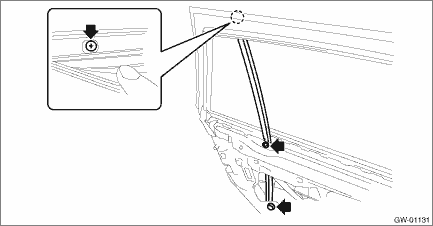
(4) Remove the glass - rear door partition.

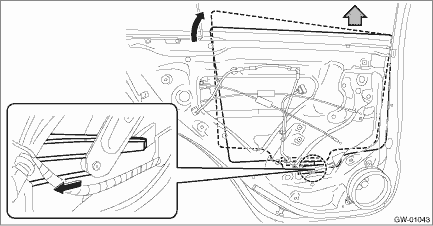
(5) While tilting the glass assembly - rear door, remove the guide from the roller of the regulator and motor assembly - rear, then remove the glass assembly - rear door.
CAUTION:
Avoid impact and damage to the glass assembly - rear door.
 Installation
GLASS/WINDOWS/MIRRORS > Rear Door GlassINSTALLATIONCAUTION:• Check that the running channel - rear door is securely fixed to the panel assembly - rear door and to the sash COMPL - rear partit ...
 Rear gate glass
...
Other materials:
Tire replacement
The tires and wheels of your Subaru Ascent are carefully selected to match the
vehicle’s design characteristics, ensuring optimal handling, comfort, and durability.
Replacing them with incorrect specifications can negatively impact performance and
safety.
Always use tires that match the ori ...
Dtc c0042 power supply voltage failure
VEHICLE DYNAMICS CONTROL (VDC) (DIAGNOSTICS) > Diagnostic Procedure with Diagnostic Trouble Code (DTC)DTC C0042 POWER SUPPLY VOLTAGE FAILUREDTC detecting condition:Improper VDCCM&H/U power supply voltageTrouble symptom:• ABS does not operate.• EBD may not operate.• VDC does ...
Dtc c0063 normal closing valve 1 malfunction
VEHICLE DYNAMICS CONTROL (VDC) (DIAGNOSTICS) > Diagnostic Procedure with Diagnostic Trouble Code (DTC)DTC C0063 NORMAL CLOSING VALVE 1 MALFUNCTIONNOTE:For the diagnostic procedure, refer to “C0064 NORMAL CLOSING VALVE 2 MALFUNCTION”. Diagnostic Procedure with Diagnostic Trouble Code ...
