Subaru Crosstrek Service Manual: Removal
EXTERIOR/INTERIOR TRIM > Side Garnish
REMOVAL
1. Remove the clips and detach the side garnish assembly.
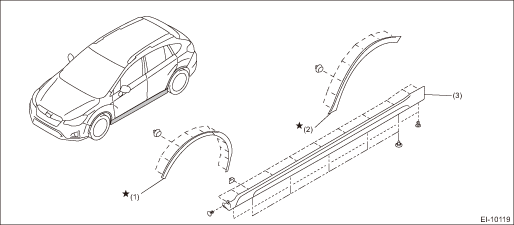
(1) | Garnish ASSY - fender | (2) | Garnish ASSY - rear quarter | (3) | Garnish ASSY - side sill |
2. Remove the garnish assembly or protector on the fender panel.
CAUTION:
Do not reuse the garnish assembly and protector that have been deformed during removal.
(1) Attach the protective tape to the periphery of the garnish and protector.
(2) Heat the garnish and protector sections for 3 — 5 minutes at 40 — 60°C using a heat light or a drier.
CAUTION:
Be careful not to burn yourself.
(3) Separate the bonded part of double sided tape with a nylon cord or equivalent.
(4) Release the clips, and remove the garnish assembly and protector.
 Installation
EXTERIOR/INTERIOR TRIM > Side GarnishINSTALLATIONCAUTION:Do not reuse the garnish assembly. Deformation occurs on the garnish assembly when once removed, and this may cause improper adhesion.1. Ins ...
 Sun visor
...
Other materials:
Note
LIGHTING SYSTEM > Back-up Light SystemNOTEFor operation procedures of each component of the back-up light system, refer to the respective section.• Rear combination light assembly: Rear Combination Light Assembly">• Back-up light bulb: Back-up Light Bulb"> ...
Removal
SECURITY AND LOCKS > Remote OpenersREMOVAL1. FRONT HOOD OPENER1. Remove the opener handle.(1) Remove the cable.(2) Remove the bolt, and remove the opener handle.2. After removing the following parts, attach a string to the end of the cable - front hood and remove the cable clip and the cable.&bul ...
Inspection
CONTINUOUSLY VARIABLE TRANSMISSION(TR580) > Turbine Speed SensorINSPECTION1. Set the ST between the TCM and bulkhead harness.ST 18460AA040CHECK BOARD2. Set the probe of oscilloscope to the check board connector.Connector & terminalNo. 12 (+) — No. 42 (−):(A)+ probe(B)− probe3 ...
