Subaru Crosstrek Service Manual: Removal
DRIVE SHAFT SYSTEM > Propeller Shaft
REMOVAL
CAUTION:
• Before removing propeller shaft, wrap metal parts with a cloth or rubber material.
• Do not disassemble the center EDJ of the propeller shaft.
• Before removing propeller shaft, wrap the metal parts attached to the rubber boot of center EDJ with a cloth or rubber material, as shown in the figure. The rubber boot may be damaged due to interference with adjacent metal parts while bending the EDJ during removal.

1. Shift the select lever or gear shift lever to neutral.
2. Release the parking brake.
3. Lift up the vehicle.
4. Remove the under cover - front. Front Under Cover > REMOVAL">
5. Remove the center exhaust pipe, rear exhaust pipe, and muffler.
• Center exhaust pipe & rear exhaust pipe: Rear Exhaust Pipe > REMOVAL">
• Muffler: Muffler > REMOVAL">
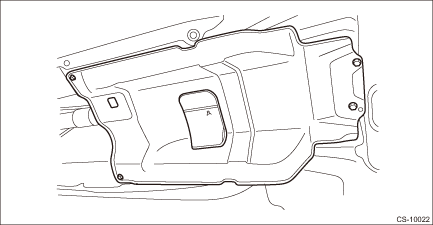
6. Remove the bolts, and then remove the center exhaust cover.
7. Remove the propeller shaft assembly.
CAUTION:
Do not disassemble the propeller shaft.
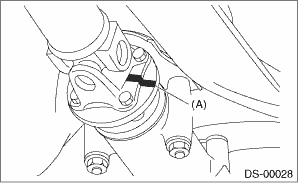
(1) Place alignment marks (A) on the flange yoke and rear differential.
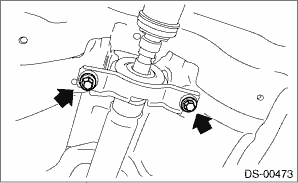
(2) Remove four bolts holding the propeller shaft to the rear differential.
(3) Remove the center bearing.
(4) Remove the propeller shaft from transmission.
CAUTION:
Be careful not to damage oil seals and contact surface of the sleeve yoke.
NOTE:
• Use a container to catch CVTF or oil flowing from propeller shaft.
• To prevent CVTF from leaking, install extension cap etc. to the transmission.
 Inspection
DRIVE SHAFT SYSTEM > Propeller ShaftINSPECTIONCheck the propeller shaft with the propeller shaft installed to the vehicle.1. Remove the front exhaust pipe. Front Exhaust Pipe > REMOVAL"> ...
 Installation
DRIVE SHAFT SYSTEM > Propeller ShaftINSTALLATION1. Before installation, check the following items, and replace the propeller shaft assembly as necessary.• Dents or cracks on the tube surface& ...
Other materials:
Check list for interview Check
BODY CONTROL SYSTEM (DIAGNOSTICS) > Check List for InterviewCHECKInspect the following items regarding the vehicle’s state.Body Control System Check List for Interview Date of Vehicle Bring-in Year Month Day Customer’s ...
Dtc b1012 battery backup power supply
BODY CONTROL SYSTEM (DIAGNOSTICS) > Diagnostic Procedure with Diagnostic Trouble Code (DTC)DTC B1012 BATTERY BACKUP POWER SUPPLYDTC detecting condition:Voltage failure caused by poor contact of battery power supply backup circuitsTrouble symptom:Illuminations for the keyless entry, map light, lug ...
Features
In the Subaru Ascent, all essential vehicle data and system controls are intelligently
integrated into the center information display, providing the driver with a unified
and highly intuitive interface. This display presents a wide range of information,
including vehicle settings, real-time ve ...
