Subaru Crosstrek Service Manual: Removal
CONTROL SYSTEMS > AT Shift Lock Solenoid and “P” Range Switch
REMOVAL
1. SOLENOID UNIT
1. Remove the AT select lever. Select Lever > REMOVAL">
2. Remove the spacer and gasket. Select Lever > DISASSEMBLY">
3. Using a flat tip screwdriver with a thin tip, remove the harness connector from the plate COMPL.
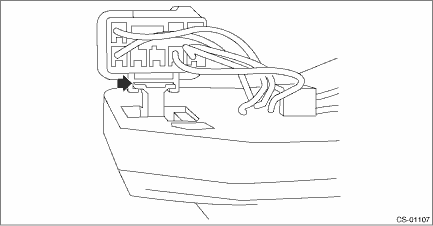
4. Raise the claw using a flat tip screwdriver with a thin tip, and remove the solenoid unit from the plate COMPL.
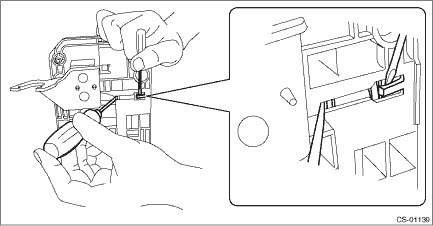
5. Remove the terminal of the solenoid unit using a flat tip precision screwdriver with a tip width of 1.3 mm (0.05 in) or less, KTC connector terminal tool ECC-1T or equivalent.
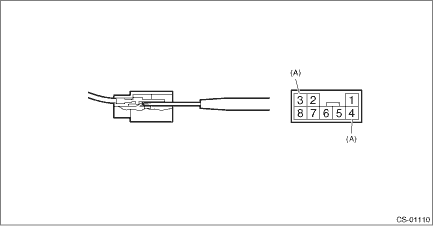
(A) | Solenoid unit terminals |
2. “P” RANGE SWITCH
For the removal of “P” range switch, refer to the procedure for AT select lever. Select Lever > DISASSEMBLY">
 Inspection
CONTROL SYSTEMS > AT Shift Lock Solenoid and “P” Range SwitchINSPECTIONSTEPCHECKYESNO1.CHECK SOLENOID UNIT.Measure the resistance of solenoid unit connector terminals.TerminalsNo. 4 — ...
 Installation
CONTROL SYSTEMS > AT Shift Lock Solenoid and “P” Range SwitchINSTALLATIONInstall in the reverse order of removal.NOTE:Insert the solenoid unit terminals to the harness connector.(A)Sole ...
Other materials:
Wiring diagram
ENTERTAINMENT > Navigation SystemWIRING DIAGRAMRefer to “Navigation System” in the wiring diagram.• Model without telematics: Navigation System > WIRING DIAGRAM">• Model with telematics: Navigation System > WIRING DIAGRAM"> ...
Removal
GLASS/WINDOWS/MIRRORS > Rearview MirrorREMOVALCAUTION:• Be careful not to damage the mirror surface and the glass - front window.• Do not remove the base - inner mirror from the glass - front window.1. Release the claws, and then remove the cover.2. Release the lock lever, and slide t ...
Inspection
FUEL INJECTION (FUEL SYSTEMS)(H4DO) > Knock SensorINSPECTION1. Check that the knock sensor has no deformation, cracks or other damages.2. Measure the resistance between knock sensor terminals.Terminal No.Standard1 and 2560±28 k? ...
