Subaru Crosstrek Service Manual: Key lock cylinders Replacement
SECURITY AND LOCKS > Key Lock Cylinders
REPLACEMENT
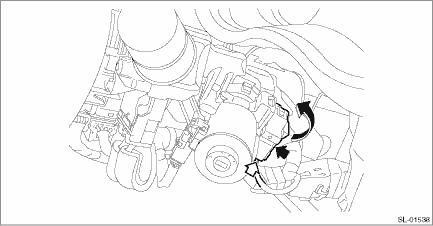
1. STEERING LOCK
1. Disconnect the ground cable from battery. NOTE">
2. Remove the cover assembly - column.
(1) Remove the screws by turning the steering wheel to right and left.
(2) Release the claw, and remove the cover assembly - column UPR and the cover assembly - column LWR.

3. Remove the immobilizer antenna assembly or the ignition switch illumination. Immobilizer Antenna > REMOVAL">
4. Remove the key lock solenoid.
(1) Disconnect the connector.
(2) Remove the screws and remove the key lock solenoid.
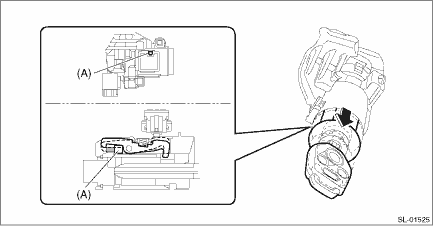
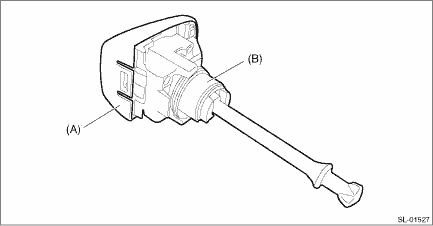
5. Replace the key cylinder.
(1) Insert the key into the key cylinder, and turn the key to the ACC position.
(2) Insert a flat tip screwdriver from the steering lock frame hole (A), and pull the key cylinder until the key cylinder claws touch the steering lock frame stopper (B).
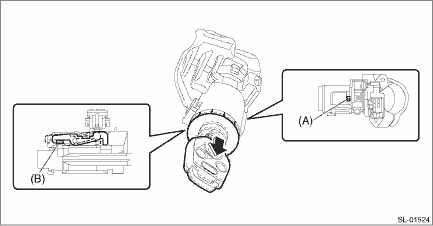
(3) Insert a flat tip screwdriver from the steering lock frame hole (A), and release the claws to pull out the key cylinder.
6. Install each part in the reverse order of removal.
2. FRONT DOOR
1. Raise the glass assembly - front door to the top position.
2. Remove the cover - handle front outer.
Preparation tool:
TORX® T30
(1) Remove the plug at the rear end of the panel assembly - front door.
(2) Loosen the TORX® bolt and remove the cover - handle front outer.
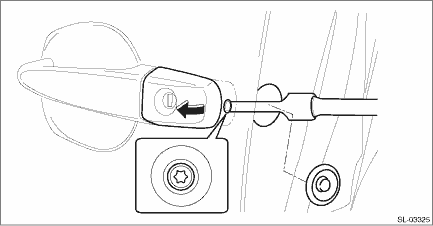
3. Remove the key cylinder (B) from the cover - handle front outer (A), and replace the key cylinder.
4. Install each part in the reverse order of removal.
CAUTION:
When installing the cover - handle front outer on driver’s side, make sure that the key cylinder shaft is correctly inserted into the latch & actuator assembly - front.
Tightening torque:
Refer to “COMPONENT” of “General Description”. General Description > COMPONENT">
3. GLOVE BOX LID
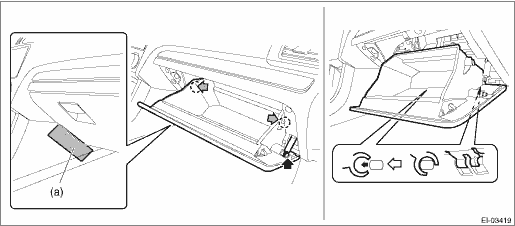
1. Remove the pocket assembly.
(1) Attach the protective tape (a) to the panel center LWR.
(2) Remove the damper COMPL - pocket.
(3) Release the stoppers and remove the pocket assembly by pulling it toward you.
2. Replace the key cylinder.
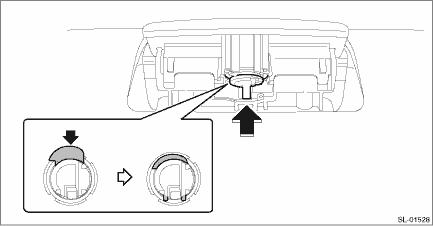
(1) Pull up the lock knob.
(2) Push out the key cylinder from the pocket assembly while pressing in the metal plate.
3. Install each part in the reverse order of removal.
 Immobilizer control module Note
SECURITY AND LOCKS > Immobilizer Control ModuleNOTEThe control of immobilizer system is carried out in body integrated unit. Refer to the section on the body integrated unit for the work procedures ...
 Keyless access with push button start system Diagnostic procedure with phenomenon
SECURITY AND LOCKS > Keyless Access With Push Button Start SystemDIAGNOSTIC PROCEDURE WITH PHENOMENONRefer to “Diagnostics with Phenomenon” of “KEYLESS ACCESS WITH PUSH BUTTON STA ...
Other materials:
Component
INTAKE (INDUCTION)(H4DO) > General DescriptionCOMPONENT(1)Air intake duct(8)Air cleaner case (rear)Tightening torque: N·m (kgf-m, ft-lb)(2)Clip(9)ClipT1:1 (0.1, 0.7)(3)Cushion(10)Mass air flow and intake air temperature sensorT2:3 (0.3, 2.2)(4)Air cleaner case (front)(11)ClampT3:6 (0.6, 4. ...
Removal
AIRBAG SYSTEM > Side Airbag ModuleREMOVALCAUTION:Before handling the airbag system components, refer to “CAUTION” of “General Description” in “AIRBAG SYSTEM”. General Description > CAUTION">NOTE:Remove the passenger’s side by referring to driv ...
Adjustment
CLUTCH SYSTEM > Clutch PedalADJUSTMENT1. Turn the lock nut until the full stroke of clutch pedal becomes within the specification.CAUTION:When adjusting the full stroke of clutch pedal, do not turn the clutch switch.NOTE:If the lock nut cannot adjust the full stroke of clutch pedal to the specifi ...
