Subaru Ascent 2018-2026 Owner's Manual: Installing child restraint systems with ALR/ELR seatbelt
In the Subaru Ascent, proper installation of a child restraint system using the ALR/ELR seatbelt is critical for ensuring maximum safety. The ALR (Automatic Locking Retractor) function allows the seatbelt to securely hold the child seat in place, preventing movement during sudden stops or collisions.
CAUTION
- When installing a child restraint system in the Subaru Ascent, always
strictly follow the manufacturer’s instructions provided with the child seat.
After installation, verify that the system is firmly secured. A loose installation may significantly increase the risk of injury to the child in the event of an accident.
- When installing a child restraint system in the rear center seating position
of the Subaru Ascent, ensure both seatbacks are fully returned to their original
upright positions.
Failure to do so may prevent proper securing of the child restraint system, which could lead to serious injury or death during sudden braking or a collision.
Installing a rearward facing child restraint system
WARNING
- NEVER INSTALL A CHILD RESTRAINT SYSTEM IN THE FRONT PASSENGER SEAT OF
THE SUBARU ASCENT.
The SRS airbag can deploy with significant force and may cause serious injury or death if a child is positioned too close.
- Before installing a child restraint system in the Subaru Ascent, confirm
that the seatback is securely locked into place.
If the seatback is not properly secured, it may collapse during an accident, resulting in severe injury.
1. If the seat in the Subaru Ascent is equipped with a sliding mechanism, move it as far back as possible to provide sufficient installation space.
2. Position the child restraint system in the appropriate rear seating location of the Subaru Ascent.
NOTE
If the child restraint system cannot be installed due to interference with the head restraint, remove the head restraint temporarily to ensure proper fit.
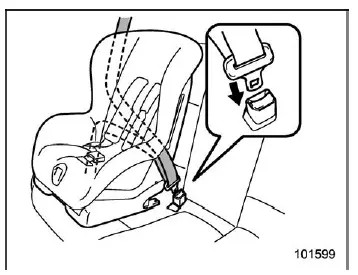
3. Route the lap and shoulder belt through or around the child restraint system according to the manufacturer’s instructions.
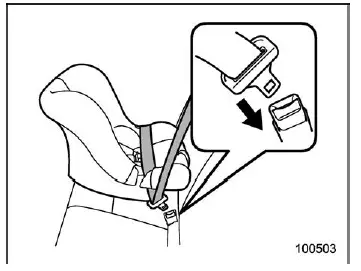
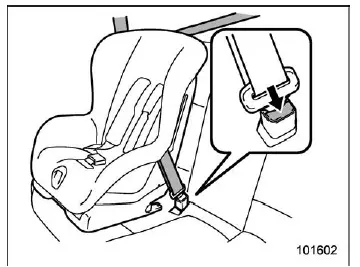
4. Insert the tongue plate into the buckle until a clear clicking sound confirms proper engagement.
5. Remove any slack from the lap portion of the seatbelt to ensure a tight fit.
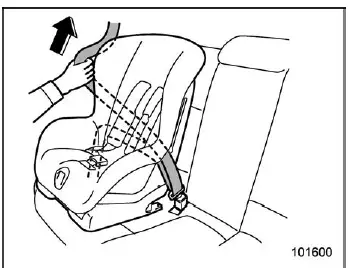
6. If required by the child restraint system manufacturer, switch the Subaru Ascent seatbelt to ALR mode using the following steps.
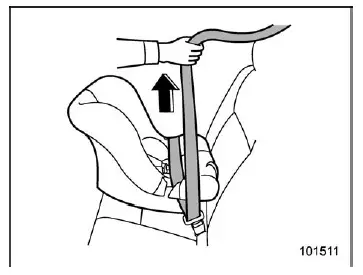
- Pull the seatbelt fully out from the retractor to switch from ELR mode to ALR mode.
- Allow the belt to retract slowly. A clicking sound will indicate that the ALR function is active.
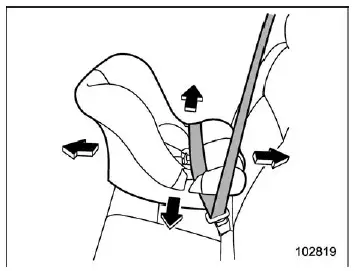
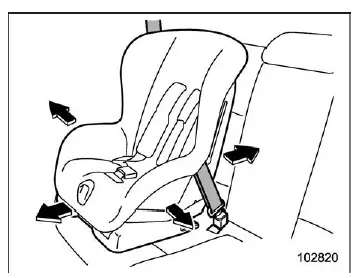
7. Before placing the child in the seat, test the installation in the Subaru Ascent by attempting to move the child restraint system in all directions.
It should not move more than 1 inch (2.5 cm). For a tighter installation, press the child restraint system firmly into the seat cushion while tightening the belt.
8. If ALR mode has been activated, pull the shoulder belt to confirm that it cannot extend further, ensuring proper locking function.
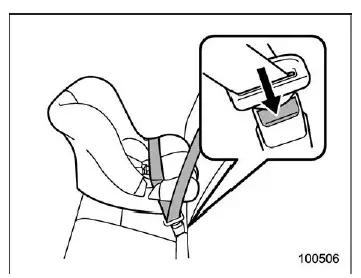
9. To remove the child restraint system from the Subaru Ascent, press the buckle release button and allow the seatbelt to retract fully. This will return the system to ELR mode.
NOTE
After removing the child restraint system, always allow the seatbelt in the Subaru Ascent to fully retract to restore ELR functionality before normal use.
Installing a forward facing child restraint system
WARNING
- NEVER INSTALL A CHILD RESTRAINT SYSTEM IN THE FRONT PASSENGER SEAT OF
THE SUBARU ASCENT.
This position is unsafe due to airbag deployment and may result in serious injury or death.
- Always confirm that the seatback in the Subaru Ascent is securely locked
before installation.
An unsecured seatback can compromise the effectiveness of the child restraint system during an accident.
The Subaru Ascent is engineered with advanced seatbelt systems, but proper installation of child restraint systems remains essential to ensure the highest level of safety for young passengers.
1. If the seat in the Subaru Ascent is equipped with a sliding function, move it as far back as possible to create sufficient space for proper installation of the child restraint system.
2. Carefully position the child restraint system in the rear seating area of the Subaru Ascent, which is the safest location for child passengers.
3. If there is any gap between the child restraint system and the seatback, adjust the angle of the seatback until firm and consistent contact is achieved, ensuring stability.
4. If the child restraint system comes into contact with the head restraint in the Subaru Ascent, raise the head restraint to its fully extended position. If interference remains, remove the head restraint to allow proper installation.
CAUTION
Store any removed head restraint securely in the cargo area of the Subaru Ascent. Never leave it loose in the passenger compartment, as it may become a dangerous projectile during sudden braking or sharp turns.
WARNING
If installing a child restraint system in the rear center seating position of the Subaru Ascent, and it does not fit snugly against the seat cushion contours, relocate it to a window-side seat position for improved safety and secure installation.
5. Route the lap and shoulder belt through or around the child restraint system according to the manufacturer’s instructions provided with the system.
- When installing a child restraint system in the Subaru Ascent third-row center seating position, ensure the seatbelt is properly routed through the comfort guide. Refer to the "Third-row center seatbelt" section for additional details.
6. Insert the tongue plate into the buckle until a distinct clicking sound confirms proper engagement.
7. Remove slack from the lap belt portion to achieve a tight and secure fit in the Subaru Ascent.
8. Fully extend the seatbelt from the retractor to switch the system from Emergency Locking Retractor (ELR) mode to Automatic Locking Retractor (ALR) mode. Then allow the belt to retract slowly. Audible clicks will indicate that ALR mode is active.
9. Before placing a child in the restraint system, test its stability in the Subaru Ascent by attempting to move it forward, backward, and side to side.
For maximum safety, the child restraint system should not move more than 1 inch (2.5 cm). Applying downward pressure while tightening the belt can improve stability.
10. Pull on the shoulder portion of the seatbelt to confirm that it cannot extend further, ensuring that the ALR mechanism is functioning correctly in the Subaru Ascent.
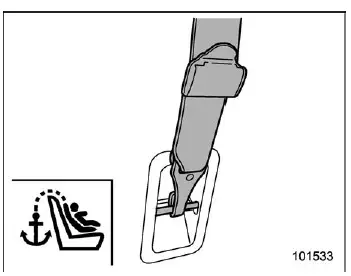
11. Attach the tether hook to the designated tether anchorage located behind the second-row or third-row seat in the Subaru Ascent and tighten it firmly for additional stability.
- If the head restraint remains installed, route the tether strap between the head restraint supports to avoid interference.
12. To remove the child restraint system from the Subaru Ascent, press the seatbelt buckle release button and allow the belt to retract fully. This action will automatically return the system to ELR mode.
NOTE
After removing the child restraint system, always ensure the seatbelt in the Subaru Ascent fully retracts to restore normal ELR operation before regular use.
Proper installation of a child restraint system in the Subaru Ascent is essential for ensuring maximum safety and protection for young passengers during every journey.
 Choosing a child restraint system
When selecting a child restraint system for the Subaru Ascent, it is essential
to choose a model that matches the child’s age, weight, and height to ensure maximum
safety and proper protecti ...
 Installing a booster seat or booster cushion
Booster seat
Booster cushion
The Subaru Ascent provides a सुरक्षित and flexible environment for installing
booster seats and booster cushions, ensuring proper seatbelt posi ...
Other materials:
Inspection
SEAT BELT SYSTEM > Rear Seat BeltINSPECTION1. VISUAL INSPECTIONCheck for the following, and replace with new parts if necessary.• Seat belt is slackened, bent or worn.• Seat belt is abnormally wound or extended.• Seat belt inner - rear is deformed or damaged.• Seat belt bu ...
Installation
BRAKE > Master CylinderINSTALLATION1. Replace the seal sub assembly for the master cylinder assembly with a new part.CAUTION:Be careful not to install the seal sub assembly in the wrong location.(a)Primary piston(b)Seal sub ASSY(c)Install the seal sub assembly to this surface.2. Install each part ...
Inspection
SECURITY AND LOCKS > Keyless Access Outdoor AntennaINSPECTION1. Check the setting by performing Keyless access system check using the Subaru Select Monitor. Keyless Access System Check > OPERATION">2. Disconnect the Subaru Select Monitor. While bringing the access key, operate the tou ...
