Subaru Ascent 2018-2026 Owner's Manual: Installing a booster seat or booster cushion
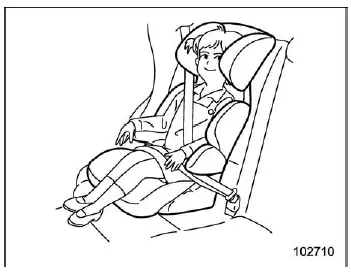
Booster seat
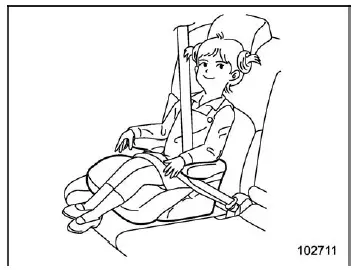
Booster cushion
The Subaru Ascent provides a सुरक्षित and flexible environment for installing booster seats and booster cushions, ensuring proper seatbelt positioning and enhanced safety for growing children. Correct installation in the Subaru Ascent is essential to achieve maximum protection during everyday driving and emergency situations.
WARNING
Before installing a booster seat or booster cushion in the Subaru Ascent, always verify that the seatback is securely locked in place. An unsecured seatback may collapse during an accident, leading to serious injury or death.
1. If the Subaru Ascent seat includes a sliding mechanism, move it as far back as possible to create sufficient installation space and improve safety positioning.
2. Adjust the head restraint according to the type of booster being used.
For booster seat:
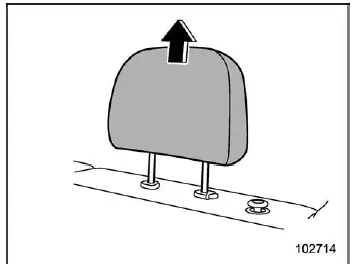
Raise the head restraint to its fully extended position. If the booster seat still contacts the head restraint, remove it to ensure a proper fit in the Subaru Ascent.
CAUTION
Any removed head restraint in the Subaru Ascent must be stored securely in the cargo area. Never leave it inside the passenger compartment, as it may become a dangerous object during sudden braking or sharp turns.
For booster cushion: Raise the head restraint to the extended position. Do not remove the head restraint when using a booster cushion in the Subaru Ascent.
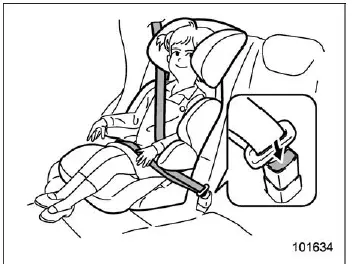
3. Place the booster seat or booster cushion in the rear seat of the Subaru Ascent and seat the child on it. Ensure the child sits fully back against the seatback for proper posture and safety.
4. If there is any gap between the booster system and the seatback, adjust the seatback angle until firm contact is achieved.
5. Route the lap and shoulder belt through or around the booster seat/cushion and the child, following the manufacturer’s instructions. If the booster is equipped with a belt guide, ensure the seatbelt passes through it correctly for optimal positioning in the Subaru Ascent.
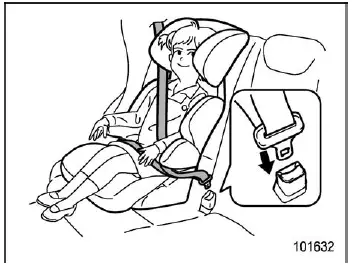
6. Insert the tongue plate into the buckle until a clear click is heard. Ensure the seatbelt is not twisted during this process.
Make sure the shoulder belt is positioned across the center of the child’s shoulder and that the lap belt sits as low as possible across the hips, not the abdomen.
7. To remove the booster seat or cushion from the Subaru Ascent, press the seatbelt release button and allow the belt to retract smoothly.
WARNING
- Never use a twisted or reversed seatbelt in the Subaru Ascent, as it may increase the severity of injuries during an accident.
- Do not position the shoulder belt under the child’s arm or behind their
back.
This incorrect positioning significantly increases the risk of serious injury during sudden braking or collisions.
- The seatbelt must fit snugly against the child’s body to provide full
restraint.
A loose seatbelt reduces effectiveness and may fail to protect the child properly.
- Always position the lap belt as low as possible on the child’s hips.
A high-positioned belt increases the risk of sliding under the belt or abdominal injury, both of which can be life-threatening.
- Ensure the shoulder belt lies across the center of the child’s shoulder. Placement near the neck can result in serious neck injuries in the Subaru Ascent during impact situations.
Proper installation and use of booster seats in the Subaru Ascent ensures that children receive the highest level of safety, combining correct seatbelt positioning with the vehicle’s advanced restraint systems.
 Installing child restraint systems with ALR/ELR seatbelt
In the Subaru Ascent, proper installation of a child restraint system using the
ALR/ELR seatbelt is critical for ensuring maximum safety. The ALR (Automatic Locking
Retractor) function allows the ...
 Installation of child restraint systems by use of lower and tether anchorages
(LATCH)
Installation of child restraint systems by use of lower and tether anchorages
(LATCH)
The Subaru Ascent is equipped with a modern LATCH (Lower Anchors and Tethers
for Children) system, designed to simplify the installation of child restraint systems
while ensuring maximum safety. U ...
Other materials:
Inspection
FUEL INJECTION (FUEL SYSTEMS)(H4DO) > Oil Control SolenoidINSPECTION1. Check that the oil control solenoid has no deformation, cracks or other damages.2. Measure the resistance between the oil control solenoid terminals.Terminal No.Standard1 and 27.25±0.4 ? (when 20°C (68°F ...
Dtc c2022 tire 2 air pressure low (normal mode)
TIRE PRESSURE MONITORING SYSTEM (DIAGNOSTICS) > Diagnostic Procedure with Diagnostic Trouble Code (DTC)DTC C2022 TIRE 2 AIR PRESSURE LOW (NORMAL MODE)NOTE:Refer to DTC C2024 for diagnostic procedure. Diagnostic Procedure with Diagnostic Trouble Code (DTC) > DTC C2024 TIRE 4 AIR PRESSURE LOW ( ...
Electrical component location Location
IMMOBILIZER (DIAGNOSTICS) > Electrical Component LocationLOCATION(1)Security indicator light (LED bulb)(3)Data link connector(5)Transponder(2)Body integrated unit(4)Antenna(6)Security control module (for C5 model only) ...
