Subaru Crosstrek Owners Manual: Installation of child restraint systems by use of lower and tether anchorages (LATCH)
WARNING
- Child restraint systems and seatbelts can become hot in a vehicle that has been closed up in sunny weather; they could burn a small child. Check the child restraint system before you place a child in it.
- Do not leave an unsecured child
restraint system in your vehicle.
Unsecured child restraint systems can be thrown around inside of the vehicle in a sudden stop, turn or accident; they can strike and injure vehicle occupants as well as result in serious injuries or death to the child.
CAUTION
When you install a child restraint system, follow the manufacturer's instructions supplied with it. After installing the child restraint system, check to ensure that it is held securely in position. If it is not held tight and secure, the danger of your child suffering personal injury in the event of an accident may be increased.
Lower and tether anchorages
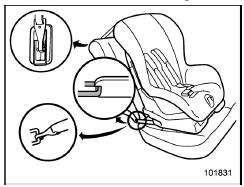
Some types of child restraint systems can be installed on the rear seat of your vehicle without use of the seatbelts. Such child restraint systems are secured to the designated anchorages provided on the vehicle body. The lower and tether anchorages are sometimes referred to as the LATCH system (Lower Anchors and Tethers for CHildren).
Your vehicle is equipped with four lower anchorages (bars) and three upper anchorages (tether anchorages) for accommodating such child restraint systems.
Lower anchorages
The lower anchorages (bars) are used for installing a child restraint system only on the rear seat window-side seating positions.
For each window-side seating position, two lower anchorages are provided.
Each lower anchorage is located where the seat cushion meets the seatback.
Tether anchorages
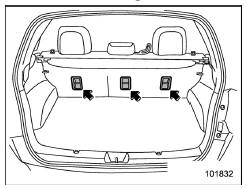
The tether anchorages (upper anchorages) are provided at the locations shown in the above illustration. For details, refer to "Top tether anchorages" 1- 36.
To install a child restraint system using lower and tether anchorages
To install a child restraint system using lower and tether anchorages, perform the following procedure.
WARNING
Before installing a child restraint system, be sure to confirm that the seatback is securely locked into place. Otherwise, in an accident, serious injury or death could result.
1. Shake the seatback slightly to confirm that it is securely locked into place.
- It is possible to check whether the seatback is locked visually. If the seatback is locked into place, the red colored unlocking marker which is attached to the bottom of the lock release knob is invisible. For details, refer to "Folding down the rear seatback" 1-10.
2. You will find marks " " at
the bottom of
the rear seat seatbacks. These marks
indicate the positions of the lower anchorages
(bars).
" at
the bottom of
the rear seat seatbacks. These marks
indicate the positions of the lower anchorages
(bars).

Remove the covers and locate the lower anchorages (bars).
3. Remove the rear seat head restraint.
For details, refer to "Rear windows side seating position" 1-9.
4. While following the instructions supplied
by the child restraint system manufacturer,
connect the lower hooks onto the
lower anchorages located at "  "
marks on
the bottom of the rear seatback. When the
hooks are connected, make sure the
adjacent seatbelts are not caught.
"
marks on
the bottom of the rear seatback. When the
hooks are connected, make sure the
adjacent seatbelts are not caught.
5. [If your child restraint system is of a flexible attachment type (which uses tether belts to connect the child restraint system properly to the lower anchorages)] While pushing the child restraint into the seat cushion, pull both left and right lower tether belts up to secure the child restraint system firmly by taking up the slack in the belt.
6. Latch the top tether hook onto the tether anchorage that is located behind the rear seat and tighten the top tether firmly. For additional instructions, refer to "Top tether anchorages" 1-36.
7. Before seating a child in the child restraint system, try to move it back and forth and right and left to verify that it is held securely in position.
8. To remove the child restraint system, follow the reverse procedures of installation.
If you have any question concerning this type of child restraint system, ask your SUBARU dealer.
 Installing a booster seat
WARNING
Child restraint systems and seatbelts
can become hot in a vehicle
that has been closed up in sunny
weather; they could burn a small
child. Check the child restraint
system before ...
 Top tether anchorages
Your vehicle is equipped with three top
tether anchorages so that a child restraint
system having a top tether can be
installed in the rear seat. When installing
a child restraint system using top ...
Other materials:
Tire Identification Number (TIN)
Tire Identification Number (TIN) is
marked on the intended outboard
sidewall. The TIN is composed of
four groups. Here is a brief review
of the TIN with a breakdown of its
individual elements.
(1) Manufacturer's Identification
Mark
(2) Tire Size
(3) Tire Type Code
(4) Date of Manufacture
...
Disassembly
CLUTCH SYSTEM > Operating CylinderDISASSEMBLY1. Remove the boot and push rod.2. Apply compressed air through clutch hose attachment hole.NOTE:Face the piston hole down and place a piece of wood underneath to prevent the piston from popping out.3. Separate the piston and piston spring. ...
Inspection
COOLING(H4DO) > RadiatorINSPECTION1. Check that the radiator does not have deformation, cracks or damage.2. Check that the hose has no cracks, damage or loose part.3. Remove the radiator cap, fill the radiator with engine coolant, and then install the radiator cap tester to the filler neck of rad ...
