
Subaru Crosstrek Service Manual: Installation
SEATS > Front Seat
INSTALLATION
Install each part in the reverse order of removal.
CAUTION:
• The front seat mounting bolts differ between the front mounting points and the rear mounting points. When installing the front seat, make sure that you are using correct bolts at correct positions.
• Tighten the slide rail assembly installing bolts in the order as shown in the figure, in several steps by gradually increasing the torque until they reach the specified torque.
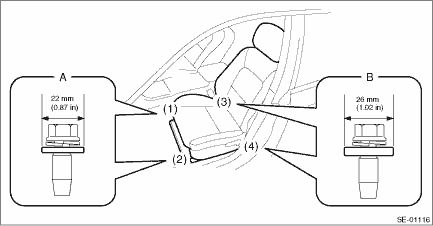
• Front (bolt A): Washer diameter 22 mm (0.87 in)
• Rear (bolt B): Washer diameter 26 mm (1.02 in)
Tightening torque:
Front seat assembly: 53 N·m (5.4 kgf-m, 39.1 ft-lb)
 Inspection
SEATS > Front SeatINSPECTION1. SEAT COVERCheck that there is no tear or fray on the cover COMPL - front backrest and the cover - front cushion.NOTE:For model with side airbag, if the door side of t ...

Other materials:
List of diagnostic trouble code (dtc) List
LAN SYSTEM (DIAGNOSTICS) > List of Diagnostic Trouble Code (DTC)LISTDTCItemContent of diagnosisNoteU1201CAN-HS COUNTER ABNORMALHigh speed CAN communication error Diagnostic Procedure with Diagnostic Trouble Code (DTC) > DTC U1201 CAN-HS COUNTER ABNORMAL">U0073CONTROL MODULE COMMUNICATI ...
Installation
EXTERIOR BODY PANELS > Front HoodINSTALLATIONCAUTION:The hood COMPL - front is heavy. When removing or installing the hinge COMPL - front hood, be sure to work in a group of two or more.1. To install the insulator - front hood and the seal - front duct, follow the removal procedure in the reverse ...
Removal
ENTERTAINMENT > Rear Accessory Power Supply SocketREMOVAL1. Disconnect the ground cable from battery and wait for at least 60 seconds before starting work. NOTE">2. Remove the console box assembly. Console Box > REMOVAL">3. Remove the socket assembly.(1) While releasing the c ...
