Subaru Crosstrek Service Manual: Installation
FUEL INJECTION (FUEL SYSTEMS)(H4DO) > Rear Oxygen Sensor
INSTALLATION
CAUTION:
If lubricant is spilt over the exhaust pipe, wipe it off with cloth to avoid emission of smoke or causing a fire.
1. Before installing rear oxygen sensor, apply the anti-seize compound only to the threaded portion of rear oxygen sensor to make the next removal easier.
CAUTION:
Never apply anti-seize compound to the protector of rear oxygen sensor.
Anti-seize compound:
NEVER-SEEZ NSN, JET LUBE SS-30 or equivalent
2. Install the rear oxygen sensor.
Tightening torque:
21 N·m (2.1 kgf-m, 15.5 ft-lb)

3. Connect the rear oxygen sensor connector.
NOTE:
Be careful not to allow the rear oxygen sensor harness to interfere with the sensor unit and the front oxygen (A/F) sensor harness.
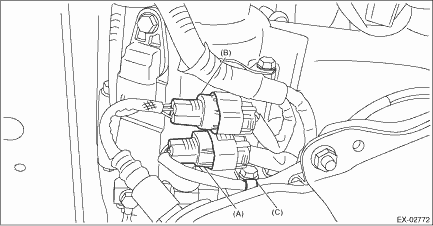
(A) | Front oxygen (A/F) sensor connector | (B) | Rear oxygen sensor connector | (C) | Clip |
4. Install the under cover. Front Under Cover > INSTALLATION">
5. Lower the vehicle.
6. Connect the battery ground terminal.

 Removal
FUEL INJECTION (FUEL SYSTEMS)(H4DO) > Rear Oxygen SensorREMOVAL1. Disconnect the ground cable from battery.2. Lift up the vehicle.3. Remove the under cover. Front Under Cover > REMOVAL"> ...
 Throttle body
...
Other materials:
Inspection
FUEL INJECTION (FUEL SYSTEMS)(H4DO) > Fuel Level SensorINSPECTION1. Check that the fuel level sensor has no damage.2. Measure the fuel level sensor float position.NOTE:When inspecting the fuel level sensor, perform the work with the sensor installed to the fuel pump.(1)FULL(2)EMPTY(3)Fuel tank se ...
61
CRUISE CONTROL SYSTEM (DIAGNOSTICS) > Diagnostic Procedure with Cancel Code61Malfunction in the stop light & brake switch is detected.TROUBLE SYMPTOM:• Cruise control cannot be set.• Cruise control cannot be released.Refer to DTC 12 for diagnostic procedure. Diagnostic Procedure w ...
Seatbelt maintenance
To clean the seatbelts, use a mild soap
and lukewarm water. Never bleach or dye
the belts because this could seriously
affect their strength.
Inspect the seatbelts and attachments
including the webbing and all hardware
periodically for cracks, cuts, gashes,
tears, damage, loose bolts or wor ...
