Subaru Crosstrek Service Manual: Installation
EXTERIOR BODY PANELS > Rear Door
INSTALLATION
1. REAR DOOR PANEL
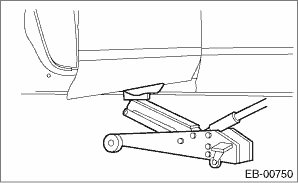
1. Put a wooden block on a jack and place the panel assembly - rear door on it.
2. Apply grease to the moving part of door hinges.
3. Adjust the height by the jack, and temporarily install the panel assembly - rear door to the upper hinge - rear door and the lower hinge - rear door.
NOTE:
• When installing the panel assembly - rear door, make sure that a uniform clearance is created around the panel.
• Perform installation while paying attention to the assembly direction of the grommet.
4. Adjust the clearance around the panel assembly - rear door. Rear Door > ADJUSTMENT">
5. Tighten the bolts and nuts of the door hinge and the checker assembly - rear door.
Tightening torque:
Refer to “COMPONENT” of “General Description”. General Description > COMPONENT">
6. Install door internal parts in the reverse order of removal.
NOTE:
Before installation, check the following items.
• Is the lever of the frame assembly - rear door outer is free from deformation?
• Is grease applied sufficiently to the lever joints of the latch and actuator assembly - rear?
• Is the cable of the latch and actuator assembly - rear free from deformation such as fray?
• Is grease applied sufficiently to the cable joints of the latch and actuator assembly - rear?
7. Connect the door harness connector, and install the harness grommet.
2. REAR DOOR HINGE
1. Apply grease to the moving part of door hinges.
2. Adjust the clearance around the panel assembly - rear door. Rear Door > ADJUSTMENT">
3. Tighten the door hinge bolts.
Tightening torque:
Refer to “COMPONENT” of “General Description”. General Description > COMPONENT">
 Removal
EXTERIOR BODY PANELS > Rear DoorREMOVAL1. REAR DOOR PANEL1. Disconnect the ground cable from battery. NOTE">2. Remove the trim panel - rear door. Door Trim > REMOVAL">3. Remove ...
 Rear gate
...
Other materials:
Removal
HVAC SYSTEM (HEATER, VENTILATOR AND A/C) > Ambient SensorREMOVAL1. Disconnect the ground cable from battery. Battery > REMOVAL">2. Remove the ambient sensor.(1) Disconnect the connector.(2) Release the claws, and then remove the ambient sensor from the bracket. ...
General diagnostic table Inspection
DIFFERENTIALS > General Diagnostic TableINSPECTIONSymptom or troublePossible causeRemedy1. Oil leakage(1) Worn, scratched, or incorrectly seated front or side oil seal. Scored, battered or excessively worn sliding surface of companion flange.Repair or replace.(2) Clogged or damaged air breather c ...
Disassembly
CONTINUOUSLY VARIABLE TRANSMISSION(TR580) > Reverse Brake AssemblyDISASSEMBLY1. Remove the snap ring.2. Remove the retaining plate, drive plate, driven plate and dish plate.3. Compress the return spring using the ST to remove the snap ring.ST 18762AA001COMPRESSOR SPECIAL TOOL4. Using the ST, r ...
