Subaru Crosstrek Service Manual: Installation
DRIVE SHAFT SYSTEM > Rear Drive Shaft
INSTALLATION
1. Replace the rear differential side oil seal. Rear Differential Side Oil Seal > REPLACEMENT">
NOTE:
After pulling out the drive shaft assembly, be sure to replace with a new oil seal.
2. Insert the drive shaft assembly into the rear hub spline, and pull it into the specified position.
CAUTION:
• Be careful not to damage the magnetic encoder.
• Do not get closer the tool which charged magnetism to magnetic encoder.
• Do not hammer the drive shaft assembly when installing.
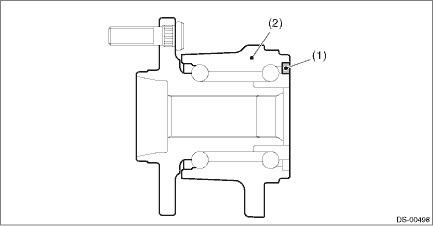
(1) | Magnetic encoder | (2) | Rear hub unit bearing |
3. Tighten the axle nut temporarily.
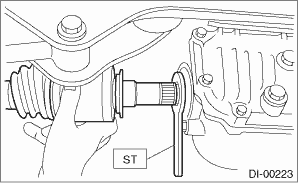
4. Using the ST, install the rear drive shaft assembly to the rear differential.
Preparation tool:
ST: OIL SEAL PROTECTOR (28099PA090)
5. Install the rear differential assembly to the rear sub frame assembly.
CAUTION:
Be sure to use a new self-locking nut.
Tightening torque:
Differential assembly — bushing - differential: 70 N·m (7.1 kgf-m, 51.6 ft-lb)
Differential assembly — rear sub frame assembly: 110 N·m (11.2 kgf-m, 81.1 ft-lb)
6. Install the sensor assembly - headlight beam leveler.
Tightening torque:
7.5 N·m (0.8 kgf-m, 5.5 ft-lb)
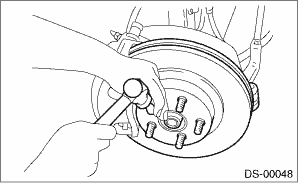
7. While pressing the brake pedal, tighten the new axle nuts to the specified torque.
CAUTION:
Do not load the rear axle before tightening the axle nut. Doing so may damage the hub unit bearing.
Tightening torque:
190 N·m (19.4 kgf-m, 140.1 ft-lb)
8. Lock the axle nut securely.
9. Fill differential gear oil.
10. Install the rear wheels.
Tightening torque:
Except for C4 model: 120 N·m (12.2 kgf-m, 88.5 ft-lb)
C4 model: 100 N·m (10.2 kgf-m, 73.8 ft-lb)
11. Perform reinitialization of the auto headlight beam leveler system. (Model with auto headlight beam leveler) Auto Headlight Beam Leveler System > PROCEDURE">
 Inspection
DRIVE SHAFT SYSTEM > Rear Drive ShaftINSPECTIONCheck the removed parts for damage, wear, corrosion etc. Repair or replace if defective.• DOJ (Double Offset Joint):Check for seizure, corrosion ...

Other materials:
Disassembly
FUEL INJECTION (FUEL SYSTEMS)(H4DO) > Intake ManifoldDISASSEMBLY1. Remove the throttle body. Throttle Body > REMOVAL">2. Remove the purge control solenoid valve. Purge Control Solenoid Valve > REMOVAL">3. Remove the manifold absolute pressure sensor. Manifold Absolute Pre ...
Dtc c0063 normal closing valve 1 malfunction
VEHICLE DYNAMICS CONTROL (VDC) (DIAGNOSTICS) > Diagnostic Procedure with Diagnostic Trouble Code (DTC)DTC C0063 NORMAL CLOSING VALVE 1 MALFUNCTIONNOTE:For the diagnostic procedure, refer to “C0064 NORMAL CLOSING VALVE 2 MALFUNCTION”. Diagnostic Procedure with Diagnostic Trouble Code ...
Removal
COOLING(H4DO) > Water Pipe AssemblyREMOVAL1. WATER PIPE ASSEMBLY RH1. Disconnect the ground cable from battery. NOTE">2. Drain engine coolant. Engine Coolant > REPLACEMENT">3. Remove the front exhaust pipe. Front Exhaust Pipe > REMOVAL">4. Disconnect the water hos ...
