
Subaru Crosstrek Service Manual: Inspection
FUEL INJECTION (FUEL SYSTEMS)(H4DO) > Camshaft Position Sensor
INSPECTION
1. CAMSHAFT POSITION SENSOR (METHOD WITH OSCILLOSCOPE)
1. Prepare an oscilloscope.
2. Remove the glove box. Glove Box > REMOVAL">
3. Connect the probe to ECM connector.
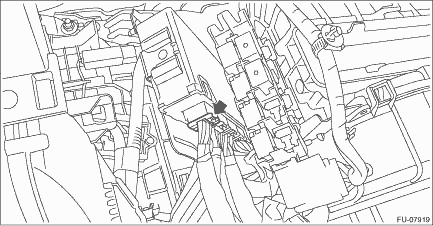
• Intake camshaft position sensor
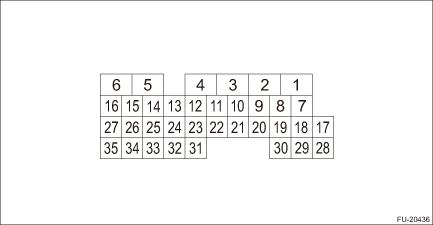
• Exhaust camshaft position sensor
Camshaft position sensor | Terminal No. | Probe | |
Intake | RH | 26 | + |
LH | 15 | + | |
Exhaust | RH | 14 | + |
LH | 25 | + | |
RH and LH | 3 | − | |
4. Start the engine and let it idle.
5. Check the waveforms and voltage.
NOTE:
For waveform and voltage, refer to “Engine Control Module (ECM) I/O Signal”. Engine Control Module (ECM) I/O Signal > ELECTRICAL SPECIFICATION">
6. After inspection, install the related parts in the reverse order of removal.
2. OTHER INSPECTIONS
Check that the camshaft position sensor has no deformation, cracks or other damages.

 Removal
FUEL INJECTION (FUEL SYSTEMS)(H4DO) > Camshaft Position SensorREMOVAL1. INTAKE SIDE1. Disconnect the ground cable from battery.2. Remove the air intake duct. (RH side only) Air Intake Duct > RE ...
Other materials:
File information
Compatible compressed files (Audio)
Corresponding sampling frequency (Audio)
Corresponding bit rates (Audio)
(Variable Bit Rate (VBR) compatible)
MP3 (MPEG Audio Layer 3), WMA
(Windows Media Audio) and AAC (Advanced
Audio Coding) are audio compression
standards.
This syste ...
BSD/RCTA approach indicator light
BSD/RCTA approach indicator light
It is mounted on each side of the outside
mirrors.
The indicator light will illuminate when a
vehicle approaching from behind is detected.
The indicator light will flash to warn the
driver of dangers under the following
conditions.
While the indic ...
Dtc p0843 transmission fluid pressure sensor/switch "a" circuit high
CONTINUOUSLY VARIABLE TRANSMISSION (DIAGNOSTICS) > Diagnostic Procedure with Diagnostic Trouble Code (DTC)DTC P0843 TRANSMISSION FLUID PRESSURE SENSOR/SWITCH "A" CIRCUIT HIGHDTC detecting condition:Immediately at fault recognitionTrouble symptom:Shift characteristics malfunctionCAUTION: ...
