Subaru Crosstrek Service Manual: Inspection
EyeSight (DIAGNOSTICS) > General Description
INSPECTION
1. BATTERY
Check the battery. Battery">
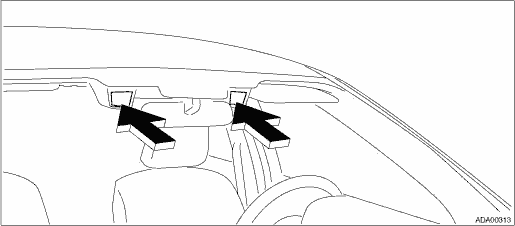
2. WINDSHIELD GLASS AND DASHBOARD
Remove the windshield glass and dashboard in front of the stereo camera.
Standard:
There must be no oil film, dirt, scratch or fogging that obstructs the forward visibility of the stereo camera.
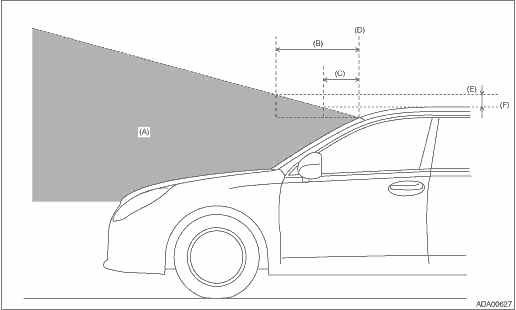
Do not stick or attach the aftermarket parts on the prohibited area (D) shown in the figure below.
Even outside the prohibited area, if the abnormal operation occurs due to the reflection of the light or the reflection on the glass, change the adhering position or installation position.
• Application of stickers or antennas, installation of wide-type mirror
– This will affect the visibility of the stereo camera, causing the function not to operate correctly.
• Placement of navigation unit, ETC or other things on the dashboard
– These things will be reflected on the windshield glass, affecting the recognition of the stereo camera, thus causing the function not to operate correctly.
• Front view
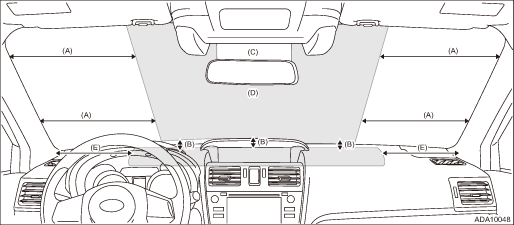
(A) | 300 mm (11.8 in) | (C) | Ceramic area | (E) | 200 mm (7.9 in) |
(B) | 120 mm (4.7 in) | (D) | Prohibited area |
• Side view
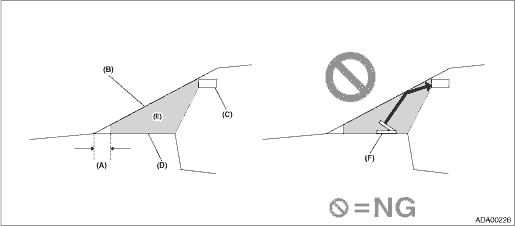
(A) | 120 mm (4.7 in) | (C) | Stereo camera cover | (E) | Prohibited area |
(B) | Windshield glass | (D) | Dashboard | (F) | External monitor etc. |
NOTE:
• Clean the windshield glass if dirt or fogging is found on the glass. Repair or replace the glass if damage is found.
– When cleaning the inner side of the windshield glass, be careful not to touch the lens of the stereo camera. Take care so that the glass cleaner is not applied to the lens. (As with the removal procedure of the stereo camera, cover the opening of camera cover with a copy paper or similar dust-free paper before the procedure, in order to avoid any interference to the camera lens, and tape the paper while being careful not to let the adhesive surface contact the glass surface. Be sure to remove the paper after the procedure. Stereo Camera > REMOVAL">
– When replacing the windshield glass, be sure to replace the part for the EyeSight.
– If the glass is removed or replaced, always perform the stereo camera adjustment and inspection.
• If the damage is found in the glass repair prohibited area shown in the figure below, replace the glass.
– Damage in the prohibited area can affect the recognition of the stereo camera even if it is repaired, and thereby EyeSight function may not operate properly.
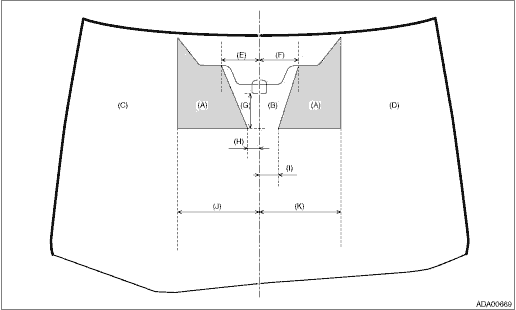
(A) | Glass repair prohibited area | (E) | 130 mm (5.1 in) | (I) | 65 mm (2.6 in) |
(B) | Glass repairable area | (F) | 135 mm (5.3 in) | (J) | 280 mm (11.0 in) |
(C) | Glass repairable area (LHD side) | (G) | 120 mm (4.7 in) | (K) | 280 mm (11.0 in) |
(D) | Glass repairable area (RHD side) | (H) | 40 mm (1.6 in) |
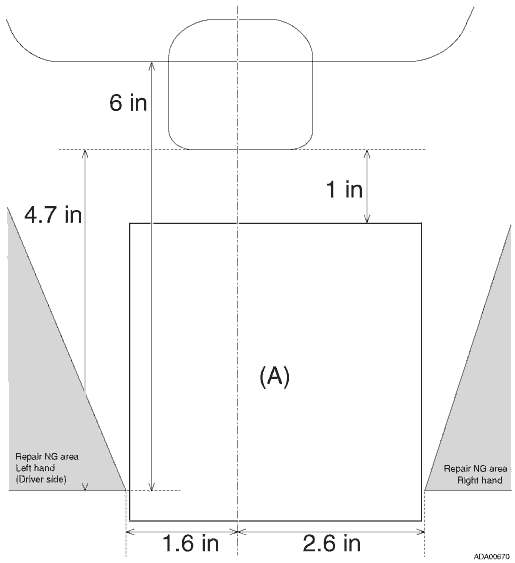
– Install the ETC transponder inside the area (A) shown in the figure below.
Before installing, attach a full-scale copy of the following figure onto the windshield glass surface to install the parts to correct positions.
– Align the position with respect to the end of the ceramic area.
– Prepare a full-scale copy in which the reference dimension on the upper part of the figure actually has 4 inches long.
– Only the transponder with a thickness of 1.5 inches or less can be used.
• Relocate any aftermarket parts out of the prohibited area.
• Do not touch the lens on the stereo camera. Do not clean the lens of the stereo camera. (If the lens surface is touched, the stereo camera must be replaced as it is impossible to clean the lens surface for ensuring quality.)
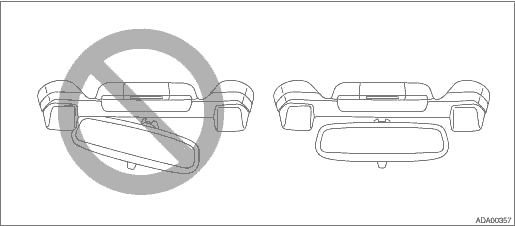
3. REAR VIEW MIRROR
Check the rear view mirror condition.
Standard:
The rear view mirror other than genuine parts shall not be used. (Wide mirrors shall not be used)
The visibility of the stereo camera shall not be blocked.
— This will affect the visibility of the stereo camera, causing the system not to operate correctly.
4. FRONT WIPER
Check the wiping condition of windshield glass.
Standard:
Use Subaru genuine part only for wiper blade body and blade rubber.
— Using the part other than genuine part will affect the recognition of the stereo camera, which may cause the function not to operate correctly.
Do not continue using the damaged blade rubber.
— The glass may be damaged. If the wiping performance decreases, or if the distinct streak is found, replace it as soon as possible.
NOTE:
Clean the windshield glass if there is an oil film or any dirt on the surface.
5. TIRE INFLATION PRESSURE
Check the tire air pressure.
Standard:
Adjust to the specified air pressure. General Description > SPECIFICATION">
Do not install worn tire or tires with excessive wear difference.
Install tires with specified size.
6. STEREO CAMERA
Through the windshield glass, check if there are any fingerprints or faults such as crack found on lens filters at the left and right camera lenses of the stereo camera.
NOTE:
• Do not remove the camera or camera cover to check the lens.
• When spider’s web or insects are found within the camera view or inside the lens hood, remove it by blowing air etc. while taking care not to touch the lens surface. Do not use a hand or a cloth.
• Thin and uniform adhesion of dust, dirt or tobacco stains to the lens filter surface resulting from normal use will not be an obstacle. Do not attempt to clean in such cases.
• If an oil film such as a fingerprint or any excessive dirt adheres, or if the lens filter cracks, replace the stereo camera. Stereo Camera">
• If the fingerprint adhesions or cracks occur on the lens filter, the following failures may arise.
– The vehicle may not be able to detect the preceding vehicle or obstacle due to the effects of the headlight of the oncoming vehicle.
– The vehicle may not be able to detect the preceding vehicle or obstacle due to the effects of the brake light operation of the preceding vehicle.
– All the functions of the EyeSight may be suspended by the self-diagnosis function equipped with the camera.
– When the lens filter is broken, the vehicle may not be able to detect the preceding vehicle or obstacle all day and all night.
• Do not clean the lens filter with any cleaner. It is quite difficult to uniformly clean both of the right and left lenses, and such an attempt just ends up spreading dirt and will cause problems as same as those from oil film.
7. LOAD ON THE ROOF
Check that load on the roof is not sticking out to the front of the stereo camera.
Standard:
The load on the roof is placed outside the prohibited area (A) shown in the figure below.
(A) | Prohibited area | (C) | 520 mm (20.5 in) | (E) | 100 mm (3.9 in) |
(B) | 880 mm (34.6 in) | (D) | Windshield glass upper end | (F) | Highest surface of the roof |
 Preparation tool
EyeSight (DIAGNOSTICS) > General DescriptionPREPARATION TOOL1. SPECIAL TOOLILLUSTRATIONTOOL NUMBERDESCRIPTIONREMARKS — SUBARU SELECT MONITOR 4Used for setting of each function and troubleshooting ...

Other materials:
Reverse Automatic Braking (RAB) system
The Reverse Automatic Braking (RAB) system in the Subaru Ascent is an advanced
safety feature developed to help minimize the risk of collisions when reversing.
By continuously monitoring the area behind the vehicle, the Subaru Ascent can detect
obstacles such as walls or stationary objects and ...
Dtc b1820 short in side airbag rh
AIRBAG SYSTEM (DIAGNOSTICS) > Diagnostic Chart with Trouble CodeDTC B1820 SHORT IN SIDE AIRBAG RHDiagnosis start condition:Ignition voltage is 10 V to 16 V.DTC detecting condition:• Side airbag harness (RH) circuit is shorted.• Side airbag module (RH) is faulty.• Airbag control ...
Interior light off delay timer setting
1. Perform the preparation steps according
to "Preparation for car settings"
2. Operate the " " or "
" switch to
select the "Interior Light" item. Then push
the button.
3. The current setting will be displayed.
Push the button to enter the
selection
mode.
4. Select ...
