
Subaru Crosstrek Service Manual: Inspection
DIFFERENTIALS > Rear Differential (T-type)
INSPECTION
Wash all the disassembled parts clean, and examine them for wear, damage and other defects. Repair or replace the defective parts as necessary.
1. Hypoid driven gear and drive pinion
• If there is evidently an abnormal tooth contact, find out the cause and adjust until the teeth contact correctly. Replace the gear if there is an excessive worn or an incapable adjustment.
• If crack, cutout or seizure is found, replace the parts as a set. Slight damage of some teeth can be corrected by oil stone or the like.
2. Side gear and pinion mate gear
• Replace if cracks, scoring or other defects are evident on the tooth surface.
• Replace if thrust washer contact surface is worn or scored. Slight damages of the surface can be corrected by oil stones or equivalent.
3. Bearing
Replace if seizure, peeling, wear, rust, dragging during rotation, noise or other defect is evident.
4. Thrust washer of the side gear and pinion mate gear
Replace if seized, flawed, abnormally worn or having other defects.
5. Oil seal
Replace if deformed or damaged, and at every disassembling.
6. Differential carrier
Replace if the bearing bores are worn or damaged.
7. Differential case
Replace if sliding surfaces are abnormally worn, burned, or cracked.
8. Companion flange
Replace if the oil seal lip contact surface shows cracking.
1. SIDE GEAR BACKLASH
Using a dial gauge, check the backlash of side gear.
Side gear backlash:
0.10 — 0.20 mm (0.004 — 0.008 in)
If the side gear backlash is not within the specified range, select the side gear thrust washer and adjust the side gear backlash as specified.
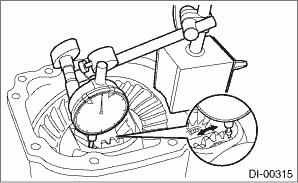
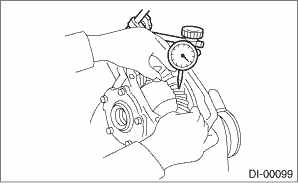
2. HYPOID DRIVEN GEAR BACKLASH
Using a dial gauge, check the backlash of hypoid driven gear.
Hypoid driven gear backlash:
0.10 — 0.20 mm (0.004 — 0.008 in)
If the hypoid driven gear backlash is outside the specification range, adjust the side bearing preload and repair if necessary.
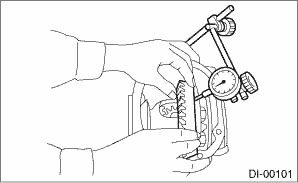
3. HYPOID DRIVEN GEAR RUNOUT ON ITS BACK SURFACE
Using a dial gauge, check the hypoid driven gear back surface runout.
Hypoid driven gear back surface runout:
0.05 mm (0.002 in)
If the hypoid driven gear runout on its back surface exceeds the limit, replace the hypoid driven gear.
4. TOOTH CONTACT BETWEEN HYPOID DRIVEN GEAR AND DRIVE PINION
Inspect the tooth contact between the hypoid driven gear and drive pinion. Rear Differential (T-type) > ASSEMBLY">
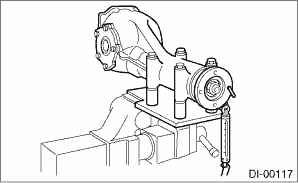
5. TOTAL PRELOAD
Using a spring scale, check the total preload.
Total preload:
20.7 — 54.4 N (2.1 — 5.5 kgf, 4.7 — 12.2 lb)
If the total preload is not within the specified range, adjust the side retainer shim.
6. COMPANION FLANGE
1. If rust or dirt is attached to the companion flange, remove them.
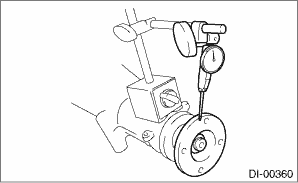
2. Set a dial gauge at a companion flange surface (mating surface of propeller shaft and companion flange), and then measure the companion flange runout.
Limit of runout:
0.08 mm (0.003 in)
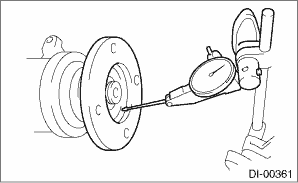
3. Set the gauge inside of the companion flange, and measure the runout.
Limit of runout:
0.08 mm (0.003 in)
4. If either runout exceeds the limit, move the phase of companion flange and drive pinion 90° each, and find the point where the runout is within the limit.
5. If the runout exceeds the limit even after changing the phase, replace the companion flange and recheck the runout.
6. If the runout exceeds the limit after replacing the companion flange, the drive pinion may be assembled incorrectly or bearing is faulty.
 Disassembly
DIFFERENTIALS > Rear Differential (T-type)DISASSEMBLYTo detect the real cause of trouble, inspect the following items before disassembling.• Tooth contact and backlash between hypoid driven g ...
 Installation
DIFFERENTIALS > Rear Differential (T-type)INSTALLATION1. Attach the rear differential member plate to the rear differential.(A)Rear differential member plate2. Set the rear differential to transmis ...
Other materials:
Deleting the contact data
You can delete the phonebook data stored
in the audio set.
1. Display the "PHONE" screen. Refer to
"How to change the hands-free phone
system" F5-73.
2. Touch the "Contacts" key, and then
select the "Delete All" key.
3. Select the "OK" key when the confirmation
screen appears.
compati ...
Specification
WIPER AND WASHER SYSTEMS > General DescriptionSPECIFICATIONFront wiper motorInput12 V — 72 W or lessRear wiper motorInput12 V — 42 W or lessFront washer motorPump typeCentrifugalInput12 V — 60 W or lessRear washer motorPump typeCentrifugalInput12 V — 36 W or less ...
Check list for interview Check
ENGINE (DIAGNOSTICS)(H4DO) > Check List for InterviewCHECK1. CHECK LIST NO. 1Check the following item when problem has occurred.NOTE:Use copies of this page for interviewing customers.Customer’s name Engine No. Date of purchase Fuel type Date of repair Odometer readingkmV.I.N. milesWeather ...
