Subaru Crosstrek Service Manual: Inspection
CLUTCH SYSTEM > Clutch Disc and Cover
INSPECTION
1. CLUTCH DISC
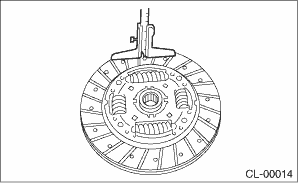
1. Facing wear
Measure the depth from the facing surface to the rivet head. Replace if the face is worn locally or worn down to less than the specified value.
Depth to rivet head:
Limit of sinking
0.8 mm (0.031 in)
NOTE:
Do not wash the clutch disc with any type of cleaning fluid.
2. Hardened facing
Replace the clutch disc.
3. Oil soakage on facing
Replace the clutch disc and inspect the transmission front oil seal, transmission case mating surface, engine rear oil seal and other locations for oil leakage.
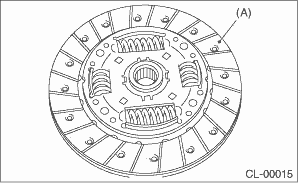
(A) | Clutch facing |
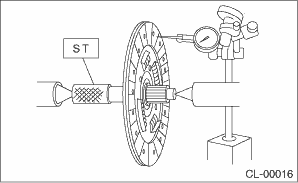
4. Deflection on facing
If deflection exceeds the specified value at the outer circumference of the facing, replace the clutch disc.
| ST 499747100 | CLUTCH DISC GUIDE |
Limit for deflection:
0.7 mm (0.028 in) at R = 110 mm (4.33 in)
5. If there is spline wear, loose rivets, failed damper springs, etc., replace the clutch disc.
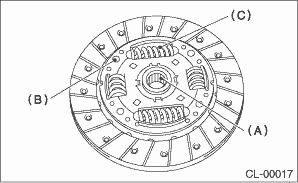
(A) | Spline |
(B) | Rivet |
(C) | Damper spring |
2. CLUTCH COVER
NOTE:
Visually check the following items without disassembling, and replace or repair if defective.
1. Loose thrust rivet
2. Damaged or worn bearing contact area at the center of diaphragm spring

(A) | Thrust rivet |
(B) | Diaphragm spring |
3. Damaged or worn disc contact surface of the pressure plate
4. Loose strap plate installation area
5. Worn diaphragm sliding area
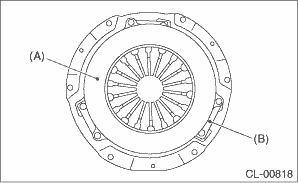
(A) | Pressure plate |
(B) | Strap plate |

 Removal
CLUTCH SYSTEM > Clutch Disc and CoverREMOVAL1. Remove the transmission assembly from the vehicle. Manual Transmission Assembly > REMOVAL">2. Attach the ST on the flywheel.ST 499747100 ...
Other materials:
Removal
EXTERIOR/INTERIOR TRIM > Rear Quarter TrimREMOVAL1. CROSSTREK MODELCAUTION:• Before handling the airbag system components, refer to “CAUTION” of “General Description” in “AIRBAG SYSTEM”. General Description > CAUTION">• Airbag system sat ...
Blind Spot Detection (BSD)
Operating range
The system warns the driver of dangers as
follows.
If the system detects vehicles in the
driver's blind spots, the BSD/RCTA approach
indicator light(s) on the outside
mirror(s) will illuminate.
If the driver operates the turn signal
lever to the side where th ...
Moonroof
WARNING
When operating the moonroof in your Subaru Ascent, never allow any part of
a person’s body—such as hands, arms, or head—or any external objects to extend outside
the opening. This safety precaution is critical, as serious injury may occur under
various driving conditions.
Du ...
