
Subaru Ascent 2018-2026 Owner's Manual: Handling of radar sensors
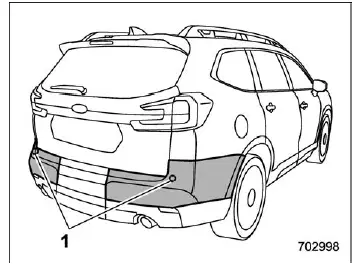
- Sensors
In the Subaru Ascent, radar sensors are strategically positioned on both sides of the rear bumper to monitor adjacent traffic and support BSD/RCTA functionality.
To maintain reliable and accurate operation of the Subaru Ascent BSD/RCTA system, the following precautions must always be observed.
- Keep the rear bumper surface around the radar sensors clean and free from dirt, snow, or debris.
- Avoid placing stickers, decals, or any objects near the sensor areas.
- Do not modify or reshape the rear bumper in the vicinity of the sensors.
- Avoid repainting the bumper near the radar sensors, as this may affect signal transmission.
- Prevent strong impacts to the bumper. Even minor collisions may misalign the sensors and impair detection accuracy. If impact occurs, have the Subaru Ascent inspected by a SUBARU dealer.
- Never attempt to disassemble or tamper with the radar sensors.
NOTE
If repair, replacement, or repainting of the rear bumper area is required, always consult a SUBARU dealer to ensure that the radar sensors in your Subaru Ascent continue to operate correctly and safely.
Maintaining clean and properly aligned radar sensors ensures that the Subaru Ascent delivers consistent performance of its advanced BSD/RCTA safety systems, especially in complex traffic environments.
 BSD/RCTA warning indicator
System malfunction
BSD/RCTA malfunction message
At first, this message will appear
Then this message will appear
BSD/RCTA warning indicator
If a malfunction occurs within the BSD/RCTA ...
 Reverse Automatic Braking (RAB) system
The Reverse Automatic Braking (RAB) system in the Subaru Ascent is an advanced
safety feature developed to help minimize the risk of collisions when reversing.
By continuously monitoring the area ...
Other materials:
Dtc p2764 torque converter clutch pressure control solenoid control circuit low
CONTINUOUSLY VARIABLE TRANSMISSION (DIAGNOSTICS) > Diagnostic Procedure with Diagnostic Trouble Code (DTC)DTC P2764 TORQUE CONVERTER CLUTCH PRESSURE CONTROL SOLENOID CONTROL CIRCUIT LOWDTC detecting condition:Immediately at fault recognitionTrouble symptom:No lock-up occurs.CAUTION:Use the check ...
Installation
VEHICLE DYNAMICS CONTROL (VDC) > Rear ABS Wheel Speed SensorINSTALLATIONCAUTION:Be careful not to damage the sensor.1. Install each part in the reverse order of removal.2. Route the rear ABS wheel speed sensor cable to the upper arm assembly.NOTE:Check the identification (mark) on the harness to ...
Preparation tool
INSTRUMENTATION/DRIVER INFO > General DescriptionPREPARATION TOOL1. SPECIAL TOOLILLUSTRATIONTOOL NUMBERDESCRIPTIONREMARKS — SUBARU SELECT MONITOR 4Used for setting of each function and troubleshooting for electrical system.NOTE:For detailed operation procedures of Subaru Select Monitor 4, refer ...
