
Subaru Crosstrek Service Manual: Dtc b2902 rear height sensor circuit
AUTO HEADLIGHT BEAM LEVELER SYSTEM (DIAGNOSTICS) > Diagnostic Procedure with Diagnostic Trouble Code (DTC)
DTC B2902 REAR HEIGHT SENSOR CIRCUIT
DTC detecting condition:
Detected when error occurs in the rear height sensor.
Trouble symptom:
The auto headlight beam leveler does not operate.
CAUTION:
Initialization is required after replacing the auto headlight beam leveler CM.
Wiring diagram:
Headlight beam leveler system Headlight Beam Leveler System > WIRING DIAGRAM">
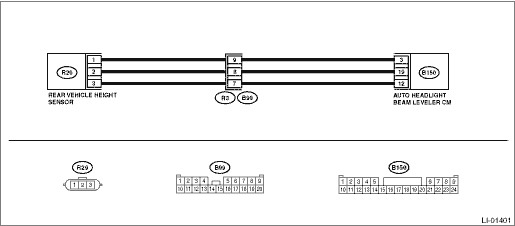
| STEP | CHECK | YES | NO |
1.CHECK DTC.
1) Turn the ignition switch to OFF > ON.
2) Turn on the headlight low beam.
3) Using the Subaru Select Monitor, clear the auto headlight beam leveler system memory. Clear Memory Mode">
4) Turn the ignition switch to OFF > ON.
5) Use the Subaru Select Monitor and read DTCs. Read Diagnostic Trouble Code (DTC)">
Is DTC B2902 displayed? (current malfunction)
Diagnostic Procedure with Diagnostic Trouble Code (DTC) > DTC B2902 REAR HEIGHT SENSOR CIRCUIT">Go to Step 2.
Even if DTC is displayed, the circuit has returned to a normal condition at this time. Reproduce the failure, and then perform the diagnosis again.
NOTE:
In this case, temporary poor contact of connector, temporary open or short circuit of harness may be the cause.
2.CHECK CURRENT DATA.
Display «R Sensor Signal» using Subaru Select Monitor. Read Current Data">
Does the data indicate the standard value (approx. 2.5 V when on a level road with one person in the vehicle)?
Replace the auto headlight beam leveler CM. Auto Headlight Beam Leveler Control Module">
Diagnostic Procedure with Diagnostic Trouble Code (DTC) > DTC B2902 REAR HEIGHT SENSOR CIRCUIT">Go to Step 3.
3.CHECK CURRENT DATA.
1) Display «R Sensor Signal» using Subaru Select Monitor. Read Current Data">
2) Change the vehicle posture.
Does the data change?
Diagnostic Procedure with Diagnostic Trouble Code (DTC) > DTC B2902 REAR HEIGHT SENSOR CIRCUIT">Go to Step 6.
Diagnostic Procedure with Diagnostic Trouble Code (DTC) > DTC B2902 REAR HEIGHT SENSOR CIRCUIT">Go to Step 4.
4.CHECK OUTPUT VOLTAGE BETWEEN AUTO HEADLIGHT BEAM LEVELER CM AND VEHICLE HEIGHT SENSOR.
1) Disconnect the vehicle height sensor connector.
2) Turn the ignition switch to ON.
3) Measure the voltage between the vehicle height sensor connector and chassis ground.
Connector & terminal
(R29) No. 3 (+) — Chassis ground (−):
Is the voltage 5±0.25 V?
Diagnostic Procedure with Diagnostic Trouble Code (DTC) > DTC B2902 REAR HEIGHT SENSOR CIRCUIT">Go to Step 5.
Replace the auto headlight beam leveler CM. Auto Headlight Beam Leveler Control Module">
5.CHECK REAR HEIGHT SENSOR.
1) Remove the rear vehicle height sensor.
2) Perform the inspection of rear height sensor unit. Rear Height Sensor > INSPECTION">
Is the rear height sensor normal?
Diagnostic Procedure with Diagnostic Trouble Code (DTC) > DTC B2902 REAR HEIGHT SENSOR CIRCUIT">Go to Step 6.
Replace the rear height sensor. Rear Height Sensor">
6.CHECK HARNESS (OPEN CIRCUIT).
1) Disconnect the auto headlight beam leveler CM connector.
2) Using a tester, measure the resistance between the auto headlight beam leveler CM connector and rear height sensor connector.
Connector & terminal
(B150) No. 3 — (R29) No. 1:
(B150) No. 19 — (R29) No. 2:
(B150) No. 12 — (R29) No. 3:
Is there continuity?
Diagnostic Procedure with Diagnostic Trouble Code (DTC) > DTC B2902 REAR HEIGHT SENSOR CIRCUIT">Go to Step 7.
Repair or replace the open circuit of harness.
7.CHECK HARNESS (GROUND SHORT CIRCUIT).
Using a tester, measure the resistance between the auto headlight beam leveler CM connector and chassis ground.
Connector & terminal
(B150) No. 3 — Chassis ground:
(B150) No. 19 — Chassis ground:
(B150) No. 12 — Chassis ground:
Is the resistance 10 k? or more?
Replace the auto headlight beam leveler CM. Auto Headlight Beam Leveler Control Module">
Repair or replace the short circuit of the harness.
 Dtc b2900 ahl control
AUTO HEADLIGHT BEAM LEVELER SYSTEM (DIAGNOSTICS) > Diagnostic Procedure with Diagnostic Trouble Code (DTC)DTC B2900 AHL CONTROLDTC DETECTING CONDITION:Detected when internal malfunction occurs in t ...
 Dtc u0073 control module communication bus off
AUTO HEADLIGHT BEAM LEVELER SYSTEM (DIAGNOSTICS) > Diagnostic Procedure with Diagnostic Trouble Code (DTC)DTC U0073 CONTROL MODULE COMMUNICATION BUS OFFDetected when CAN line abnormality is detecte ...
Other materials:
Removal
FRONT SUSPENSION > Front StabilizerREMOVAL1. Lift up the vehicle, and then remove the left and right front wheels.2. Remove the under cover - front. Front Under Cover > REMOVAL">3. Remove the front crossmember support. Front Crossmember Support Plate > REMOVAL">4. Remove t ...
Safety precautions
WARNING
Bulbs may become very hot while
illuminated. Before replacing
bulbs, turn off the lights and wait
until the bulbs cool down. Otherwise,
there is a risk of sustaining
a burn injury.
For models with HID low beam
headlights, observe the following
precautions. Not doing so carries
the ...
Cooling and dehumidifying in high humidity and low temperature weather
conditions
Under certain weather conditions (high
relative humidity, low temperatures, etc.) a
small amount of water vapor emission
from the air outlets may be noticed. This
condition is normal and does not indicate
any problem with the air conditioning
system.
Air conditioner compressor shut-off when e ...
