Subaru Crosstrek Service Manual: Dtc b1817 short in passenger s airbag dual stage - 2nd step (to ground)
AIRBAG SYSTEM (DIAGNOSTICS) > Diagnostic Chart with Trouble Code
DTC B1817 SHORT IN PASSENGER’S AIRBAG DUAL STAGE - 2ND STEP (TO GROUND)
Diagnosis start condition:
Ignition voltage is 10 V to 16 V.
DTC detecting condition:
• Airbag main harness circuit is shorted to ground.
• Airbag module harness (passenger’s side) circuit is shorted to ground.
• Passenger’s airbag module is faulty.
• Airbag control module is faulty.
CAUTION:
Before performing diagnosis, refer to “CAUTION” in “General Description”. General Description > CAUTION">
Wiring diagram:
Airbag system Airbag System > WIRING DIAGRAM">
| STEP | CHECK | YES | NO |
1.CHECK POOR CONTACT OF CONNECTORS.
Check for poor contact of the connectors between the airbag control module and the passenger’s airbag module.
Is there poor contact?
Replace the airbag harness.
Diagnostic Chart with Trouble Code > DTC B1817 SHORT IN PASSENGER’S AIRBAG DUAL STAGE - 2ND STEP (TO GROUND)">Go to Step 2.
2.CHECK AIRBAG MAIN HARNESS (PASSENGER’S AIRBAG HARNESS).
1) Turn the ignition switch to OFF, disconnect the battery ground cable, and wait for 60 seconds or more.
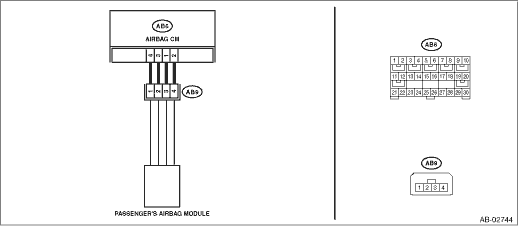
2) Disconnect the connectors (AB7) and (AB2).
3) Disconnect the connector (AB66) from the driver’s knee airbag module.
4) Disconnect the connectors (AB6, AB17, AB18) from airbag control module.
5) Disconnect the passenger’s airbag module connector (AB9).
6) Using a probe, measure the resistance between the connector (AB9) and chassis ground. General Description > PREPARATION TOOL">
CAUTION:
When measuring the resistance, make sure that the probe is inserted from the back side (harness side) of the connector. Also, do not insert the probe forcibly.
Connector & terminal
(AB9) No. 3 — Chassis ground:
(AB9) No. 4 — Chassis ground:
Is the resistance 1 M? or more?
Diagnostic Chart with Trouble Code > DTC B1817 SHORT IN PASSENGER’S AIRBAG DUAL STAGE - 2ND STEP (TO GROUND)">Go to Step 3.
Replace the airbag main harness along with body harness.
3.CHECK AIRBAG CONTROL MODULE.
1) Connect the connectors (AB6, AB17, AB18) and the airbag control module.
2) Using a probe, short the terminals No. 3 and No. 4 of connector (AB9). General Description > PREPARATION TOOL">
CAUTION:
When shorting the terminals, make sure that the probe is inserted from the back side (harness side) of the connector. Also, do not insert the probe forcibly.
Connector & terminal
(AB9) No. 3 — (AB9) No. 4:
3) Connect the battery ground terminal and turn the ignition switch to ON.
4) Perform the Inspection Mode. Inspection Mode">
5) Read the DTC. (Current malfunction) Read Diagnostic Trouble Code (DTC)">
Is DTC B1817 displayed?
Replace the airbag control module. Airbag Control Module > REMOVAL">
Diagnostic Chart with Trouble Code > DTC B1817 SHORT IN PASSENGER’S AIRBAG DUAL STAGE - 2ND STEP (TO GROUND)">Go to Step 4.
4.CHECK PASSENGER’S AIRBAG MODULE.
1) Turn the ignition switch to OFF, disconnect the battery ground cable, and wait for 60 seconds or more.
2) Release the short circuit of connector (AB9).
3) Connect the passenger’s airbag module connector (AB9).
4) Connect the connectors (AB7) and (AB2).
5) Connect the connector (AB66) to the driver’s knee airbag module.
6) Connect the battery ground terminal and turn the ignition switch to ON.
7) Perform the Inspection Mode. Inspection Mode">
8) Read the DTC. (Current malfunction) Read Diagnostic Trouble Code (DTC)">
Is DTC B1817 displayed?
Replace the passenger’s airbag module. Passenger’s Airbag Module > REMOVAL">
Diagnostic Chart with Trouble Code > DTC B1817 SHORT IN PASSENGER’S AIRBAG DUAL STAGE - 2ND STEP (TO GROUND)">Go to Step 5.
5.CHECK FOR ANY OTHER DTC ON DISPLAY.
Is any other DTC displayed?
Check DTC using “List of Diagnostic Trouble Code (DTC)”. List of Diagnostic Trouble Code (DTC)">
Finish the diagnosis.
 Dtc b1816 open in passenger s airbag dual stage - 2nd step
AIRBAG SYSTEM (DIAGNOSTICS) > Diagnostic Chart with Trouble CodeDTC B1816 OPEN IN PASSENGER’S AIRBAG DUAL STAGE - 2ND STEPDiagnosis start condition:Ignition voltage is 10 V to 16 V.DTC detect ...
 Dtc b1818 short in passenger s airbag dual stage - 2nd step circuit (to +b)
AIRBAG SYSTEM (DIAGNOSTICS) > Diagnostic Chart with Trouble CodeDTC B1818 SHORT IN PASSENGER’S AIRBAG DUAL STAGE - 2ND STEP CIRCUIT (TO +B)Diagnosis start condition:Ignition voltage is 10 V t ...
Other materials:
Initialize
Items that have been set to your preference
can be initialized. To select an
initialization menu, operate the "
" or " "
switch as follows.
Preparation for initialization
1. Turn the ignition switch to the "ON"
position.
2. Push and hold the button to show
the selection screen.
3. ...
Removal
HVAC SYSTEM (HEATER, VENTILATOR AND A/C) > Air Vent GrilleREMOVAL1. CENTER GRILLE ASSEMBLYCAUTION:• Do not put your finger on the fin of the air vent grille. Doing so may damage the fin.• Always pull the center grille assembly toward you slowly. If attempting to remove by turning it u ...
Assembly
CONTROL SYSTEMS > Select LeverASSEMBLY1. Clean all the parts before assembly.2. Apply Multemp D or equivalent to the sliding portion of each part.3. Assemble in the reverse order of disassembly.NOTE:Insert the solenoid unit terminals to the harness connector.(A)Solenoid unit (color code: blue)(B) ...
