Subaru Crosstrek Service Manual: Removal
HVAC SYSTEM (HEATER, VENTILATOR AND A/C) > Air Vent Grille
REMOVAL
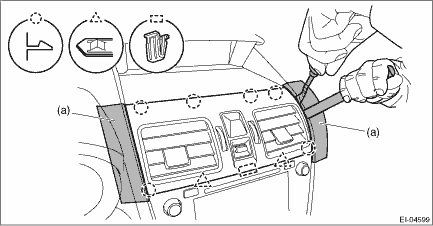
1. CENTER GRILLE ASSEMBLY
CAUTION:
• Do not put your finger on the fin of the air vent grille. Doing so may damage the fin.
• Always pull the center grille assembly toward you slowly. If attempting to remove by turning it upward, the claws and connectors may be damaged.
1. Disconnect the ground cable from battery. NOTE">
2. Remove the center grille assembly.
(1) Attach the protective tape (a) to the instrument panel assembly.
(2) Release the claw by using a clip remover wrapped with protective tape.
(3) Disconnect the connector and remove the center grille assembly.
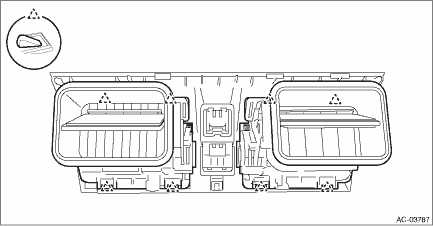
3. Release the claws, and then remove the grille assembly - CTR ventilation from the center grille assembly.
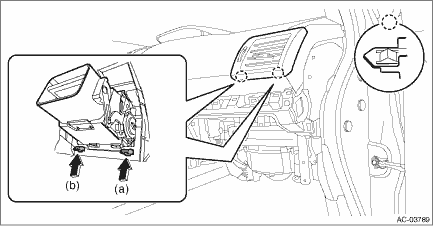
2. SIDE GRILLE ASSEMBLY
LH side
1. Disconnect the ground cable from battery. NOTE">
2. Remove the cover assembly - instrument panel LWR driver OUT. Instrument Panel Lower Cover > REMOVAL">
3. Remove the grille assembly - ventilation LH.
CAUTION:
• When using a flat tip screwdriver, apply protective tape or cloth and be careful not to cause damage.
• Do not pull the grille assembly - ventilation forcibly. Doing so may cause deformation or damage.
(1) Push the claw (a) on the outlet dial side upward from the back of the instrument panel assembly.
(2) While pushing, pull the grille assembly - ventilation toward you to release the claw.
(3) Release the other claw (b) in the same manner, then remove the grille assembly - ventilation LH.

RH side
1. Disconnect the ground cable from battery. NOTE">
2. Remove the pocket assembly and the back panel - pocket. Glove Box > REMOVAL">
3. Remove the grille assembly - ventilation RH.
CAUTION:
• When using a flat tip screwdriver, apply protective tape or cloth and be careful not to cause damage.
• Do not pull the grille assembly - ventilation forcibly. Doing so may cause deformation or damage.
(1) Push the claw (a) on the outlet dial side upward from the back of the instrument panel assembly.
(2) While pushing, pull the grille assembly - ventilation toward you to release the claw.
(3) Release the other claw (b) in the same manner, then remove the grille assembly - ventilation RH.
 Inspection
HVAC SYSTEM (HEATER, VENTILATOR AND A/C) > Air Vent GrilleINSPECTION1. Check that the direction and amount of air can be adjusted smoothly. Replace the grille assembly - ventilation if faulty.2. Ch ...
 Installation
HVAC SYSTEM (HEATER, VENTILATOR AND A/C) > Air Vent GrilleINSTALLATIONCAUTION:After installing the center grille assembly or grille assembly - ventilation, check that the air vent grille is inserte ...
Other materials:
Vehicle Dynamics Control operation indicator light
The indicator light flashes during activation
of the skid suppression function and
during activation of the traction control
function.
NOTE
The light may remain illuminated for
a short period of time after the engine
has been started, especially in cold
weather. This does not indicate ...
Inspection
MANUAL TRANSMISSION AND DIFFERENTIAL(5MT) > Main Shaft AssemblyINSPECTIONDisassembled parts should be washed with cleaning solvent first, then inspected carefully.1. BearingReplace the bearings in the following cases.• When the bearing balls, outer races and inner races are broken or rusty. ...
Inspection
LIGHTING SYSTEM > Rear Height SensorINSPECTION1. Connect three dry cell batteries (1.5 V) in series.NOTE:• Use new dry-cell batteries.• Using a circuit tester, check that the initial voltage of each dry-cell battery is 1.6 V or more. And also check that the voltage of three batteries ...
