Subaru Crosstrek Service Manual: Diagnostics with phenomenon Inspection
AUTO HEADLIGHT BEAM LEVELER SYSTEM (DIAGNOSTICS) > Diagnostics with Phenomenon
INSPECTION
1. BEAM LEVEL CONTROL DOES NOT FUNCTION
CAUTION:
• Before performing diagnosis, check the fuse in this circuit.
• Initialization is required after replacing the auto headlight beam leveler CM.
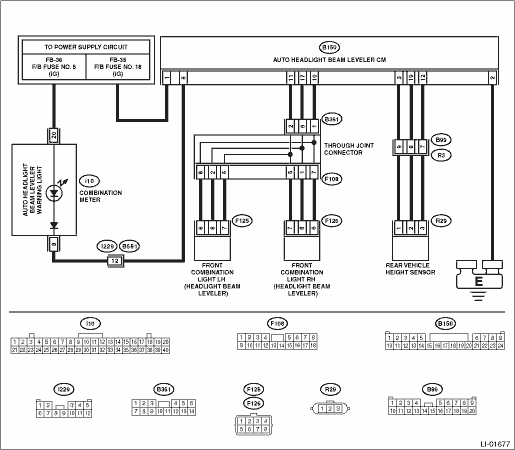
Wiring diagram:
Headlight beam leveler system Headlight Beam Leveler System > WIRING DIAGRAM">
| STEP | CHECK | YES | NO |
1.CHECK CURRENT DATA.
Display «Control module voltage» using Subaru Select Monitor. Read Current Data">
Does the current data indicate the standard value?
Diagnostics with Phenomenon > INSPECTION">Go to Step 3.
Diagnostics with Phenomenon > INSPECTION">Go to Step 2.
2.CHECK HARNESS BETWEEN POWER SUPPLY — AUTO HEADLIGHT BEAM LEVELER CM.
1) Disconnect the auto headlight beam leveler CM connector.
2) Turn the ignition switch to ON.
3) Measure the voltage between the auto headlight beam leveler CM connector and chassis ground.
Connector & terminal
(B150) No. 1 (+) — Chassis ground (−):
Is the voltage 8 — 16 V?
Replace the auto headlight beam leveler CM. Auto Headlight Beam Leveler Control Module">
Repair or replace the harness.
3.CHECK INDICATOR OUTPUT.
Turn the ignition switch to ON.
Does the warning indicator turn on for three seconds?
Diagnostics with Phenomenon > INSPECTION">Go to Step 5.
Diagnostics with Phenomenon > INSPECTION">Go to Step 4.
4.CHECK CURRENT DATA.
1) Display «Indicator Signal» using Subaru Select Monitor. Read Current Data">
2) Turn the ignition switch to ON.
Is it set as ON for 3 seconds?
Diagnostics with Phenomenon > INSPECTION">Go to Step 6.
Replace the auto headlight beam leveler CM. Auto Headlight Beam Leveler Control Module">
5.CHECK INDICATOR OUTPUT.
Leave the ignition switch to ON for 10 seconds.
Does the warning indicator light go off?
Diagnostics with Phenomenon > INSPECTION">Go to Step 9.
Diagnostics with Phenomenon > INSPECTION">Go to Step 13.
6.CHECK HARNESS BETWEEN BATTERY — INDICATOR BULB — AUTO HEADLIGHT BEAM LEVELER CM.
1) Disconnect the auto headlight beam leveler CM connector.
2) Turn the ignition switch to ON.
3) Measure the voltage between the auto headlight beam leveler CM (indicator bulb) connector and chassis ground.
Connector & terminal
(B150) No. 6 (+) — Chassis ground (−):
Is the voltage 12 V?
Replace the auto headlight beam leveler CM. Auto Headlight Beam Leveler Control Module">
Diagnostics with Phenomenon > INSPECTION">Go to Step 7.
7.CHECK INDICATOR BULB.
Perform system operation check mode on the combination meter. System Operation Check Mode">
Does the warning indicator illuminate?
Diagnostics with Phenomenon > INSPECTION">Go to Step 8.
Replace the meter case assembly. Combination Meter">
8.CHECK HARNESS BETWEEN AUTO HEADLIGHT BEAM LEVELER CM AND INDICATOR BULB (OPEN CIRCUIT).
1) Turn the ignition switch to OFF.
2) Measure the continuity between the auto headlight beam leveler CM and the combination meter.
Connector & terminal
(B150) No. 6 — (i10) No. 8:
Is there continuity?
Replace the auto headlight beam leveler CM. Auto Headlight Beam Leveler Control Module">
Repair the open circuit and poor contact of the connector in the harness between the auto headlight beam leveler CM and indicator.
9.CHECK HEADLIGHT ASSEMBLY (ACTUATOR) DRIVE.
1) Connect the auto headlight beam leveler CM connector.
2) Turn the ignition switch to ON, and within 10 seconds, repeat the OFF > Low beam of headlight switch 5 times.
3) Check that the headlight beam drops once, then returns to normal.
4) Then, after waiting for 30 seconds or more with the ignition ON, turn the ignition switch to OFF.
Does the headlight beam drop down once, and then return?
Replace the auto headlight beam leveler CM. Auto Headlight Beam Leveler Control Module">
Diagnostics with Phenomenon > INSPECTION">Go to Step 10.
10.CHECK HEADLIGHT ASSEMBLY (ACTUATOR) OUTPUT.
1) Display «Actuator Signal» using Subaru Select Monitor. Read Current Data">
2) Turn the ignition switch to ON, and within 10 seconds, repeat the OFF > Low beam of headlight switch 5 times.
3) Check that the headlight beam drops once, then returns to normal.
4) Then, after waiting for 30 seconds or more with the ignition ON, turn the ignition switch to OFF.
Does the current data indicate the standard value? (Does the value change at 10 — 90%?)
Diagnostics with Phenomenon > INSPECTION">Go to Step 11.
Replace the auto headlight beam leveler CM. Auto Headlight Beam Leveler Control Module">
11.CHECK OUTPUT VOLTAGE BETWEEN HEADLIGHT ASSEMBLY (ACTUATOR).
1) Disconnect the auto headlight beam leveler CM connector.
2) Turn the ignition switch to ON.
3) Measure the voltage between the auto headlight beam leveler CM connector and chassis ground.
Connector & terminal
(B150) No. 10 (+) — Chassis ground (−):
Is the voltage 12 V?
Replace the headlight assembly. Headlight Assembly">
Diagnostics with Phenomenon > INSPECTION">Go to Step 12.
12.CHECK HARNESS BETWEEN AUTO HEADLIGHT BEAM LEVELER CM AND HEADLIGHT ASSEMBLY (ACTUATOR) (OPEN CIRCUIT).
1) Disconnect the connector of headlight assembly.
2) Measure the continuity between the auto headlight beam leveler CM connector and headlight assembly (actuator) connector.
Connector & terminal
• Headlight beam leveler RH
(B150) No. 10 — (F126) No. 6:
(B150) No. 17 — (F126) No. 8:
(B150) No. 11 — (F126) No. 7:
• Headlight beam leveler LH
(B150) No. 10 — (F125) No. 6:
(B150) No. 17 — (F125) No. 8:
(B150) No. 11 — (F125) No. 7:
Is there continuity?
Replace the auto headlight beam leveler CM. Auto Headlight Beam Leveler Control Module">
Repair the open circuit or poor contact of the connector in the harness between headlight assembly and auto headlight beam leveler CM.
13.CHECK DTC.
Display DTC using the Subaru Select Monitor. Read Diagnostic Trouble Code (DTC)">
Is DTC displayed?
Perform the diagnosis according to DTC. List of Diagnostic Trouble Code (DTC) > LIST">
Replace the auto headlight beam leveler CM. Auto Headlight Beam Leveler Control Module">
 Clear memory mode Operation
AUTO HEADLIGHT BEAM LEVELER SYSTEM (DIAGNOSTICS) > Clear Memory ModeOPERATION1. On «Start» display, select «Diagnosis».2. On «Vehicle selection» display, input the target vehicle information ...
 Electrical component location Location
AUTO HEADLIGHT BEAM LEVELER SYSTEM (DIAGNOSTICS) > Electrical Component LocationLOCATION(1)Headlight ASSY– Headlight beam leveler actuator(4)Headlight relay (Hi)(7)Combination meter(2)Rear vehic ...
Other materials:
Dtc p0010 "a" camshaft position actuator control circuit/open bank 1
ENGINE (DIAGNOSTICS)(H4DO) > Diagnostic Procedure with Diagnostic Trouble Code (DTC)DTC P0010 "A" CAMSHAFT POSITION ACTUATOR CONTROL CIRCUIT/OPEN BANK 1DTC detecting condition:Immediately at fault recognitionTrouble symptom:Improper idlingCAUTION:After servicing or replacing faulty part ...
Dtc c1721 yaw rate sensor
VEHICLE DYNAMICS CONTROL (VDC) (DIAGNOSTICS) > Diagnostic Procedure with Diagnostic Trouble Code (DTC)DTC C1721 YAW RATE SENSORDTC DETECTING CONDITION:Defective yaw rate & G sensorTROUBLE SYMPTOM:• ABS does not operate.• VDC does not operate.• Hill start assist does not oper ...
Rocking the vehicle
If you must rock the vehicle to free it from
snow, sand, or mud, depress the accelerator
pedal slightly and move the shift
lever/select lever back and forth between
"1"/"D" and "R" repeatedly. Do not race the engine. For the best possible
traction,
avoid spinning the wheels when trying to
fr ...
