Subaru Crosstrek Service Manual: Component
LUBRICATION(H4DO) > General Description
COMPONENT
1. OIL PAN AND STRAINER
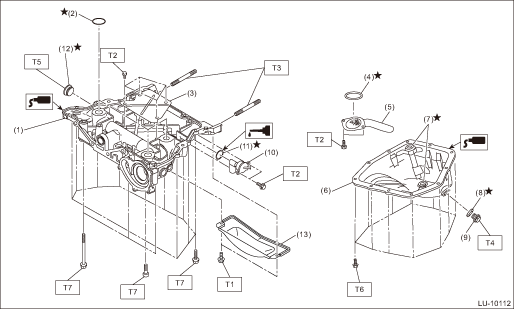
(1) | Oil pan upper | (8) | Drain plug gasket | Tightening torque: N·m (kgf-m, ft-lb) | |
(2) | O-ring | (9) | Drain plug | T1: | 5 (0.5, 3.7) |
(3) | Baffle plate | (10) | Oil level switch | T2: | 6.4 (0.7, 4.7) |
(4) | O-ring | (11) | O-ring | T3: | 10 (1.0, 7.4) |
(5) | Oil strainer | (12) | Plug | T4: | 41.7 (4.3, 30.8) |
(6) | Oil pan | (13) | Clutch housing cover (MT model) | T5: | 90 (9.2, 66.4) |
(7) | Oil pan seal ring | T6: | Oil Pan > INSTALLATION"> | ||
T7: | Oil Pan > INSTALLATION"> | ||||

2. OIL FILTER AND OIL LEVEL GAUGE
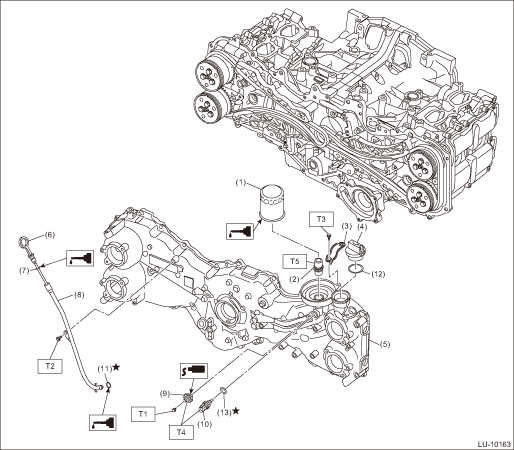
(1) | Oil filter | (8) | Oil level gauge guide | Tightening torque: N·m (kgf-m, ft-lb) | |
(2) | Oil pump union | (9) | Oil pressure switch | T1: | 1.5 (0.2, 1.1) |
(3) | Generator cord stay | (10) | Engine oil temperature sensor | T2: | 6.4 (0.7, 4.7) |
(4) | Oil filler cap | (11) | O-ring | T3: | 8 (0.8, 5.9) |
(5) | Chain cover | (12) | Gasket | T4: | 18 (1.8, 13.3) |
(6) | Oil level gauge | (13) | Gasket | T5: | 45 (4.6, 33.2) |
(7) | O-ring | ||||
 Specification
LUBRICATION(H4DO) > General DescriptionSPECIFICATIONLubrication methodForced lubricationOil pumpPump typeTrochoid typeNumber of teethInner rotor11Outer rotor12Outer rotor diameter ? Thicknessmm (in ...
 Preparation tool
LUBRICATION(H4DO) > General DescriptionPREPARATION TOOL1. SPECIAL TOOLILLUSTRATIONTOOL NUMBERDESCRIPTIONREMARKS18332AA000OIL FILTER WRENCHUsed for removing and installing oil filter (black). (Outer ...
Other materials:
Dtc b2817 brake lamp
EyeSight (DIAGNOSTICS) > Diagnostic Procedure with Diagnostic Trouble Code (DTC)DTC B2817 BRAKE LAMPDTC DETECTING CONDITION:• Defective brake light relay• Defective brake light switch• Defective VDCTROUBLE SYMPTOM:• All functions of EyeSight system do not operate.• E ...
Vehicle Dynamics Control warning
light
CAUTION
The Vehicle Dynamics Control system
provides its ABS control
through the electrical circuit of the
ABS. Accordingly, if the ABS is
inoperative, the Vehicle Dynamics
Control system becomes unable to
provide ABS control. As a result, the
Vehicle Dynamics Control system
also becomes ...
Removal
CONTINUOUSLY VARIABLE TRANSMISSION(TR580) > Transmission Control DeviceREMOVAL1. Remove the transmission assembly from the vehicle. Automatic Transmission Assembly > REMOVAL">2. Remove the inhibitor switch. Inhibitor Switch > REMOVAL">3. Remove the oil pan and oil strainer ...
