Subaru Crosstrek Service Manual: Clutch fluid air bleeding Procedure
CLUTCH SYSTEM > Clutch Fluid Air Bleeding
PROCEDURE
CAUTION:
Be careful not to spill the brake fluid. Brake fluid spilled on the vehicle body will harm the paint surface; wash it off with water and wipe clean quickly if spilled.
NOTE:
Bleed air from the oil line with help of a co-worker.
1. Remove the clip (A) from the air intake boot.
2. Loosen the clamp (B) connecting the air intake boot and air cleaner case (rear).
3. Loosen the clamp (C) which connects the air intake boot and throttle body.
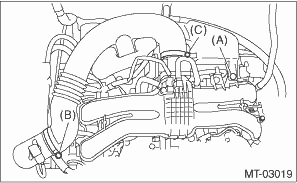
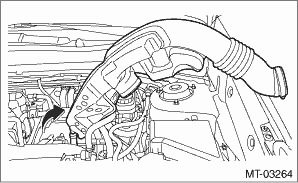
4. Remove the air intake boot from the throttle body, and move it to the left side wheel apron.
5. Fit one end of a vinyl tube into the air bleeder of the operating cylinder, and put the other end into a container.
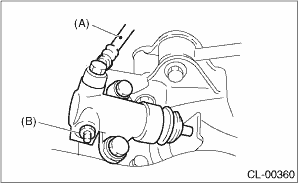
(A) | Clutch hose |
(B) | Air bleeder |
6. Slowly depress the clutch pedal and keep it depressed. Then open the air bleeder to discharge air together with the brake fluid.
Release the air bleeder for 1 or 2 seconds. Next, close the air bleeder, and slowly release the clutch pedal.
CAUTION:
Cover the air bleeder with cloth to prevent brake fluid from being splashed on surrounding parts when loosening the bleeder.
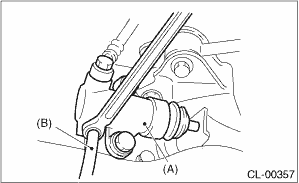
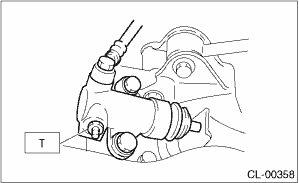
(A) | Operating cylinder |
(B) | Vinyl tube |
7. Repeat procedure 6), until there are no more air bubbles appearing from the air bleeder.
8. Tighten the air bleeder.
Tightening torque:
T: 7.8 N·m (0.8 kgf-m, 5.8 ft-lb)
9. After stepping on the clutch pedal, make sure that there are no leaks evident in the entire clutch system.
10. After bleeding the air from clutch system, ensure that the clutch operates properly.
11. Install the air intake boot. Air Intake Boot > INSTALLATION">
 Installation
CLUTCH SYSTEM > Release Bearing and LeverINSTALLATIONNOTE:Apply the specified grease to lubricate to the following points before installation.• Contact surface of lever and pivot• Conta ...
 General diagnostic table Inspection
CLUTCH SYSTEM > General Diagnostic TableINSPECTION1. CLUTCHSymptomsPossible causeCorrective action1. Clutch slippageIt is hard to perceive clutch slippage in the early stage, but pay attention to t ...
Other materials:
Removal
FUEL INJECTION (FUEL SYSTEMS)(H4DO) > Main RelayREMOVAL1. Disconnect the ground cable from battery.2. Remove the glove box. Glove Box > REMOVAL">3. Remove the main relay from relay block. ...
Removal
WIPER AND WASHER SYSTEMS > Wiper BladeREMOVAL1. FRONTWhile pushing the locking clip (A) up, pull out the blade assembly - windshield wiper in the direction of the arrow, and remove it from the arm assembly - windshield wiper.2. REARTurn the blade assembly - rear wiper in the direction of arrow (A ...
Removal
EXHAUST(H4DO) > Front Exhaust PipeREMOVALCAUTION:Vehicle components are extremely hot after driving. Be wary of receiving burns from heated parts.1. Disconnect the ground cable from battery. NOTE">2. Lift up the vehicle.3. Remove the under cover. Front Under Cover > REMOVAL"> ...
