Subaru Crosstrek Service Manual: Assembly
SEATS > Rear Seat
ASSEMBLY
CAUTION:
• Do not reuse hog rings.
• Secure the hog ring using hog ring pliers.
• Install the hog rings to the specified points securely and make sure that there is no wrinkle or twisting on the cover COMPL - rear backrest.
1. Assemble the cover COMPL - rear backrest and the cover - rear cushion in the same manner as for the front seat. Front Seat > ASSEMBLY">
2. Make sure that all hog rings (A) and wire clips (B) are attached securely.
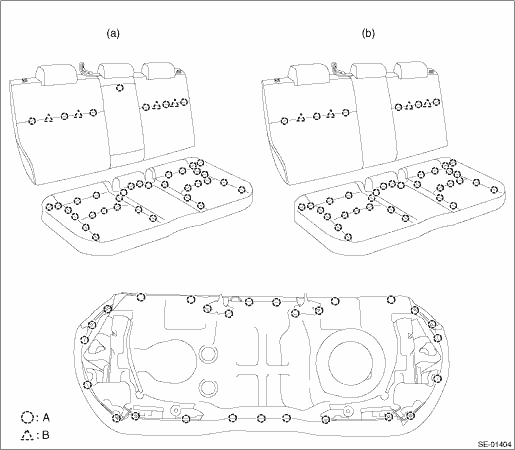
(a) | Model with armrest assembly - rear center | (b) | Model without armrest assembly - rear center |
3. Assemble each part in the reverse order of disassembly.
NOTE:
• Do not contaminate or damage the cover COMPL - rear backrest and the cover - rear cushion.
• While installing the hog rings, prevent the cover COMPL - rear backrest and the cover - rear cushion from getting wrinkled.
Tightening torque:
Refer to “COMPONENT” of “General Description”. General Description > COMPONENT">
4. Before installation, check the following items.
• No tear and fray on the cover COMPL - rear backrest and the cover - rear cushion.
• No fray or deformation on each wire cable.
5. Install each part in the reverse order of removal.
 Rear seat
...
 Removal
SEATS > Rear SeatREMOVALCAUTION:• Before handling the airbag system components, refer to “CAUTION” of “General Description” in “AIRBAG SYSTEM”. General De ...
Other materials:
Read cancel code Operation
CRUISE CONTROL SYSTEM (DIAGNOSTICS) > Read Cancel CodeOPERATION1. On «Start» display, select «Diagnosis».2. On «Vehicle selection» display, input the target vehicle information and select «Confirmed».3. On «Main Menu» display, select «Each System».4. On «Select System» display, sele ...
Inspection
SECURITY AND LOCKS > Keyless TransmitterINSPECTION1. KEYLESS TRANSMITTER BATTERY1. Check the keyless transmitter battery voltage.PREPARATION TOOL:Circuit testerNOTE:Complete the measurement within 5 seconds because the battery discharges during measurement.Battery terminalInspection ConditionsSta ...
Dtc u0423 invalid data received from instrument panel cluster control module
HVAC SYSTEM (AUTO A/C) (DIAGNOSTICS) > Diagnostic Procedure with Diagnostic Trouble Code (DTC)DTC U0423 INVALID DATA RECEIVED FROM INSTRUMENT PANEL CLUSTER CONTROL MODULEThis is detected when CAN data from meter is abnormal.NOTE:Perform the diagnosis for LAN system. Basic Diagnostic Procedure &g ...
