Subaru Crosstrek Service Manual: Assembly
REAR SUSPENSION > Rear Trailing Link
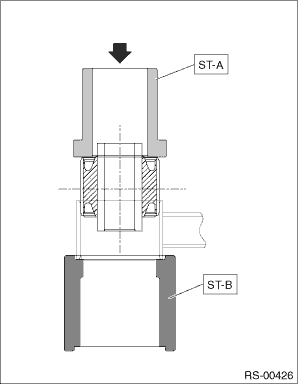
ASSEMBLY
1. BUSHING A - TRAILING LINK
1. Before assembly, inspect the following items and replace any faulty part with a new one.
• Perform visual check for damage or bend on the trailing link.
• Visually check the bushing for abnormal cracks, fatigue or damage.
2. Using the ST-A and ST-B, press-fit the bushing.
CAUTION:
Make sure to press the bushing straight in.
Preparation tool:
ST-A: INSTALLER (899874100)
ST-B: INSTALLER & REMOVER (BASE) (20099PA010)
2. BUSHING - TRAILING LINK
For the installation procedure of bushing - trailing link, refer to “Rear Axle” in the “DRIVE SHAFT SYSTEM” section. Rear Axle > DISASSEMBLY">

 Removal
REAR SUSPENSION > Rear Trailing LinkREMOVAL1. Lift up the vehicle, and then remove the rear wheels.2. Remove the bolts and nuts, and then remove the trailing link. ...
Other materials:
Removal
MECHANICAL(H4DO) > CamshaftREMOVAL1. CAMSHAFT RHThe camshaft RH and cam carrier are designed as removing as a unit. Refer to “Cam Carrier” for removal procedures of camshaft RH. Cam Carrier > REMOVAL"> Cam Carrier > DISASSEMBLY">2. CAMSHAFT LHThe camshaft LH an ...
Dtc c0045 incorrect vdc control module specifications
VEHICLE DYNAMICS CONTROL (VDC) (DIAGNOSTICS) > Diagnostic Procedure with Diagnostic Trouble Code (DTC)DTC C0045 INCORRECT VDC CONTROL MODULE SPECIFICATIONSDTC detecting condition:Different control module specificationTrouble symptom:• ABS does not operate.• VDC does not operate.• ...
Removal
INTAKE (INDUCTION)(H4DO) > Air Intake BootREMOVAL1. Remove the clip (A) from the air intake boot.2. Loosen the clamp (B) securing the air cleaner case (rear) to the air intake boot.3. Loosen the clamp (C) which secures the throttle body to the air intake boot.4. Disconnect the PCV hose and remove ...
