
Subaru Ascent 2018-2026 Owner's Manual: Air filtration system
The Subaru Ascent is equipped with an advanced air filtration system integrated into the climate control unit, designed to improve cabin air quality by capturing dust, pollen, and other airborne particles.
To maintain optimal performance of the Subaru Ascent air conditioning and ventilation system, it is important to replace the cabin air filter according to the schedule specified in the "Warranty and Maintenance Booklet". Following this schedule ensures that the filter continues to operate efficiently and maintains its dust-collecting capability.
When driving the Subaru Ascent in extremely dusty or polluted environments, the cabin air filter may require more frequent inspection or replacement. For best results, have the filter checked or replaced by an authorized SUBARU dealer, and always use a genuine SUBARU air filter kit to ensure compatibility and performance.
CAUTION
Even if the scheduled replacement interval has not yet been reached, contact your SUBARU dealer if you notice any of the following conditions in your Subaru Ascent:
- Reduced airflow from the ventilation outlets.
- Frequent fogging or misting of the windshield.
NOTE
A clogged or poorly maintained filter in the Subaru Ascent can negatively affect the efficiency of the air conditioning, heating, and defrosting systems.
Replacing the cabin air filter
1. Remove the glove box.
NOTE
Before removing the glove box in the Subaru Ascent, it is recommended to protect the surrounding trim, such as the center console, with masking tape to prevent scratches during the procedure.
- Open the glove box.
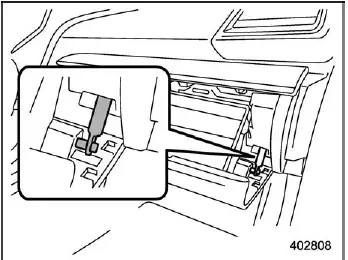
- Detach the damper shaft from the glove box.
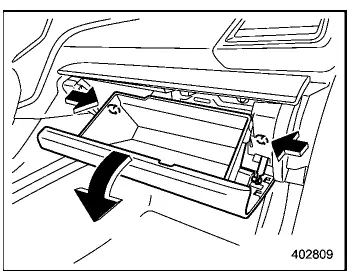
- Press inward on the stoppers located on both sides of the glove box, then lower it completely.
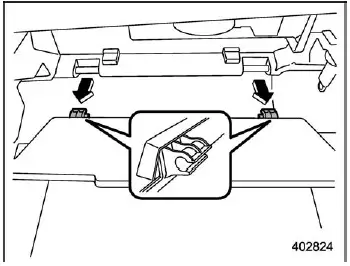
- Pull the glove box outward horizontally and carefully remove it from the
hinge.
Take care not to damage the hinge mechanism during removal.
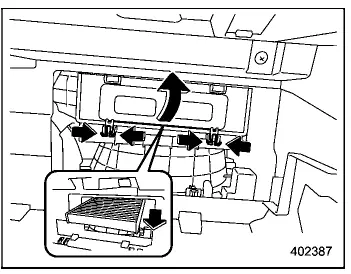
2. Remove the cabin air filter using the following method to prevent dust from falling into the housing.
- Press both tabs and remove the filter cover.
- Gently tilt the filter downward and slowly pull it out approximately 0.4 in (1 cm).
- Carefully remove the filter completely.
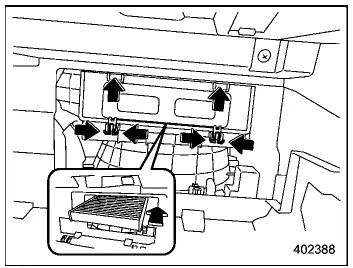
3. Install a new cabin air filter into the Subaru Ascent and securely reinstall the cover.
CAUTION
Ensure that the arrow printed on the filter is facing UP during installation to guarantee proper airflow direction.
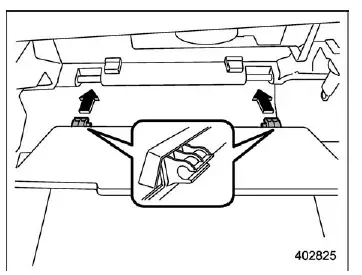
4. Reinstall the glove box and reconnect the damper shaft.
5. Close the glove box securely.
 Operating tips for heater and air conditioner
Cleaning ventilation grille
Front ventilation inlet grille
To maintain optimal performance of the Subaru Ascent climate system, always keep
the ventilation inlet grille free from snow, de ...
 Audio
Audio
Antenna
Printed antenna
CAUTION
Do not use sharp tools or abrasive cleaning agents on the inner surface of
the rear window in the Subaru Ascent, as this may damage the printed antenna.
The ...
Other materials:
Electrical component location Location
CONTINUOUSLY VARIABLE TRANSMISSION (DIAGNOSTICS) > Electrical Component LocationLOCATION1. CONTROL MODULE(1)Transmission control module (TCM)(3)AWD light(5)Body integrated unit(2)AT OIL TEMP light(4)Engine control module (ECM)(6)Data link connector2. SENSOR(1)Secondary speed sensor(3)Primary spee ...
Operation
AUTO HEADLIGHT BEAM LEVELER SYSTEM (DIAGNOSTICS) > Read Current DataOPERATION1. On «Start» display, select «Diagnosis».2. On «Vehicle selection» display, input the target vehicle information and select «Confirmed».3. On «Main Menu» display, select «Each System».4. On «Select System» ...
Installation
EXHAUST(H4DO) > Center Exhaust PipeINSTALLATION1. Install the center exhaust pipe upper cover to the center exhaust pipe.Tightening torque:13 N·m (1.3 kgf-m, 9.6 ft-lb)2. Temporarily tighten the nuts which secure the center exhaust pipe to the front exhaust pipe.NOTE:Use a new gasket.3. In ...
