Subaru Ascent 2018-2026 Owner's Manual: Air cleaner element
WARNING
Never operate the engine of your Subaru Ascent without the air cleaner element installed. This component not only filters incoming air but also acts as a safety barrier in case of engine backfire. Without it, flames could escape and cause serious burns or injury.
CAUTION
When replacing the air cleaner element in your Subaru Ascent, always use a genuine SUBARU part. Using non-original components may negatively affect engine performance and long-term durability.
The air cleaner element in your Subaru Ascent serves as a critical filtration barrier, preventing dust, dirt, and contaminants from entering the engine. If the element becomes damaged, perforated, or is removed, it can significantly accelerate engine wear and reduce overall engine lifespan.
Cleaning or washing the air cleaner element is not recommended. Replacement is the only effective way to maintain proper filtration and engine protection.
Replacing the air cleaner element
Replace the air cleaner element of your Subaru Ascent according to the intervals specified in the "Warranty and Maintenance Booklet". In environments with high dust levels or harsh driving conditions, more frequent replacement may be necessary to maintain optimal engine efficiency.
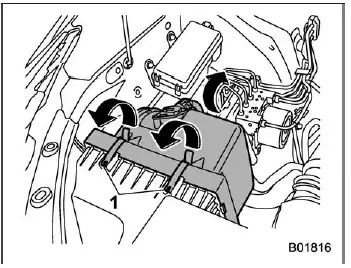
- Clips
1. Release the two retaining clips that secure the rear section of the air cleaner housing in your Subaru Ascent.
2. Open the air cleaner case and carefully lift the cover while pulling it rearward.
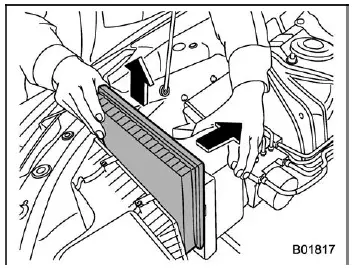
3. Remove the old air cleaner element from the housing.
4. Clean the inside of the air cleaner housing (both front and rear sections) using a damp cloth to remove any accumulated dust or debris. Then install a new air cleaner element.
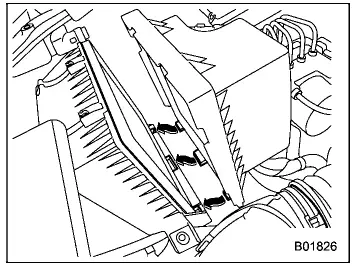
5. Reassemble the air cleaner housing by inserting the three projections on the rear section into the corresponding slots on the front section.
6. Secure the housing by following the removal steps in reverse order, ensuring all clips are properly fastened.
NOTE
When installing the new air cleaner element, ensure that the side marked "UPR" is facing upward to maintain correct airflow direction in your Subaru Ascent.
 Cooling system
Safety precautions
WARNING
Never attempt to remove the radiator cap on your Subaru Ascent while the engine
is still hot or running. The cooling system operates under pressure, and opening
the ca ...
 Spark plugs
Replacing spark plugs in your Subaru Ascent can be technically challenging due
to limited access and engine layout. For this reason, it is recommended to have
this service performed by a qualified ...
Other materials:
Dtc c1211 front right abs sensor circuit
VEHICLE DYNAMICS CONTROL (VDC) (DIAGNOSTICS) > Diagnostic Procedure with Diagnostic Trouble Code (DTC)DTC C1211 FRONT RIGHT ABS SENSOR CIRCUITNOTE:For the diagnostic procedure, refer to “DTC C1241 REAR LEFT ABS SENSOR CIRCUIT”. Diagnostic Procedure with Diagnostic Trouble Code (DTC) ...
Dtc b1761 occupant detection sensor mat liquid coating
AIRBAG SYSTEM (DIAGNOSTICS) > Diagnostic Chart with Trouble CodeDTC B1761 OCCUPANT DETECTION SENSOR MAT LIQUID COATINGNOTE:Refer to “Occupant Detection System” for details on DTC B1761. Diagnostic Procedure with Diagnostic Trouble Code (DTC) > DTC B1761 OCCUPANT DETECTION SENSOR M ...
Talking on the phone
The call screen opens when you perform
the following operations.
When you accept a call on the incoming
call screen (by selecting the
key),
the call screen opens.
When you are on the outgoing call
screen, the screen changes to the call
screen when the other party answers the ...
