Subaru Crosstrek Service Manual: Adjustment
WIPER AND WASHER SYSTEMS > Front Washer Nozzle and Hose
ADJUSTMENT
1. NOZZLE - WINDSHIELD WASHER
1. Turn the wiper switch to OFF position.
2. While the vehicle is at a standstill, insert a precision screwdriver (A) or equivalent wrapped with protective tape into the clearance on the upper/lower side or the right/left side of the nozzle - windshield washer to perform necessary adjustment.
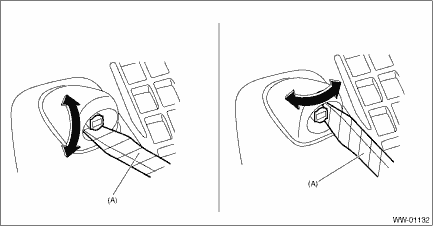
CAUTION:
• The nozzle - windshield washer is made of resin. If precision screwdriver (A) or equivalent is inserted into discharge port for adjustment, the discharge port can be deformed, and washer fluid cannot be sprayed.
• Do not rotate the discharge port of the nozzle - windshield washer, otherwise it may be damaged.
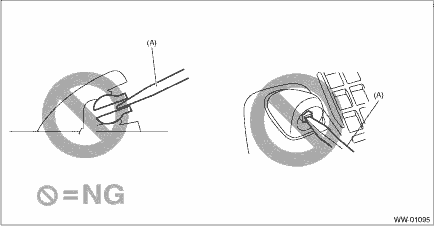
3. Adjust the washer injection position as shown in the figure.
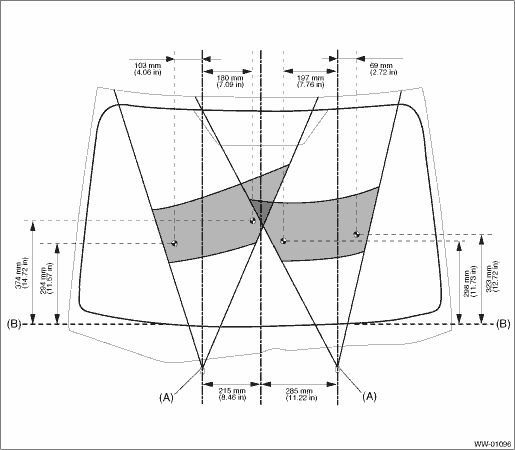
(A) | Nozzle - windshield washer | (B) | Ceramic line |
2. NOZZLE - WIPER ARM WASHER (MODEL WITH EyeSight)
CAUTION:
Check and adjust the spray position of the nozzle - wiper arm at the position where the wiper arm stops.
1. Turn the wiper switch to OFF position.
2. While the vehicle is stopped, check that the washer spray position is as shown in the figure.
3. After inspection, if the spray position is really out of the specified range, replace with a new arm assembly - windshield wiper assistor.
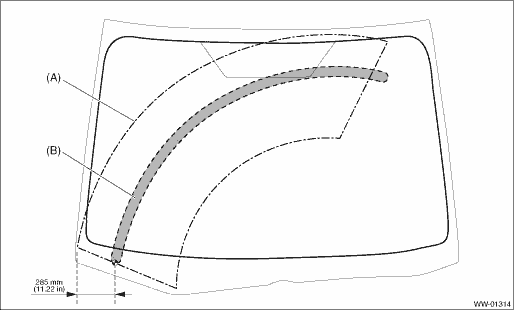
(A) | Wiping area of arm ASSY - windshield wiper assistor | (B) | Spray area |

 Removal
WIPER AND WASHER SYSTEMS > Front Washer Nozzle and HoseREMOVAL1. NOZZLE - WINDSHIELD WASHER & HOSE1. Remove the arm assembly - windshield wiper. Front Wiper Arm > REMOVAL">2. Remove ...
Other materials:
Installation
FUEL INJECTION (FUEL SYSTEMS)(H4DO) > Fuel FilterINSTALLATION1. Install O-ring (A), O-ring (B), and backup ring (C) to the pressure regulator.NOTE:• Use new O-rings.• Apply gasoline to the O-ring and backup ring.2. Install the pressure regulator to the fuel filter assembly.3. Install ...
Assembly
EMISSION CONTROL (AUX. EMISSION CONTROL DEVICES)(H4DO) > Leak Check Valve AssemblyASSEMBLY1. Install the bracket to the leak check valve assembly.Tightening torque:18 N·m (1.8 kgf-m, 13.3 ft-lb)2. Install the drain tube to the leak check valve assembly.CAUTION:• Check that there is n ...
Basic diagnostic procedure Procedure
AUTO HEADLIGHT BEAM LEVELER SYSTEM (DIAGNOSTICS) > Basic Diagnostic ProcedurePROCEDURESTEPCHECKYESNO1.PERFORM CUSTOMER INTERVIEW.Using the Check List for Interview, ask the customer the condition of how the trouble occurred. Check List for Interview > CHECK">Did you interview the cust ...
