Subaru Ascent 2018-2026 Owner's Manual: Wear indicators

- New tread
- Worn tread
- Tread wear indicator
Each tire installed on your Subaru Ascent is equipped with built-in tread wear indicators. These indicators become visible once the tread depth has worn down to approximately 0.063 in (1.6 mm). When this happens, the indicator appears as a continuous band across the tread surface.
At this stage, the tire has reached its service limit and must be replaced immediately to maintain safe driving conditions and proper traction.
WARNING
When the tread wear indicator on your Subaru Ascent tires becomes visible, the tire is no longer safe for use. Driving at higher speeds, especially in wet conditions, significantly increases the risk of hydroplaning.
Loss of traction may lead to reduced vehicle control and could result in a serious accident.
NOTE
For maximum safety, regularly inspect the tire tread on your Subaru Ascent and replace tires before the wear indicators become visible.
Rotational direction of tires
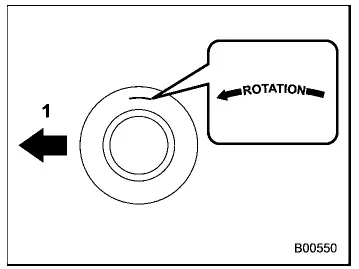
Example of rotational direction marked on the sidewall
- Front
Some tires used on your Subaru Ascent are designed with a specific rotational direction. In such cases, always follow the directional arrow marked on the tire sidewall.
When installing these tires, ensure that the arrow points in the forward direction of vehicle travel to maintain optimal grip, water dispersion, and handling performance.
Tire rotation
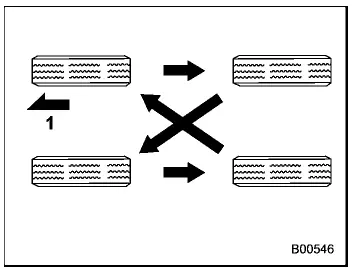
Vehicles equipped with 4 non-unidirectional tires
- Front
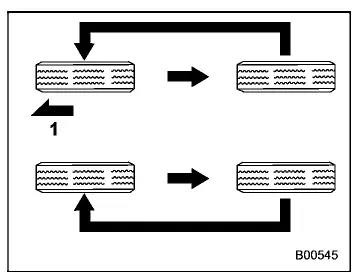
Vehicles equipped with unidirectional tires
- Front
Tire wear patterns vary depending on position, driving habits, and road conditions. To promote even wear and extend tire life on your Subaru Ascent, rotate the tires according to the patterns shown in the illustrations and follow the recommended schedule in the "Warranty and Maintenance Booklet".
If any tire shows signs of damage or uneven wear, replace it during rotation to maintain balanced performance.
After completing tire rotation on your Subaru Ascent, always adjust tire pressures to the recommended values and ensure that all wheel nuts are properly tightened.
After driving approximately 600 miles (1,000 km), recheck the wheel nut torque and retighten any that may have loosened.
 Tire inspection
Perform a visual inspection of the tires on your Subaru Ascent on a daily basis
to ensure they are free from serious damage, embedded nails, stones, or other foreign
objects. At the same time, car ...
 Tire replacement
The tires and wheels of your Subaru Ascent are carefully selected to match the
vehicle’s design characteristics, ensuring optimal handling, comfort, and durability.
Replacing them with incorrect ...
Other materials:
Steering warning light does not come on
POWER ASSISTED SYSTEM (POWER STEERING) (DIAGNOSTICS) > STEERING Warning LightSTEERING WARNING LIGHT DOES NOT COME ON1. POWER STEERING ASSIST ENABLEDDetecting condition:• Defective combination meter• Defective harnessTrouble symptom:When the ignition switch is turned to ON (engine OFF) ...
Removal
LIGHTING SYSTEM > Hazard SwitchREMOVAL1. Disconnect the ground cable from battery. NOTE">2. Remove the center grille assembly. Air Vent Grille > REMOVAL">3. Release the claws, and remove the switch - hazard from the center grille assembly. ...
Assembly
COOLING(H4DO) > Radiator Main Fan and Fan MotorASSEMBLYAssemble in the reverse order of disassembly.Tightening torque:4.41 N·m (0.45 kgf-m, 3.25 ft-lb)Tightening torque:3.4 N·m (0.3 kgf-m, 2.5 ft-lb) ...
