Subaru Crosstrek Service Manual: Replacement
CONTINUOUSLY VARIABLE TRANSMISSION(TR580) > Differential Side Retainer Oil Seal
REPLACEMENT
CAUTION:
• Immediately after the vehicle has been running or after idling for a long time, the differential gear oil will be hot. Be careful not to burn yourself.
• Be careful not to spill the differential gear oil on exhaust pipe to prevent it from emitting smoke or fire. If differential gear oil is spilled on the exhaust pipe, wipe it off completely.
1. Remove the front tires. Tire and Wheel > REMOVAL">
2. Remove the center exhaust pipe. Center Exhaust Pipe > REMOVAL">
3. Remove the differential gear oil drain plug using TORX® bit T70, and then drain differential gear oil.
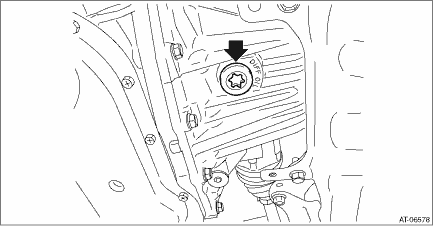
4. Tighten the differential gear oil drain plug.
NOTE:
Use a new gasket.
Tightening torque:
70 N·m (7.1 kgf-m, 51.6 ft-lb)
5. Remove the jack-up plate.
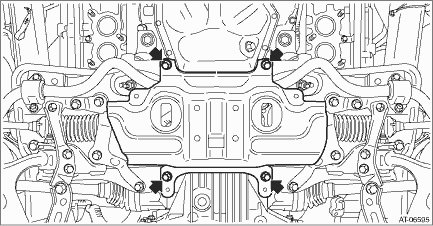
6. Remove the stabilizer bracket.
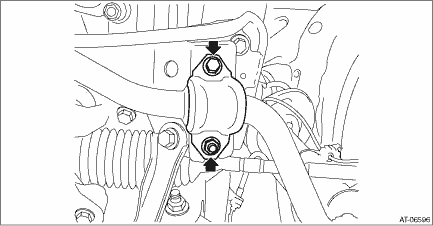
7. Remove the bolts which secure to the front housing, and separate the front arm and housing.
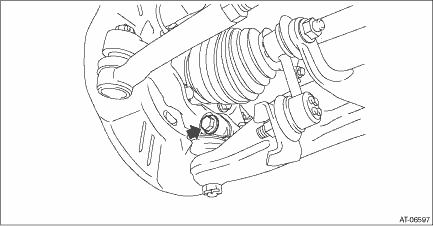
8. Using a crowbar, etc., pull out until the front drive shaft transmission side joint slides move smoothly.
NOTE:
Place cloth between the crowbar and the transmission in order to avoid damaging the transmission side retainer.
9. Hold the transmission side joint of the front drive shaft by hand and extract the housing from the transmission while pressing the housing outward, so as not to stretch the boot.
NOTE:
• Before pulling the RH front drive shaft from transmission, turn the steering wheel to the right hand at full lock.
• Before pulling the LH front drive shaft from transmission, turn the steering wheel to the left hand at full lock.
10. Remove the differential side retainer oil seal using driver wrapped with vinyl tape etc.
11. Using the ST, install the differential side retainer oil seal by lightly tapping with a hammer.
NOTE:
• Apply differential gear oil to the lip surface, so that the oil seal lip is not deformed.
• Apply differential gear oil to the press-fitting surface of oil seal and the differential side retainer.
• Oil seal has an identification mark (R, L). When installing oil seals, do not confuse the left and right.
| ST 18675AA000 | DIFFERENTIAL SIDE OIL SEAL INSTALLER |
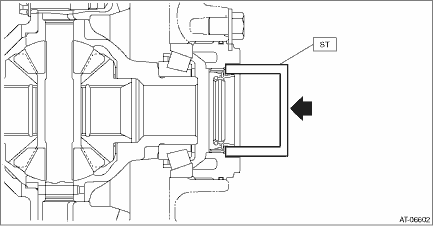
12. Set the ST to side retainer.
| ST 28399SA010 | OIL SEAL PROTECTOR |
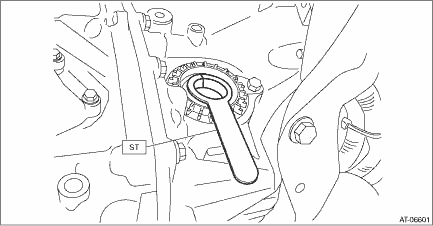
13. Replace the circlip of the drive shaft with a new part.
14. Insert the front drive shaft spline section into transmission and remove the ST (DIFFERENTIAL SIDE OIL SEAL INSTALLER).
NOTE:
• Before inserting the RH front drive shaft into transmission, turn the steering wheel to the right hand at full lock.
• Before inserting the LH front drive shaft into transmission, turn the steering wheel to the left hand at full lock.
15. Insert the drive shaft into the transmission securely by pressing the housing from outside of the vehicle.
16. Insert the ball joint into housing and secure with bolt.
Tightening torque:
50 N·m (5.1 kgf-m, 36.9 ft-lb)
CAUTION:
• Do not apply grease to the tapered portion of ball stud.
• Before tightening, make sure the lower side of housing and stepped section of ball joint are in contact.

17. Install the stabilizer bracket.
Tightening torque:
25 N·m (2.5 kgf-m, 18.4 ft-lb)

18. Install the jack-up plate.
Tightening torque:
60 N·m (6.1 kgf-m, 44.3 ft-lb)

19. Install the center exhaust pipe. Center Exhaust Pipe > INSTALLATION">
20. Fill differential gear oil. Differential Gear Oil">
21. Adjust the differential gear oil level, and check for leakage. Differential Gear Oil > ADJUSTMENT">
22. Install the front tires. Tire and Wheel > INSTALLATION">
 Inspection
CONTINUOUSLY VARIABLE TRANSMISSION(TR580) > Differential Side Retainer Oil SealINSPECTIONCheck for leakage of gear oil from differential side retainer oil seal part. If there is an oil leak, inspec ...
Other materials:
Removal
CONTINUOUSLY VARIABLE TRANSMISSION(TR580) > Oil PumpREMOVAL1. Remove the transmission assembly from the vehicle. Automatic Transmission Assembly > REMOVAL">2. Remove the torque converter assembly. Torque Converter Assembly > REMOVAL">3. Remove the oil pump chain cover. Oi ...
Wiring diagram
SECURITY AND LOCKS > Door Lock Control SystemWIRING DIAGRAMFor wiring diagrams related to the door lock control system, refer to the following items.• Keyless entry system: Keyless Entry System > WIRING DIAGRAM">• Keyless access system: Keyless Access System > WIRING D ...
Disassembly
MANUAL TRANSMISSION AND DIFFERENTIAL(5MT) > Main Shaft AssemblyDISASSEMBLY1. Put vinyl tape around main shaft spline to protect the oil seal from damage. Then pull out the oil seal and needle bearing by hand.2. Remove the lock nut and lock washer.NOTE:Flatten the lock nut tab before removing the ...

