Subaru Crosstrek Service Manual: Removal
POWER ASSISTED SYSTEM (POWER STEERING) > Universal Joint
REMOVAL
1. Adjust the tilt position of the column assembly - steering to the lowest position and lock the tilt lever.
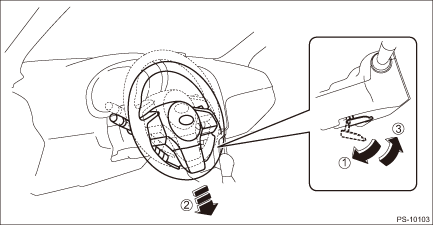
2. Remove the universal joint assembly - steering.
(1) Place alignment marks on the universal joint assembly - steering.
NOTE:
Place alignment marks on the following positions.
• Between the column assembly - steering and the universal joint assembly - steering
• Between the steering gearbox assembly and the universal joint assembly - steering
(2) Remove the bolt, and remove the universal joint assembly - steering.

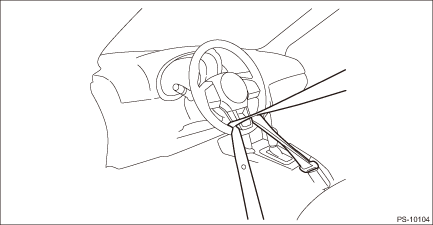
3. Prevent the steering wheel from turning using the seat belt.
 Inspection
POWER ASSISTED SYSTEM (POWER STEERING) > Universal JointINSPECTIONCheck for wear, damage or any other faults.1. Check the universal joint assembly - steering for excessive looseness.Service limit:P ...
 Installation
POWER ASSISTED SYSTEM (POWER STEERING) > Universal JointINSTALLATION1. Before installation, check the universal joint assembly - steering. Universal Joint > INSPECTION">2. Adjust the ti ...
Other materials:
Inspection
MANUAL TRANSMISSION AND DIFFERENTIAL(5MT) > Transfer Drive GearINSPECTION1. Ball bearingReplace the bearings in the following cases.• In case of broken or rusty bearings• In case of worn or damaged bearings• When the bearings fail to turn smoothly or emit noise in rotation after ...
15
CRUISE CONTROL SYSTEM (DIAGNOSTICS) > Diagnostic Procedure with Cancel Code15Detected when CANCEL switch is pressed or malfunction related to CRUISE switch occurs.TROUBLE SYMPTOM:• Cruise control cannot be set. (Cancelled immediately.)• Cruise control cannot be released.Refer to DTC 1 ...
Removal
HVAC SYSTEM (HEATER, VENTILATOR AND A/C) > Heater CoreREMOVALCAUTION:Before handling the airbag system components, refer to “CAUTION” of “General Description” in “AIRBAG SYSTEM”. General Description > CAUTION">1. Using the refrigerant recovery syste ...
