Subaru Crosstrek Service Manual: Removal
LUBRICATION(H4DO) > Oil Pan
REMOVAL
1. OIL PAN
1. Disconnect the ground cable from battery. NOTE">
2. Lift up the vehicle.
3. Remove the under cover. Front Under Cover > REMOVAL">
4. Drain the engine oil. Engine Oil > REPLACEMENT">
5. Remove the front exhaust pipe. Front Exhaust Pipe > REMOVAL">
6. Remove the bolts which secure oil pan to oil pan upper.
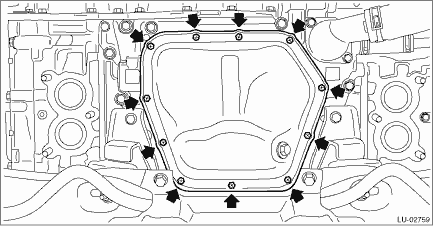
7. Insert an oil pan cutter blade into the gap between oil pan upper and oil pan, and remove the oil pan.
CAUTION:
Do not use a screwdriver or similar tool in place of oil pan cutter.
8. Remove the liquid gasket from the oil pan and the oil pan upper.
2. OIL PAN UPPER
1. Remove the engine from the vehicle. Engine Assembly > REMOVAL">
2. Remove the water pump. Water Pump > REMOVAL">
3. Remove the thermostat cover. Thermostat > REMOVAL">
4. Remove the water pipe assembly. Water Pipe Assembly > REMOVAL">
5. Remove the chain cover. Chain Cover > REMOVAL">
6. Remove the oil pan. Oil Pan > REMOVAL">
7. Remove the oil level switch. Oil Level Switch > REMOVAL">
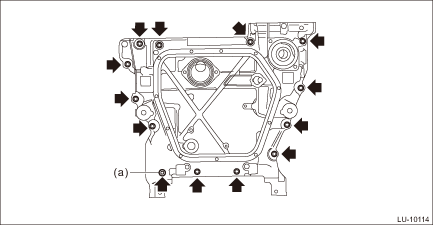
8. Remove the bolts which secure oil pan upper to cylinder block, and remove the oil pan upper.
NOTE:
Remove the bolt (a) shown in the figure using TORX® bit T45.
9. Remove the baffle plate from the oil pan upper.
10. Remove the oil strainer from the oil pan upper.
11. Remove stud bolts from the oil pan upper.
12. Remove the O-ring from the cylinder block.
13. Remove the clutch housing cover from the oil pan upper. (MT model)
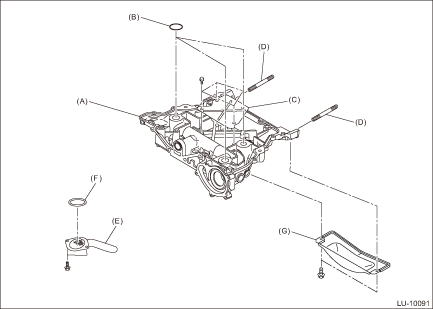
(A) | Oil pan upper | (B) | O-ring | (C) | Baffle plate |
(D) | Stud bolt | (E) | Oil strainer | (F) | O-ring |
(G) | Clutch housing cover (MT model) |
14. Remove the liquid gasket from oil pan upper and cylinder block.
 Inspection
LUBRICATION(H4DO) > Oil PanINSPECTIONCheck that the oil pan, oil pan upper, oil strainer and baffle plate do not have deformation, cracks or damage. ...
 Installation
LUBRICATION(H4DO) > Oil PanINSTALLATION1. OIL PAN1. Apply liquid gasket to the mating surface of the oil pan upper as shown in the figure, and install the oil pan.NOTE:• Before applying liqui ...
Other materials:
Dtc c0073 abnormal lateral g sensor output
VEHICLE DYNAMICS CONTROL (VDC) (DIAGNOSTICS) > Diagnostic Procedure with Diagnostic Trouble Code (DTC)DTC C0073 ABNORMAL LATERAL G SENSOR OUTPUTDTC detecting condition:Defective lateral G sensorTrouble symptom:• VDC does not operate.• EyeSight does not operate.STEPCHECKYESNO1.CHECK IN ...
Wiring diagram
LIGHTING SYSTEM > Interior Light SystemWIRING DIAGRAMRefer to “Interior Light System” in the wiring diagram.• Model without EyeSight: Interior Light System > WIRING DIAGRAM">• Model with EyeSight: Interior Light System > WIRING DIAGRAM"> ...
Engine
SPECIFICATIONS > CrosstrekENGINEModel2.0 L DOHC non-turboEngine typeHorizontally opposed, liquid cooled, 4-cylinder, 4-stroke gasoline engineValve arrangementDOHCBore ? strokemm (in)84.0 ? 90.0 (3.31 ? 3.54)Displacementcm3 (cu in)1,995 (121.7)Compression ratio10.5Ignition order1 — 3 — 2 — 4 ...
