Subaru Crosstrek Service Manual: Removal
EXTERIOR BODY PANELS > Rear Sealing Cover
REMOVAL
1. Disconnect the ground cable from battery. NOTE">
2. Remove the trim panel - rear door. Door Trim > REMOVAL">
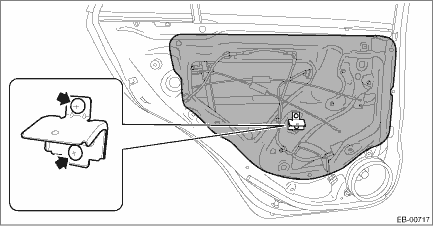
3. Remove the sealing cover - rear door.
CAUTION:
• Carefully remove the butyl tape. Excessive force will easily break the cover.
• If the sealing cover - rear door gets broken, replace it with a new part.
• Be careful not to allow the butyl tape to contact any trims and seats because the butyl tape, which has a strong adhesive force, is difficult to remove once it adhered.
(1) Remove the screw to remove the bracket - door trim rear.
(2) Carefully remove the butyl tape to remove the sealing cover - rear door.
 Inspection
EXTERIOR BODY PANELS > Rear Sealing CoverINSPECTIONIf the sealing cover - rear door is broken, replace it with a new part. ...
 Installation
EXTERIOR BODY PANELS > Rear Sealing CoverINSTALLATIONCAUTION:• If the sealing cover - rear door gets broken, replace it with a new part.• Apply a butyl tape evenly.• Attach the se ...
Other materials:
Inspection
LIGHTING SYSTEM > Day Time Running Light SystemINSPECTION1. DAYTIME RUNNING LIGHT SYSTEM CHECKSTEPCHECKYESNO1.CHECK FUSE.1) Turn the ignition switch to OFF.2) Check the headlight HI fuse.Is the fuse OK? Day Time Running Light System > INSPECTION">Go to Step 2.Replace the fuse.2.CHECK R ...
Engine oil setting
1. Perform the preparation steps according
to "Preparation for maintenance settings"
2. Operate the "
" or "
" switch to
select the "Engine Oil" item. Then push
the
button.
3. Select the setting location (month, day,
year or distance) by operating the "
" or ...
Removal
HVAC SYSTEM (HEATER, VENTILATOR AND A/C) > CondenserREMOVAL1. Using the refrigerant recovery system, discharge refrigerant. Refrigerant Recovery Procedure > PROCEDURE">2. Remove the air intake duct. Air Intake Duct > REMOVAL">3. Remove the clip, and remove the bracket - gr ...
