Subaru Crosstrek Service Manual: Removal
EMISSION CONTROL (AUX. EMISSION CONTROL DEVICES)(H4DO) > Canister
REMOVAL
1. Lift up the vehicle.
2. Remove the rear exhaust pipe. Rear Exhaust Pipe > REMOVAL">
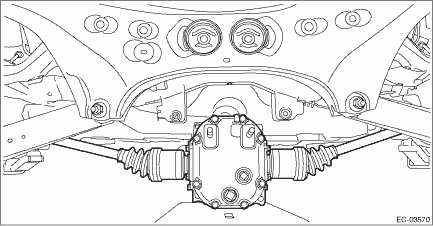
3. Remove the propeller shaft. Propeller Shaft > REMOVAL">
4. Support the rear differential with the transmission jack.
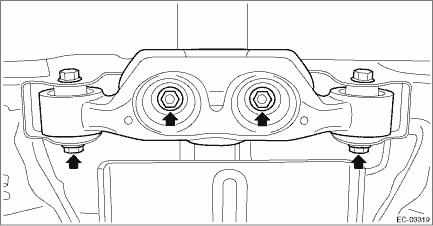
5. Remove the self-locking nuts which hold the rear differential to the rear sub frame assembly.
6. Remove the rear differential member from the rear sub frame assembly and the rear differential.
7. Lower the transmission jack gradually until the rear differential is at the position shown in the figure.
NOTE:
• When pulling out the stud bolt from the bushing portion of the rear sub frame assembly, adjust the angle and location of transmission jack and jack stand.
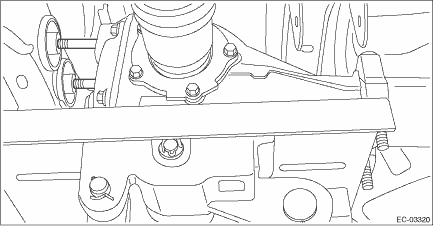
• Do not lower the rear differential excessively. Doing so may add extra load to the drive shaft or cause the falling-off of the drive shaft.
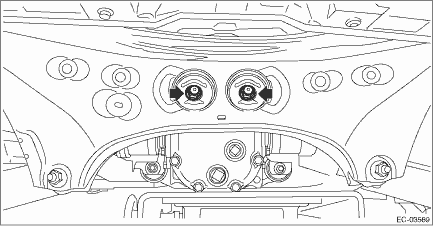
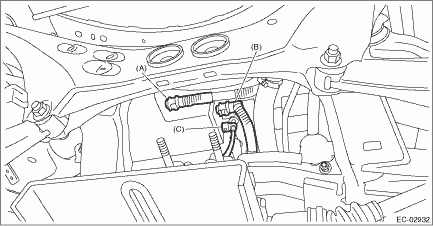
8. Disconnect the drain tube (A), vent tube (B) and purge tube (C) from the canister.
NOTE:
Disconnect the quick connector as shown in the figure.
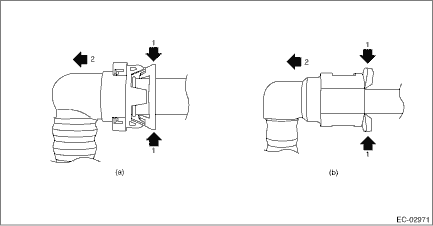
(a) | Drain tube and vent tube | (b) | Purge tube |
9. Remove the bolts and nuts securing the canister to the vehicle, and remove the canister.

 Inspection
EMISSION CONTROL (AUX. EMISSION CONTROL DEVICES)(H4DO) > CanisterINSPECTION1. Check that the canister has no deformation, cracks or other damages.2. Check that the tube has no cracks, damage or loo ...
 Installation
EMISSION CONTROL (AUX. EMISSION CONTROL DEVICES)(H4DO) > CanisterINSTALLATION1. Install the canister to the vehicle using bolts and nuts.Tightening torque:7.5 N·m (0.8 kgf-m, 5.5 ft-lb)2. In ...
Other materials:
Replacement
CONTINUOUSLY VARIABLE TRANSMISSION(TR580) > Differential Gear OilREPLACEMENTCAUTION:• Immediately after the vehicle has been running or after idling for a long time, the differential gear oil will be hot. Be careful not to burn yourself.• Be careful not to spill differential gear oil ...
Dtc p0451 evap system (cpc) pressure sensor/switch circuit range/performance
ENGINE (DIAGNOSTICS)(H4DO) > Diagnostic Procedure with Diagnostic Trouble Code (DTC)DTC P0451 EVAP SYSTEM (CPC) PRESSURE SENSOR/SWITCH CIRCUIT RANGE/PERFORMANCEDTC detecting condition:Detected when two consecutive driving cycles with fault occur.CAUTION:After servicing or replacing faulty parts, ...
Activation of malfunction indicator light
ENGINE (DIAGNOSTICS)(H4DO) > Malfunction Indicator LightACTIVATION OF MALFUNCTION INDICATOR LIGHT1. When the ignition switch is turned to ON (engine OFF), the malfunction indicator light (A) in the combination meter illuminates.NOTE:If the malfunction indicator light does not illuminate, perform ...
